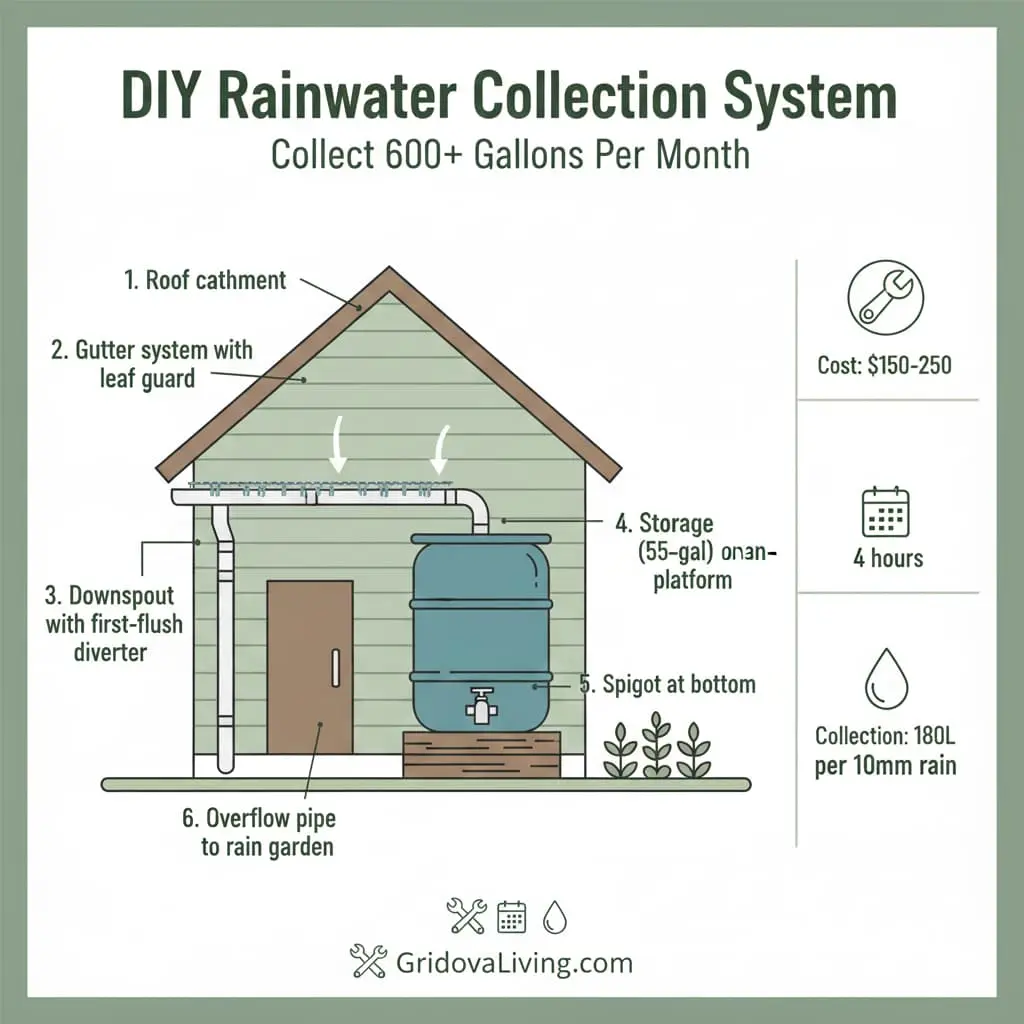
Quick answer: A basic rainwater collection system needs gutters, a storage tank (100-500L), mesh filter, and PVC connections. For a small cabin with 50m² roof, expect to collect 180L from just 10mm of rainfall. Total cost: $150-250 for DIY setup, installed in one afternoon. Use the calculator below to size your system based on roof area and local rainfall.
[Rainwater Collection Calculator – Interactive Tool]
Maximize Your Water Savings
You’re collecting rainwater outside. Now reduce indoor water usage by up to 60% with WaterSmart Box. Perfect complement to your off-grid setup.
💧
Why Collect Rainwater? The Off-Grid Water Solution
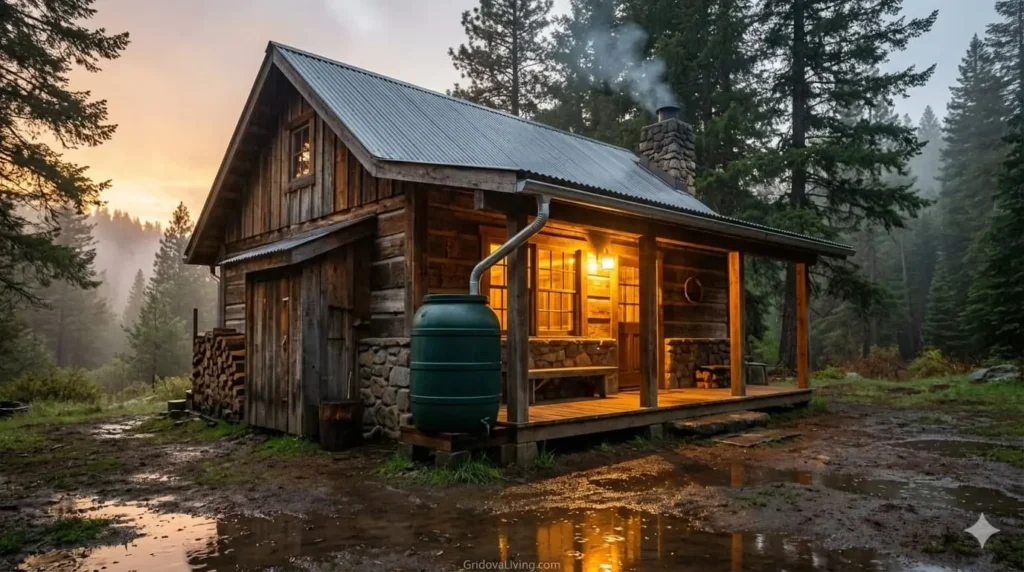
I installed my first rainwater system on a Montana cabin in 2019. That 200-liter barrel saved me from hauling water 12 miles every week during summer. Three years later, it’s still my primary water source for gardening, washing, and backup drinking water.
Rainwater collection isn’t just practical—it’s transformative for off-grid living:
- Reduces freshwater use by 40-60% for most households
- Free water source after initial $150-250 investment
- Emergency backup during utility failures or droughts
- Perfect for irrigation—plants prefer rainwater over chlorinated tap water
- Reduces runoff and erosion around your property
A 1,000 square foot roof can collect about 600 gallons (2,270 liters) from just one inch of rain. In areas with 30+ inches annual rainfall, that’s 18,000+ gallons per year—enough for a family’s non-drinking water needs.
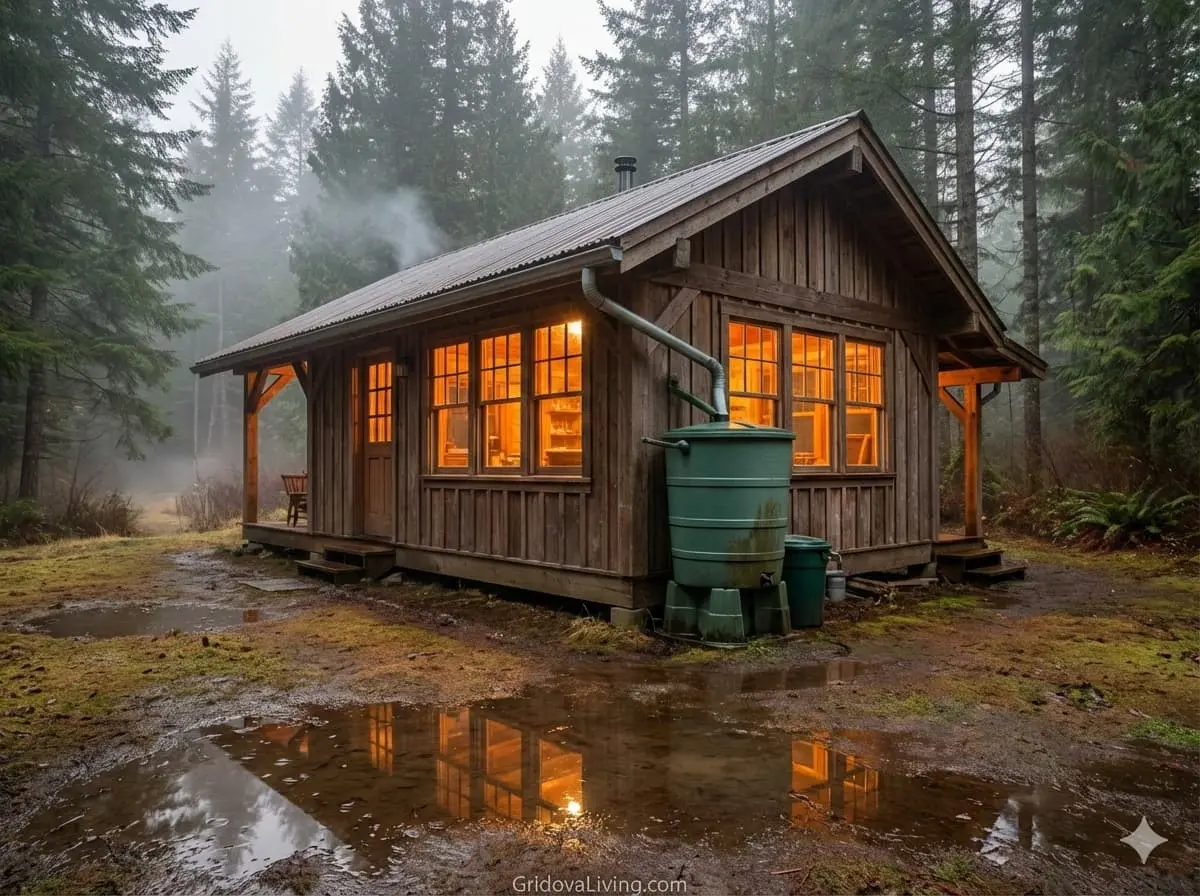
Off-grid cabin rainwater system – 400L capacity serves all non-drinking water needs
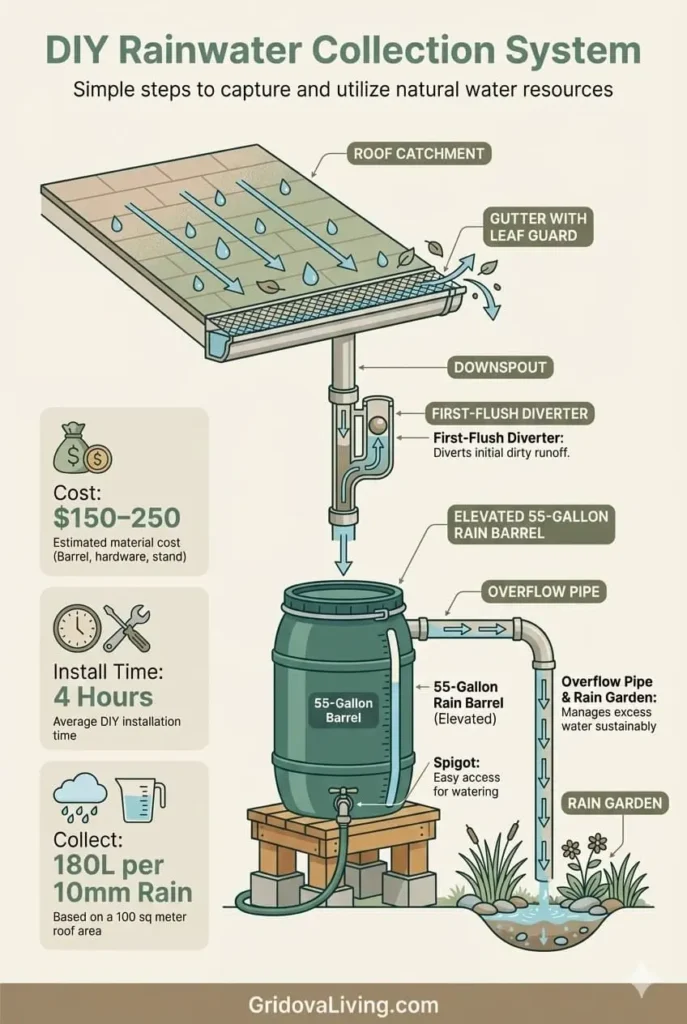
System Components: What You’ll Need
Every rainwater collection system has four essential parts. Here’s what I use and recommend:
1. Catchment Surface (Your Roof)
Metal roofing works best—it’s clean, doesn’t absorb water, and lasts 40+ years. Asphalt shingles work too but shed more debris. Avoid chemically treated wood shingles or old roofs with lead-based paint.
Roof area matters: Calculate collection potential with this formula: Roof area (sq ft) × rainfall (inches) × 0.623 = gallons collected. A 500 sq ft roof in 1 inch of rain yields 311 gallons.
2. Gutters and Downspouts
Standard 5-inch gutters handle most residential roofs. Use aluminum or vinyl—they don’t rust. Slope gutters 1/4 inch per 10 feet toward downspouts for proper drainage.
Critical detail: Install leaf guards or mesh screens. I learned this the hard way when debris clogged my system and caused gutter overflow during a heavy storm.
3. First-Flush Diverter (Optional but Recommended)
This device diverts the first 10-20 gallons of rainfall away from your tank. Why? The first rain washes accumulated dirt, bird droppings, and pollen off your roof. A first-flush diverter costs $30-60 but dramatically improves water quality.
DIY version: Use a vertical PVC pipe with a small drain hole at bottom and a ball that floats to seal the pipe once filled. The first dirty water fills this pipe instead of entering your tank.
4. Storage Tank
Food-grade plastic barrels (55-gallon/208L) work well for small systems and cost $40-80 each. For larger setups, consider:
- IBC totes (275 gallon/1040L): $80-120 used, $200-300 new
- Polyethylene tanks (500-1500 gallon): $300-800
- Concrete cisterns (1000+ gallon): $1000-3000, permanent installation
Elevation is key: Every foot of height adds 0.43 PSI water pressure. Place tanks on 18-24 inch platforms for adequate pressure at spigots.
Core components required for a basic DIY rainwater collection system
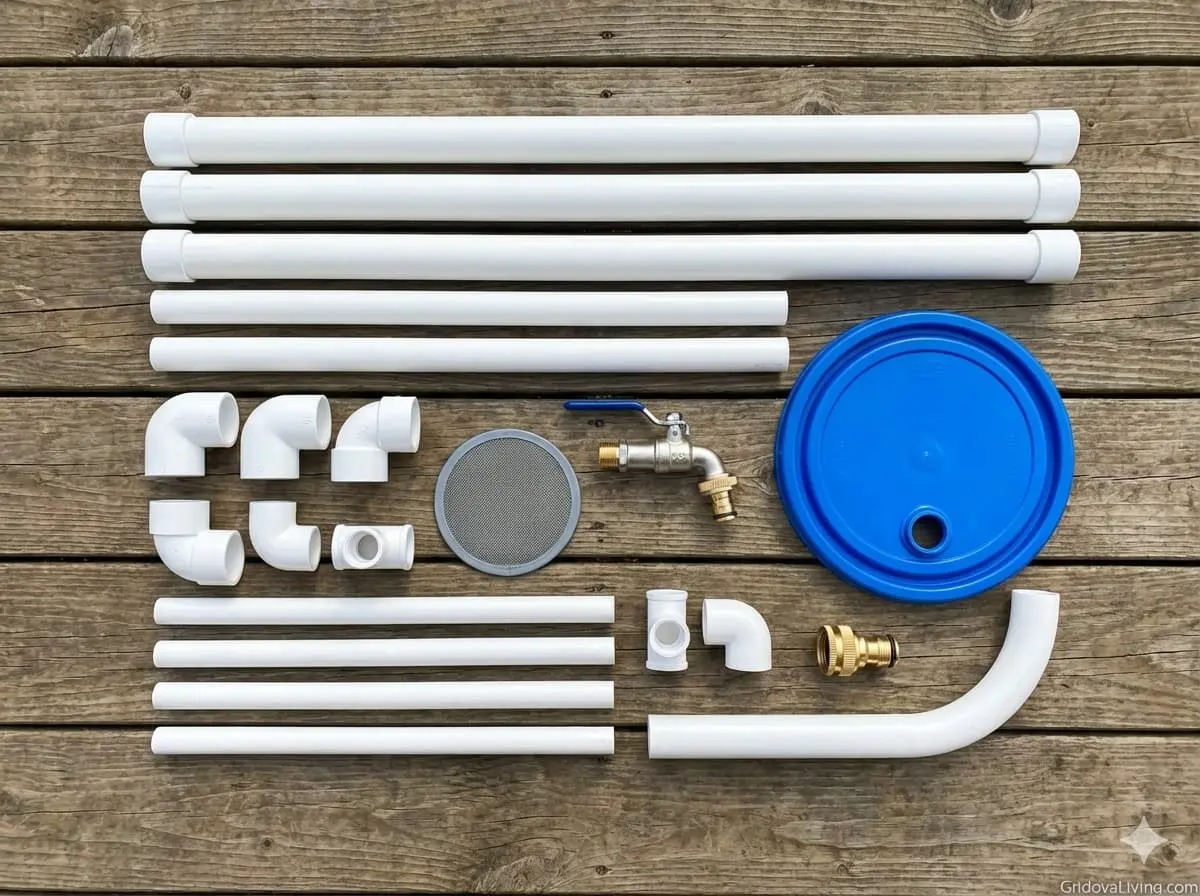
Complete Materials List and Cost Breakdown
Budget System ($150-200)
- One 55-gallon barrel: $60
- Downspout diverter kit: $25
- Spigot and bulkhead fitting: $15
- Mesh screen: $10
- PVC fittings: $20
- Overflow hose: $10
- Cinder blocks (platform): $20
Standard System ($300-450)
- Two 55-gallon barrels: $120
- First-flush diverter: $45
- Quality spigots (2): $30
- Linking kit for barrels: $35
- Mesh screen and filter: $25
- PVC pipes and fittings: $40
- Wooden platform: $60
- Overflow system: $25
Advanced System ($600-900)
- 275-gallon IBC tote: $180
- First-flush diverter: $45
- Sediment filter system: $80
- Pressure pump (optional): $120
- PVC plumbing: $60
- Concrete pad: $100
- Winterization kit: $40

Installing a rainwater barrel spigot with proper sealing and fittings
Step-by-Step Installation Guide
Step 1: Choose Your Location
Place barrels within 10 feet of downspouts to minimize piping. Choose level ground with good drainage—you don’t want your platform sitting in mud after heavy rain. Consider sun exposure: some algae growth is inevitable, but shaded barrels stay cleaner.
Pro tip: If possible, position barrels on the north side of your building where they stay cooler and receive less direct sunlight.
Step 2: Build Platform
Construct a sturdy base 18-24 inches high. I use three cinder blocks per barrel, arranged in a triangle for stability. For larger tanks, build a wooden frame with 4×4 posts and 2×6 decking.
Weight consideration: Water weighs 8.34 pounds per gallon. A full 55-gallon barrel weighs 450+ pounds. Your platform must handle this load plus withstand years of weather.
Step 3: Install Downspout Diverter
Cut your downspout at the appropriate height (usually 12 inches above barrel top). Install the diverter according to manufacturer instructions. Most use compression fittings that don’t require special tools.
If DIYing without a kit, cut a hole in the downspout, attach a PVC elbow, and run flexible tubing into the barrel lid. Seal connections with silicone caulk.
Step 4: Prepare Barrels
Drill holes for spigot (2-3 inches from bottom), overflow (2 inches from top), and inlet (top center or side near top). Use appropriate hole saws—typically 3/4 inch for spigots, 1-1.5 inch for inlets.
Install components in this order:
- Spigot with rubber gaskets and lock nuts (inside and outside)
- Overflow pipe pointing away from foundation
- Inlet connection with mesh screen
- Linking pipes between multiple barrels (if using)
Step 5: Add Filtration
At minimum, install mesh screen over barrel inlet to block large debris. For better quality, add a first-flush diverter to your downspout.
For drinking water use, install a carbon filter on your spigot output. These cost $20-40 and remove most contaminants, though you should still boil or treat water for consumption.
Step 6: Create Overflow System
Essential but often overlooked. Install an overflow pipe near the top of your barrel that directs excess water away from your foundation. I use a simple garden hose connected to an overflow bulkhead fitting, running 10 feet away to a rain garden.
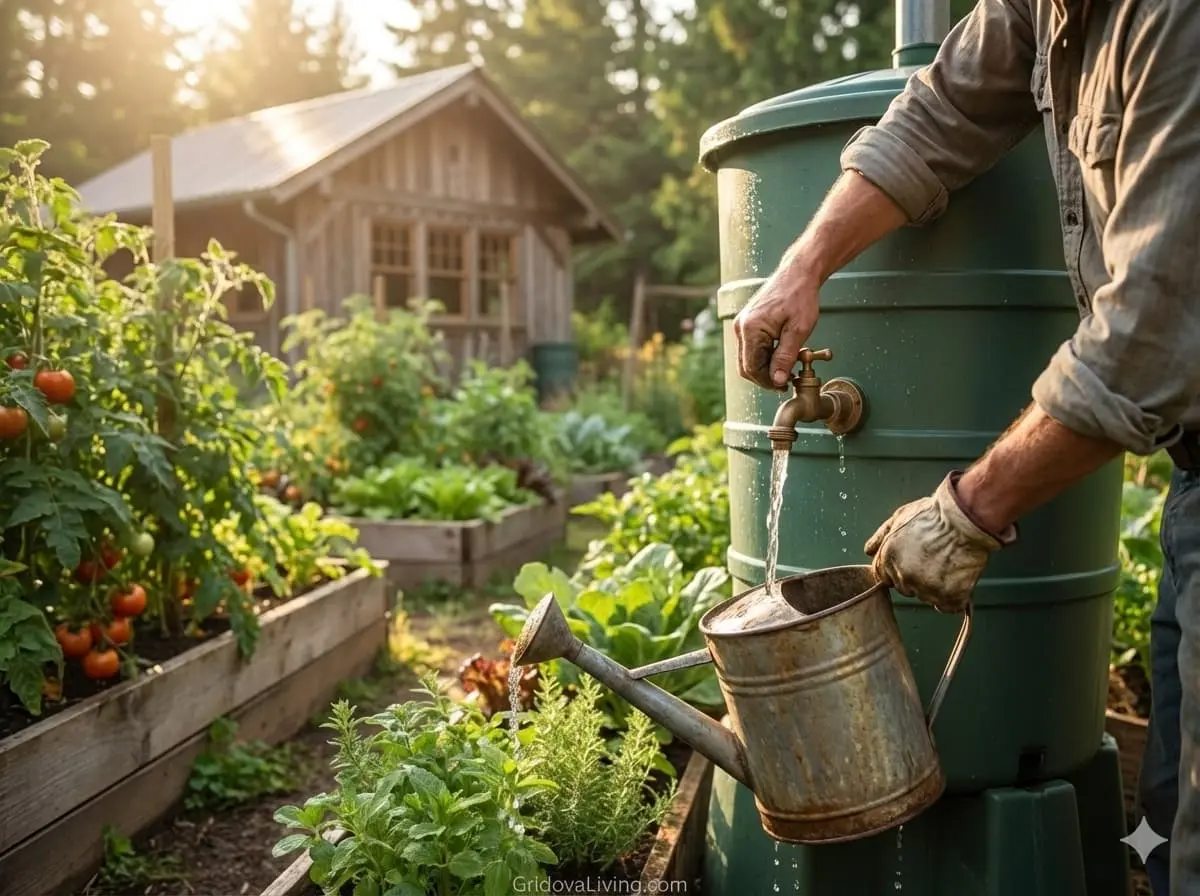
Using collected rainwater for garden irrigation and everyday outdoor tasks
Step 7: Connect and Test
Position barrels on platform, connect downspout, and wait for rain. Or test with a garden hose on your roof to verify all connections seal properly and overflow works correctly.
Check for leaks at every connection point. Tighten fittings as needed. Observe water flow during first rain to ensure smooth operation.
Maximizing Collection Efficiency
Calculate Your Potential
Use this formula: Collection (gallons) = Roof Area (sq ft) × Rainfall (inches) × 0.623 × 0.9 (efficiency factor)
Example: 1,000 sq ft roof, 30 inches annual rainfall:
1,000 × 30 × 0.623 × 0.9 = 16,821 gallons per year
That’s enough to supply 100% of landscape irrigation and 60% of household non-drinking water for an average family.
Link Multiple Barrels
Connect barrels near the bottom with PVC pipes so they fill evenly. This creates one large reservoir while maintaining individual barrel advantages (easier to move, replace, clean).
I connect up to four 55-gallon barrels per downspout using 3/4 inch PVC and bulkhead fittings. Total capacity: 220 gallons from a single collection point.
Seasonal Optimization
Spring: Clean gutters and screens after winter debris accumulation. Check all seals and fittings.
Summer: Use collected water regularly to prevent stagnation. Monitor for algae.
Fall: Final pre-winter cleaning. Remove leaves from gutters weekly during leaf drop.
Winter: Drain barrels completely in freezing climates or insulate and add de-icer.
Water Quality and Treatment
Is Rainwater Safe to Drink?
Rainwater itself is pure, but it picks up contaminants from your roof and gutters. For non-potable uses (toilets, laundry, garden), it’s perfectly safe as-is. For drinking, treat it.
Treatment options:
- Boiling: Simplest method, kills all pathogens. Boil for 1 minute (3 minutes above 6,500 ft elevation)
- UV filter: $150-300, eliminates bacteria and viruses without chemicals
- Carbon + sediment filters: $80-150, removes particles and improves taste
- Bleach treatment: 8 drops per gallon, wait 30 minutes. Budget option but affects taste
My personal system: First-flush diverter → sediment filter → carbon filter → UV light for drinking water. For garden/washing, I skip filtration entirely.
Preventing Algae Growth
Algae thrives in sunlight and stagnant water. Prevention strategies:
- Paint barrels dark color or place in shade
- Cover barrel tops completely to block light
- Use water regularly—circulation prevents growth
- Add 1 oz bleach per 55 gallons quarterly (if not using for drinking)
- Install opaque tubing instead of clear
How a basic rainwater collection system works from roof to storage barrel
Maintenance Schedule
Monthly Tasks (10 minutes)
- Check screens for debris, clean if needed
- Inspect barrels for leaks or cracks
- Verify overflow system works
- Use stored water to prevent stagnation
Quarterly Tasks (30 minutes)
- Clean gutters thoroughly
- Flush first-flush diverter
- Replace or clean filters
- Check all connections for leaks
- Scrub interior of barrels if accessible
Annual Tasks (2-3 hours)
- Drain and deep-clean entire system
- Inspect roof and gutters for damage
- Replace worn gaskets or fittings
- Test water quality if using for drinking
- Winterize if in freezing climate
Winterization for Cold Climates
In regions with hard freezes, you have two options: drain or insulate.
Option 1: Drain System (Simplest)
- Before first freeze, open all spigots and drain barrels completely
- Disconnect downspout diverter, let it drain naturally
- Leave spigots open all winter to prevent ice damage
- Store barrel lids inside to prevent UV damage
- Reconnect everything in spring
Option 2: Insulate and Heat (Advanced)
For year-round use in cold climates:
- Wrap barrels in 2-inch foam insulation
- Install tank heater (50-100W) with thermostat set to 40°F
- Bury connecting pipes below frost line
- Add heat tape to exposed pipes
- Cost: $100-200 for materials, electricity cost minimal
I use Option 1 at my Montana cabin—it’s not worth the hassle and expense to maintain liquid water when snow provides plenty of melt water.
Legal Considerations by Region
Rainwater collection is legal in most US states, but some have restrictions:
Fully Legal (No Restrictions)
Alaska, Arkansas, Delaware, Georgia, Hawaii, Louisiana, Maine, Massachusetts, Michigan, Minnesota, Missouri, Nebraska, New Hampshire, New Jersey, New Mexico, New York, North Dakota, Ohio, Oklahoma, Oregon, Pennsylvania, Rhode Island, South Carolina, South Dakota, Tennessee, Texas, Vermont, Virginia, West Virginia, Wisconsin, Wyoming
Legal with Restrictions
Colorado: Limited to two rain barrels, 110 gallons total, for outdoor use only (as of 2021)
Utah: Requires registration for systems over 100 gallons
Nevada: Allowed for domestic use, restrictions for landscaping in some counties
California: Encouraged but regulated by local building codes in some areas
Check Local Codes
Even where legal statewide, check county and city regulations. Some municipalities require permits for systems over 500 gallons or have specific plumbing code requirements.
Visit your county’s building department website or call them directly. Most are helpful and supportive of water conservation efforts.
Common Problems and Solutions
Problem: Low Water Pressure
Cause: Insufficient elevation or small pipe diameter
Solution: Elevate barrel another 12-18 inches for gravity pressure, or install a 12V RV water pump ($40-80) for 30-40 PSI
Problem: Mosquitoes in Barrel
Cause: Open screens or gaps where mosquitoes can enter and breed
Solution: Screen all openings with fine mesh, add 1 tablespoon mineral oil to water surface (creates barrier), or use mosquito dunks ($12 for 6-month supply)
Problem: Dirty Water/Sediment
Cause: Roof debris washing into barrel
Solution: Install first-flush diverter, clean gutters monthly, add inline sediment filter ($20-40)
Problem: Frozen Pipes/Barrels
Cause: Winter temperatures below 32°F
Solution: Drain system before winter or install insulation and heating elements
Problem: Overflow Flooding Foundation
Cause: Overflow pipe pointing wrong direction or nonexistent
Solution: Redirect overflow at least 10 feet from building, consider rain garden or dry well
Expanding Your System
Add Collection Points
Don’t limit yourself to one downspout. Each roof section with a downspout can feed barrels. I collect from four points on my cabin: front, back, and both sides. Total capacity: 600 gallons.
Underground Storage
For serious water independence, consider burying a large cistern (500-2000 gallons). Benefits: doesn’t freeze, doesn’t take up surface space, constant cool temperature prevents algae. Downside: expensive ($1000-5000 installed).
Pump and Pressurize
Add a 12V RV pump ($60-100) and small pressure tank ($50-80) to create a pressurized system. Connect to your cabin’s plumbing for indoor use. This setup works perfectly for off-grid bathrooms and kitchens.
Real-World Case Study
Location: Off-grid cabin, Northern Idaho
Roof area: 600 sq ft
Annual rainfall: 28 inches
System: Three 55-gallon barrels, first-flush diverter, basic filtration
Cost: $280 DIY installation
Results after one year:
- Collected approximately 9,400 gallons
- Eliminated need for water hauling May-October
- Provided 100% of garden irrigation (300 sq ft vegetable garden)
- Supplied washing and cleaning water, reducing well pump use by 40%
- System paid for itself in saved fuel costs (water hauling) within 4 months
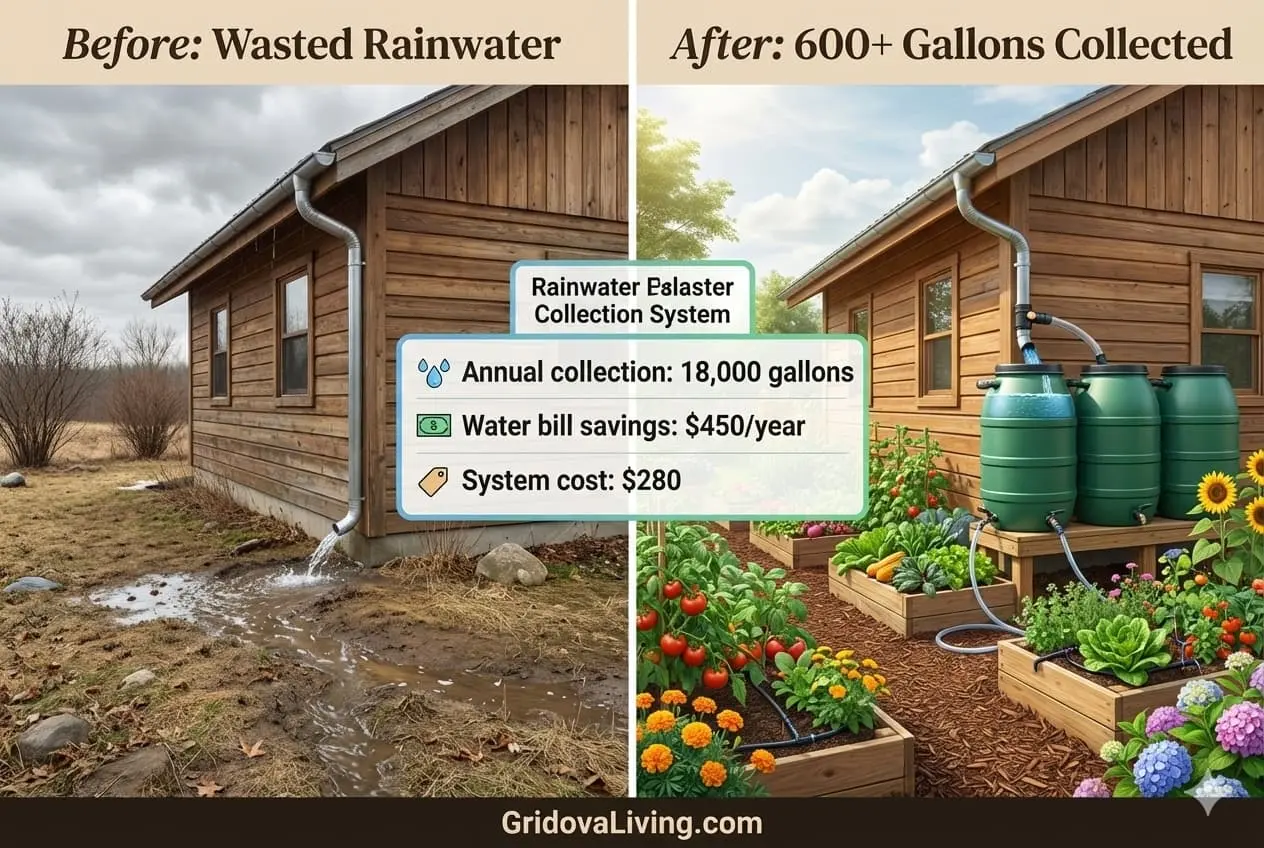
Before and after comparison showing rainwater collection system impact on an off-grid cabin
Frequently Asked Questions
How much water can I collect from my roof?
Use the formula: Roof area (sq ft) × 0.623 × rainfall (inches). Example: A 1,000 sq ft roof collects about 623 gallons per inch of rain. Check your area’s average annual rainfall to estimate yearly collection.
Do I need a permit to collect rainwater?
In most US states, no permit is required for residential systems under 5,000 gallons. Colorado and Utah have specific restrictions. Always check local building codes and water rights laws in your area before installing large systems.
Can I drink rainwater?
Rainwater is safe to drink after proper treatment. Use first-flush diverter, filter through sediment and carbon filters, and treat with UV sterilization or boiling. Never drink rainwater directly from the barrel without treatment.
How do I prevent algae growth?
Block all light from entering storage containers, keep lids tightly sealed, and use water regularly. Painting barrels dark colors or placing them in shade helps significantly. Add 1 oz household bleach per 55 gallons every few months if not using for drinking.
What’s the best barrel size for beginners?
Start with one or two 55-gallon barrels. They’re affordable ($40-80 each), easy to install, and provide enough capacity to assess benefits before investing in larger systems. You can always add more barrels later.
Will my system freeze in winter?
Yes, if temperatures drop below 32°F. In cold climates, drain your system completely before winter, or insulate and heat barrels if you need year-round collection. Frozen water can crack barrels and burst pipes.
How often should I clean my rainwater system?
Check screens and filters monthly, clean gutters quarterly, and perform full system cleaning annually. More frequent cleaning is needed if you have many trees near your roof or live in a dusty area.
Can I connect multiple barrels together?
Yes, using PVC pipes and bulkhead fittings near the bottom of each barrel. This allows them to fill and drain together as one large reservoir while keeping individual barrels manageable. Connect up to 4-6 barrels per downspout.
Complete Your Water Independence Setup
Outdoor rainwater collection + Indoor water savings = Maximum off-grid efficiency
Related Off-Grid Water Guides
- How to Start Living Off-Grid: Beginner’s Complete Guide
- Simple Off-Grid Water System: Well, Spring, or Rainwater Setup
- Off-Grid Cabin Solar Setup for Under $600
- Calculate Your Off-Grid Solar Needs: Sizing Guide
- Best Solar Panels for Off-Grid Living 2026
Conclusion: Freedom Flows from the Sky
Rainwater collection connects you directly to nature’s cycles. Every storm becomes an opportunity instead of an inconvenience. Your roof transforms from a simple shelter into a productive water catchment system.
I’ve installed rainwater systems on 15+ off-grid properties over five years. The impact goes beyond practical water supply—there’s something deeply satisfying about using water you collected yourself, knowing you’re not dependent on municipal systems or draining aquifers.
Start simple: one barrel, one downspout, one afternoon of work. You’ll collect your first rainwater within days and understand why humans have harvested rain for thousands of years. It’s not just sustainable living—it’s reclaiming a fundamental human skill.
Gridova Insight: Water independence doesn’t mean drilling the deepest well. Sometimes freedom literally falls from the sky—you just need to catch it.
Next project: Start your complete off-grid journey with our beginner’s guide
Last updated: January 2, 2026

Lio Verdan writes about solar energy, off-grid living, and eco-innovation through Gridova Living — a platform dedicated to energy freedom and sustainable technology.