Series vs Parallel: What’s the Difference?
This confuses everyone at first, but it’s simple.
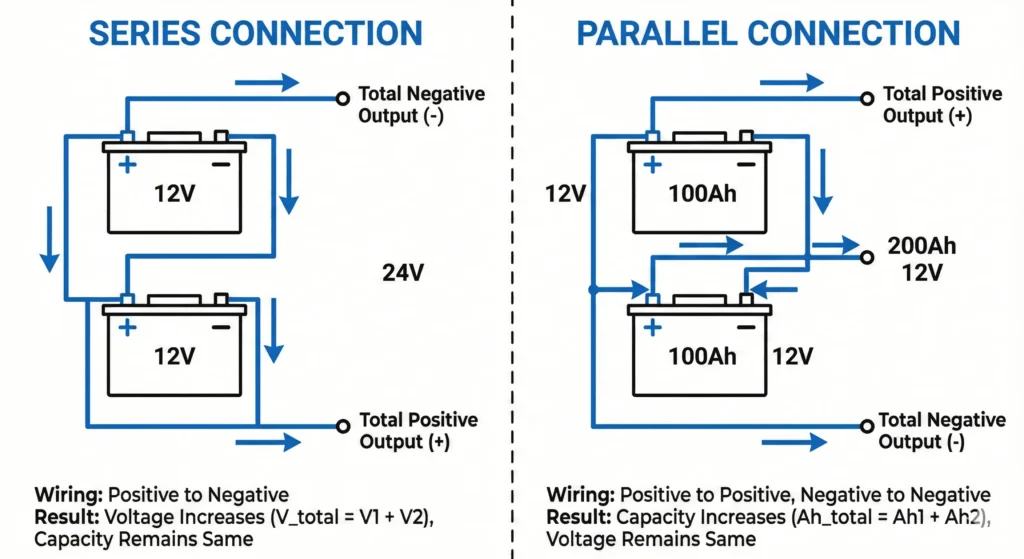
Series wiring increases voltage. Connect positive to negative across batteries. Two 12V batteries in series = 24V.
Parallel wiring increases capacity (amp-hours). Connect positive to positive, negative to negative. Two 100Ah batteries in parallel = 200Ah at the same voltage.
Most off-grid systems use both. You wire batteries in series to get your system voltage (12V, 24V, or 48V), then wire those series strings in parallel to get more capacity.
What System Voltage Should You Use?
Quick answer: probably 24V or 48V.
12V systems are fine for small setups—RVs, tiny cabins, under 1,000W. But the wire sizes get crazy thick for anything bigger. I wouldn’t go 12V unless you’re running minimal loads.
24V systems are the sweet spot for most off-grid homes. Good balance of efficiency and simplicity. This is what I use. You need two 12V batteries in series (or one 24V battery), and most quality inverters support 24V.
48V systems are best for larger homes with serious power needs (3,000W+). More efficient, thinner wires, but you need four 12V batteries in series or purpose-built 48V batteries. More expensive upfront.
If you’re just starting out and powering a normal cabin, go 24V. It’s what most people end up with anyway.
Wire Gauge: Don’t Cheap Out Here
This is where people mess up most often. They use wire that’s too thin because it’s cheaper. Then they wonder why their batteries die fast or why connections get hot.
Thicker wire = less resistance = less heat = less voltage drop = longer battery life.
Here’s what you actually need for common setups:
| Current (Amps) | Distance | 12V Wire Size | 24V Wire Size | 48V Wire Size |
|---|---|---|---|---|
| 50A | 5 feet | 4 AWG | 6 AWG | 8 AWG |
| 100A | 5 feet | 2 AWG | 4 AWG | 6 AWG |
| 150A | 5 feet | 1/0 AWG | 2 AWG | 4 AWG |
| 200A | 5 feet | 2/0 AWG | 1/0 AWG | 2 AWG |
Those numbers assume 3% voltage drop max. If your runs are longer, go thicker. Better to oversize than undersize.
For battery interconnects (battery to battery), use the same gauge throughout. Don’t mix wire sizes in your battery bank.
The Right Way to Wire Batteries in Parallel
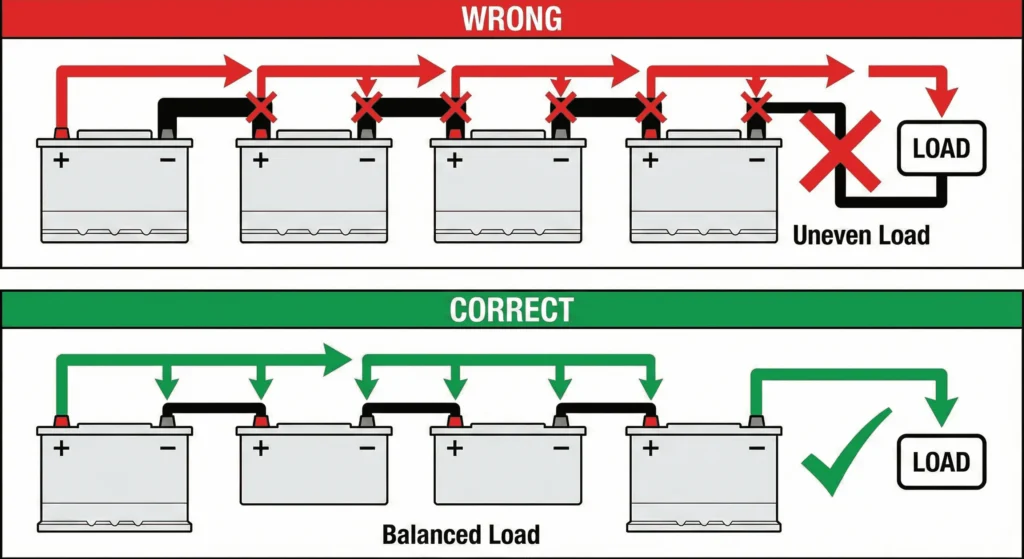
If you’re connecting multiple batteries in parallel, most people do it wrong. They connect everything to the first battery. This overworks that battery and underworks the others.
The right way is called “distributed load wiring” or “diagonal wiring.”
Here’s how it works: Take your positive load connection from one end of the battery bank. Take your negative load connection from the opposite end. This forces current to flow evenly through all batteries.
Wrong way: Both positive and negative connections on the same battery.
Right way: Positive on first battery, negative on last battery (or vice versa).
This simple change makes your batteries last way longer because they’re all doing equal work.
Step-by-Step Battery Bank Wiring
Here’s how I wired my 24V, 400Ah battery bank (four 12V 200Ah batteries):
Step 1: Position your batteries. Close together, on a non-conductive surface (wood or plastic), in a ventilated area. Not directly on concrete—temperature swings kill batteries.
Step 2: Wire the first series string. Connect positive terminal of battery 1 to negative terminal of battery 2. This gives you 24V. Use 2 AWG copper wire with proper ring terminals.
Step 3: Wire the second series string. Same thing—battery 3 positive to battery 4 negative. Now you have two 24V strings.
Step 4: Connect the strings in parallel. Here’s where distributed load matters. Connect the positive from battery 1 to battery 3. Connect the negative from battery 2 to battery 4. This balances the load.
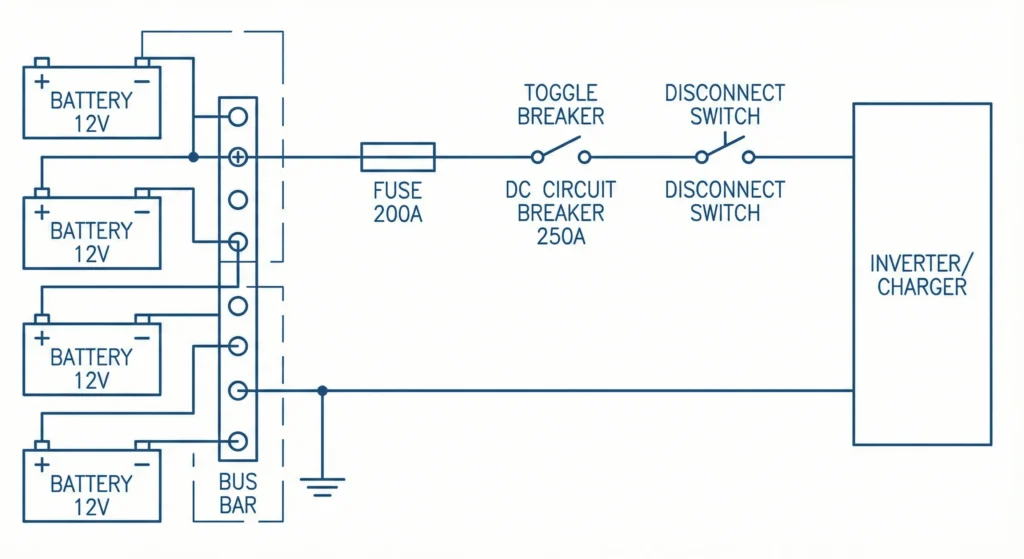
Step 5: Add your main positive and negative leads. Positive load wire goes to battery 1 (or 3). Negative load wire goes to battery 4 (or 2)—opposite end of the bank. These connect to your inverter.
Step 6: Install fuses or breakers. Put a fuse on the positive wire close to the battery bank. Size it for your system—for a 3,000W inverter on 24V, you need about 150A, so use a 175A or 200A fuse.
Step 7: Double-check everything. Measure voltage across the bank (should be 24V or close). Check all connections are tight. Look for any bare wire touching metal.
Step 8: Connect to your charge controller and inverter. Follow their wiring diagrams. Usually positive and negative from the battery bank, with proper fusing on the positive side.
Battery Bank Components You Actually Need
Don’t overthink this. Here’s the shopping list:
Batteries: Either lithium (LiFePO4) or lead-acid (AGM or flooded). Lithium costs more but lasts longer and needs less maintenance. For a 24V system, you need batteries that can be wired in series—either two 12V batteries or one 24V battery. Check out our battery storage guide for choosing the right type.
Wire: Marine-grade tinned copper wire. Not automotive wire, not aluminum. Get the gauge from the chart above. I used 2 AWG for my 100A system.
Ring terminals: Crimped, not soldered. Get the right size for your wire gauge and battery terminals. Heat shrink over the connection.
Fuses or breakers: Class T fuses are standard for battery banks. You need one on the positive line from the battery to the inverter. For 24V systems at 3,000W, use 150-200A fusing.
Battery cables (pre-made): For main connections between battery bank and inverter. These come with terminals already attached and are usually 2 AWG to 4/0 AWG depending on your current.
Bus bars (optional but helpful): Makes parallel connections cleaner. Instead of wire-to-wire connections, everything goes to a bus bar.
Safety Stuff You Can’t Skip
Batteries store a lot of energy. Short circuit a battery bank and you’re creating a welder. I’ve seen battery terminals melt because someone dropped a wrench across them.
Always disconnect before working. If you’re adding batteries or changing wiring, disconnect the bank from your inverter and charge controller first. Work on dead systems.
Remove metal jewelry. Rings, watches, bracelets—take them off. Accidentally brush a ring across terminals and you’ll burn yourself.
Use insulated tools. Tape off wrench handles or get insulated tools. Anything that prevents accidental shorts.
Work in good light. You need to see what you’re doing. Battery terminals are close together. One slip and you’ve got a problem.
Have a fire extinguisher nearby. Class B or ABC. Hopefully you never need it, but if something goes wrong with batteries, things happen fast.
Ventilation matters. Lead-acid batteries off-gas hydrogen when charging. Even sealed AGM batteries can vent under certain conditions. Make sure your battery area has airflow. Lithium batteries don’t off-gas under normal conditions but still need ventilation for temperature control.
Common Wiring Mistakes
Using wire that’s too thin. This is number one. People see the price difference between 6 AWG and 2 AWG wire and cheap out. Then they wonder why their system underperforms. Don’t do this.
Loose connections. Every connection should be tight. Loose connections create resistance, resistance creates heat, heat kills batteries and starts fires. Tighten your terminals.
Mixing old and new batteries. Don’t add a new battery to a bank of old ones. They won’t balance. The new battery gets overcharged, the old ones get undercharged. Replace all batteries at once.
No fusing. I see DIY systems with no fuses on the battery bank. That’s insane. If something shorts, there’s nothing to stop the current. Fuses are cheap insurance.
Wrong polarity. Double-check before connecting. Reverse polarity can blow up electronics instantly. Measure with a multimeter—red probe on positive, black on negative. Should read positive voltage.
Undersized battery bank. People calculate their daily power use and size their battery bank to match. Wrong. You need at least 2x your daily usage, ideally 3x. Batteries last longer when you’re not draining them completely. Our solar calculator guide helps you size everything correctly.
Maintaining Your Battery Bank
Once it’s wired, battery banks are pretty low-maintenance if you did it right.
Check connections quarterly. Look for corrosion, loose terminals, or damaged wire insulation. Tighten anything that’s worked loose.
Monitor voltage. Your inverter or charge controller should show battery voltage. For a 24V system, you want 24-28V range depending on charge state. Consistently low voltage means something’s wrong.
Balance your batteries. If you’re using lead-acid, periodic equalization helps balance cells. Lithium batteries with a good BMS (Battery Management System) balance automatically. See our battery maintenance guide for the full routine.
Keep terminals clean. Corrosion builds up over time. Clean with baking soda and water, then coat terminals with dielectric grease or anti-corrosion spray.
Watch for swelling or damage. If a battery case is swelling, leaking, or physically damaged, disconnect and replace it immediately. Don’t mess around with damaged batteries.
Do You Need a Battery Management System?
Depends on your battery type.
Lithium batteries (LiFePO4): Yes, absolutely. Most come with a built-in BMS. This monitors cell voltage, temperature, and prevents over-charge/discharge. Don’t buy lithium batteries without a BMS.
Lead-acid batteries (AGM/Flooded): No BMS needed. Your charge controller handles charge regulation. You might want a battery monitor to track state of charge, but it’s not required.
I use a battery monitor in my system even though I have lead-acid. It’s a Victron BMV-712—shows voltage, current, amp-hours consumed, and estimates remaining capacity. Not necessary but really useful for understanding what’s happening in your system.
Expanding Your Battery Bank Later
Can you add more batteries after you’ve built your system? Sometimes.
Adding capacity: If you want more amp-hours at the same voltage, you can add another parallel string. But all batteries should be the same age, type, and ideally from the same manufacturing batch. Mixing old and new batteries is asking for problems.
Changing voltage: If you want to go from 12V to 24V or 24V to 48V, you’re basically rebuilding. Your inverter and charge controller need to support the new voltage. This usually means replacing equipment.
Best practice: Size your battery bank correctly from the start. It’s easier and cheaper than trying to expand later.
Wiring for Different Battery Types
Flooded lead-acid: Need ventilation because they off-gas. Terminals corrode more, so check them more often. Otherwise, wiring is the same as any other battery.
AGM (sealed lead-acid): No maintenance, no water topping off. Can be installed in more locations. Wiring is straightforward—just follow the voltage and capacity rules.
Lithium (LiFePO4): Lighter, longer life, more expensive. Can discharge deeper without damage. Make sure your charge controller has a lithium profile. Some lithium batteries have specific requirements for series connections—check the manual.
Different chemistries don’t mix: Never wire lithium and lead-acid together. They have different charging profiles and voltages. Pick one type and stick with it.
What About Battery Monitors?
A battery monitor is basically a fuel gauge for your battery bank. It tracks amp-hours in and out, calculates state of charge, and warns you before you damage your batteries.
I didn’t have one on my first system. Regretted it. Killed my first battery bank by over-discharging because I had no idea how much capacity I had left.
Second system, I installed a Victron BMV-712 from day one. Totally worth it. Knowing exactly how much power you have left changes how you use your system. You stop guessing.
Monitors aren’t required, but if you’re serious about off-grid living and want your batteries to last, get one. They’re not that expensive compared to replacing a battery bank early.
Real-World Example: My 24V 400Ah Setup
Here’s what I actually used for my cabin:
- Four 12V 200Ah AGM batteries (wired as two series pairs in parallel = 24V 400Ah)
- 2 AWG marine-grade copper wire for all battery interconnects
- 1/0 AWG cable from battery bank to inverter (6-foot run)
- 200A Class T fuse on positive line
- Victron BMV-712 battery monitor with shunt
- Battery disconnect switch for safety
Total cost for wiring components (not including batteries): about $350. Could’ve gone cheaper but I didn’t want to redo this if something failed.
System’s been running for three years with zero issues. I check connections twice a year, keep terminals clean, and that’s it. The wiring just works.
If I was building it today, I’d probably go lithium instead of AGM. But the wiring would be identical.
Frequently Asked Questions
Can I use automotive wire for battery connections?
No. Automotive wire isn’t designed for the continuous loads in a battery bank. Use marine-grade or welding cable—it’s more flexible and handles heat better. The extra cost is worth it.
How often should I check my battery bank wiring?
Inspect connections every 3-4 months. Check for loose terminals, corrosion, or damaged insulation. Takes 10 minutes and prevents problems.
Do I need a battery disconnect switch?
Not required but highly recommended. Makes maintenance safer and gives you an emergency shutoff. I installed mine between the battery bank and inverter.
What’s the maximum wire run from batteries to inverter?
Keep it short—under 10 feet if possible. Longer runs mean more voltage drop. If you must go longer, increase wire gauge. Every foot of wire adds resistance.
Can I expand my battery bank later?
You can add parallel capacity if batteries are the same age and type. Don’t mix old and new batteries—they won’t balance properly and you’ll shorten the life of both.
Should batteries be connected in series or parallel first?
For multi-battery banks, create series strings first to get your system voltage, then connect those strings in parallel for more capacity. This is cleaner and easier to troubleshoot.
What size fuse do I need for my battery bank?
Calculate your inverter’s max current draw, then add 25% safety margin. For a 3,000W inverter on 24V: 3,000W ÷ 24V = 125A × 1.25 = 156A. Use a 175A or 200A fuse.
Final Thoughts
Battery bank wiring isn’t complicated if you follow the basics: use thick enough wire, make tight connections, fuse your positive line, and wire for balanced loads.
Don’t overthink it. People have been wiring battery banks for decades. The rules are simple and they work.
The hour or two you spend doing this right will save you years of problems. Skip the shortcuts, buy proper components, and wire it like you’re going to live with it for 10 years—because you will.
Once your battery bank is wired correctly, you can focus on the fun stuff—like actually using your off-grid power system. If you’re still planning your setup, check out our guide on choosing and installing the right inverter for your system.

Lio Verdan writes about solar energy, off-grid living, and eco-innovation through Gridova Living — a platform dedicated to energy freedom and sustainable technology.