How Solar Water Heaters Actually Work
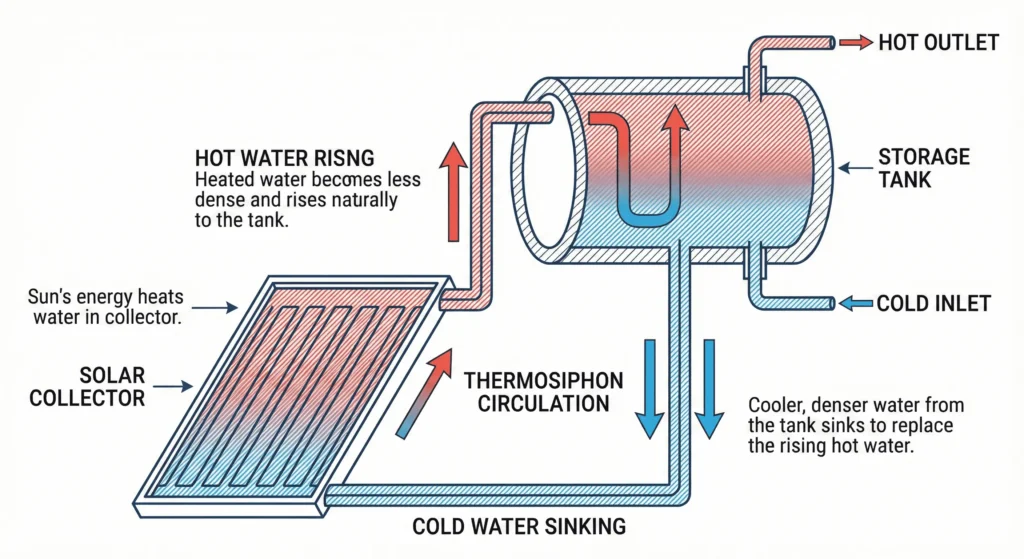
The concept is simple: water flows through black pipes sitting in a glass-covered box. Sun heats the pipes, pipes heat the water. Hot water rises naturally into a storage tank. Cold water sinks back down to get heated. This keeps circulating as long as the sun is out.
There are two main types:
Passive systems use thermosiphon—hot water rises naturally. No pumps, no electricity. Simple and reliable. This is what most DIY builds use because there’s less to break.
Active systems use a pump and controller to move water. More efficient but more complicated and expensive. Unless you’re building a large system, passive is the way to go.
For off-grid or backup use, passive systems make the most sense. They work during power outages and have fewer parts that can fail.
What You Need to Build One
Here’s the basic shopping list for a simple batch-style solar water heater:
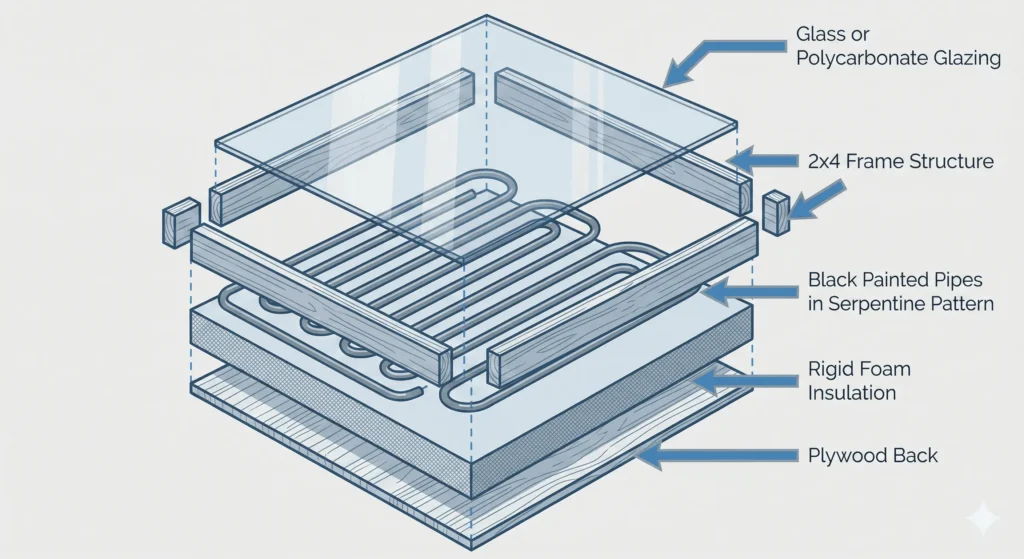
Collector box: This holds your pipes and traps heat. You can build one from plywood and 2x4s, or repurpose an old window frame. Size depends on how much hot water you need—4×8 feet is a good starting point for a family.
Pipes or tubes: Copper pipe works great but it’s expensive. Black polyethylene tubing (100 feet of ½-inch) costs about $40 and works fine. Some people use old copper from water heaters or radiators.
Glazing: Glass or clear polycarbonate to cover the collector. Needs to let sun through while trapping heat inside. Old sliding glass door panes work perfectly if you can find them cheap.
Insulation: Rigid foam board for the back and sides of the collector box. R-10 or better. This keeps heat from escaping out the back.
Storage tank: An old electric water heater works great. Remove the heating elements, drain it, and use it as a storage tank. Or buy a simple pressure tank.
Fittings and valves: Connectors for your pipes, shut-off valves, pressure relief valve. Basic plumbing hardware.
Black paint: High-temperature flat black paint for the pipes and interior of the box. This absorbs maximum heat.
Total cost if you buy everything new: $150-200. If you scavenge materials, you can build it for under $100.
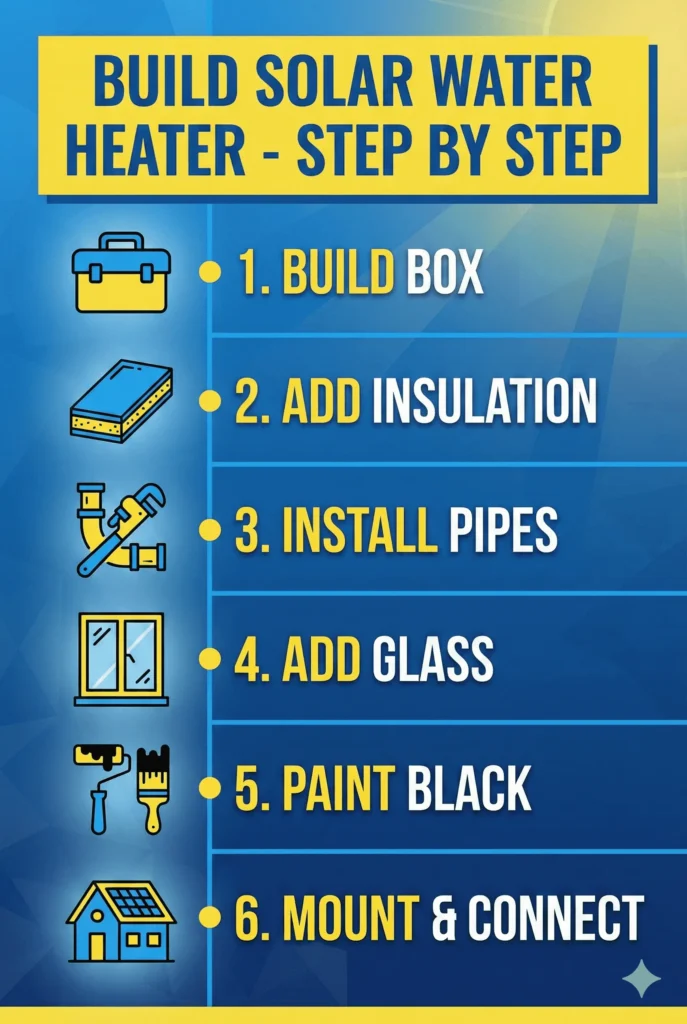
Simple Batch Heater Design
The easiest DIY solar water heater is a batch system. You’re basically building an insulated box with a glass front, putting black pipes inside, and letting the sun do its work.
Step 1: Build the collector box. Use 2x4s for the frame, plywood for the back. Make it 4 feet wide by 8 feet long, about 6 inches deep. Paint the inside flat black.
Step 2: Add insulation. Line the back and sides with 2-inch rigid foam board. This keeps heat from escaping. Seal gaps with silicone or expanding foam.
Step 3: Install your pipes. If using copper, make a coil or grid pattern. If using poly tubing, create a serpentine back-and-forth pattern. More surface area = more heat. Paint everything flat black.
Step 4: Add glazing. Attach your glass or polycarbonate to the front of the box. Seal edges with silicone. You want it airtight to trap heat but able to drain any condensation.
Step 5: Connect to your water system. Cold water inlet at the bottom, hot water outlet at the top. Install shut-off valves so you can isolate the system for maintenance.
Step 6: Mount it. South-facing, angled at your latitude (or close to it). Roof mounting works if you can do it safely. Ground mounting is easier and lets you adjust angle seasonally.
Batch System vs Thermosiphon System
Batch systems are simpler. Water sits in the collector all day heating up. You use that heated water directly. Pros: dead simple, cheap, no moving parts. Cons: water cools down overnight, limited capacity, can freeze in winter.
Thermosiphon systems circulate water between a collector and a separate storage tank. The collector is just pipes, the tank stores hot water. Pros: more capacity, stays hot longer, can be used year-round with antifreeze. Cons: more complex, more expensive, requires the tank to be higher than the collector.
For beginners, start with batch. It’s simpler and you’ll learn the basics. If you want year-round hot water, thermosiphon is worth the extra effort.
Sizing Your System
How much collector area do you need? Depends on how much hot water you use and how much sun you get.
Rough guideline: 1 square foot of collector per gallon of daily hot water use in good sun conditions. So if you use 40 gallons per day, you want about 40 square feet of collector. That’s a 4×10 foot panel or two 4×5 panels.
In cloudy climates, increase that by 50%. In sunny desert areas, you can get away with less.
For storage, you want at least one day’s worth of hot water, ideally two. A family of four using 40 gallons per day should have an 80-gallon storage tank.
Don’t oversize too much. Bigger isn’t always better. A smaller system that reaches higher temperatures is better than a huge system that barely gets warm.
Materials and Where to Get Them
Copper pipe: Check scrap yards, Habitat ReStore, or Craigslist. Old water heaters have copper coils you can salvage. New copper is $3-5 per foot—expensive but lasts forever.
Poly tubing: Hardware stores sell 100-foot rolls for $30-50. Easy to work with, doesn’t freeze and burst like copper can. Not as efficient but good enough for most climates.
Glass: Look for old sliding glass doors, storm windows, or broken window units. People give these away free on Facebook Marketplace all the time. Just make sure the glass isn’t cracked.
Insulation: Home Depot or Lowe’s. Get 2-inch rigid foam board (XPS or polyiso). About $20 for a 4×8 sheet.
Tank: Old electric water heaters work perfectly. Remove the heating elements and you have a great insulated storage tank. People throw these out constantly. Check curbs on trash day or Craigslist free section.
If you scavenge materials, you can build a working system for $50-75 in fittings and paint. New materials run $150-200.
Installation Tips
Angle matters. Point your collector south (in the Northern Hemisphere) and tilt it at your latitude angle. Most US locations are 30-45 degrees. Steeper angle works better in winter, shallower in summer. For year-round use, match your latitude.
Location matters too. Full sun exposure from 10am to 4pm minimum. No shade from trees, buildings, or chimneys. Even partial shade kills performance.
Secure it properly. Solar collectors catch wind like sails. Use serious mounting hardware. I’ve seen poorly mounted collectors rip off roofs in storms. Lag bolts into rafters, heavy-duty brackets, the works.
Plumb it correctly. Cold inlet at the bottom, hot outlet at the top. Install a pressure relief valve rated for your system pressure. Add drain valves at the lowest points so you can empty it for winter or maintenance.
Insulate your pipes. Any exposed pipe between the collector and storage tank loses heat. Use foam pipe insulation. In cold climates, add heat tape for winter protection.
Freeze Protection
If you live where it freezes, you have three options:
Drain-down system: Drain the collector when it freezes. Simple but requires attention. You need to drain it before the first freeze and not use it until spring.
Antifreeze system: Use a heat exchanger and run antifreeze through the collector. The antifreeze circulates in a closed loop, transferring heat to your water through a coil. More complex but works year-round. This requires a pump though, so it’s not passive anymore.
Drain-back system: When the pump stops, water drains back into a protected tank automatically. Works well but needs careful design so it actually drains completely.
For most DIYers in cold climates, drain-down is easiest. Just plan on it being seasonal—spring through fall only.
Maintenance and Longevity
Solar water heaters are pretty low maintenance once built right.
Clean the glazing twice a year. Dirt and pollen reduce efficiency. Windex and a squeegee, same as cleaning windows.
Check for leaks seasonally. Look at all connections and joints. Copper systems can develop leaks at solder joints. Poly tubing can crack from UV exposure if not protected.
Drain and flush yearly. Sediment builds up in the tank over time. Drain a few gallons out the bottom, look for rust or debris. If it’s bad, flush the whole system.
Inspect seals. The silicone sealing your glazing can degrade over time from UV and heat cycles. Re-seal as needed.
Replace damaged parts promptly. A cracked glazing or failed pipe fitting will kill your system’s efficiency. Fix problems when they’re small.
A well-built system can last 15-20 years with basic maintenance. The glazing might need replacing after 10-15 years depending on material quality.

How Much Hot Water Will You Get?
Realistic expectations: on a sunny day, a 40-square-foot collector can heat 40 gallons of water from 50°F to 120-140°F. That’s enough for showers, dishes, and laundry for a small family.
Cloudy days you’ll get warm water, maybe 80-100°F. Better than cold but not shower-hot. This is why having a backup system matters—either keep your old water heater on standby or have a tankless propane heater as backup.
In summer you might get water too hot to use directly. Over 160°F can scald. Install a tempering valve that mixes cold water to bring it down to safe temps.
Winter performance drops significantly unless you have a year-round system with antifreeze. In most climates, DIY solar water heaters are seasonal unless you invest in more complexity.
Integrating with Existing Systems
You don’t have to replace your current water heater. Most people run solar as a pre-heater.
Cold water flows through the solar system first. If it heats up to 120°F, great—your regular water heater doesn’t turn on. If solar only heats it to 80°F, your backup heater only needs to boost it 40 degrees instead of 70.
This is called a two-tank system. Solar heats the first tank, that feeds into your regular water heater. Your backup heater only kicks on when solar can’t keep up.
Plumbing this way is smart because you always have hot water even when solar isn’t working. And you’re still saving money—every degree the solar heats it is a degree your backup doesn’t have to.
If you’re building a complete off-grid system, check out our guide on sizing your solar panels and battery bank to power everything reliably.
Safety Considerations
Pressure relief valve is mandatory. Water expands when heated. In a closed system, this creates pressure. Without a relief valve, your tank can rupture or even explode. Install a proper temperature/pressure relief valve rated for your system.
Backflow prevention. You need a check valve or backflow preventer so hot water doesn’t flow backward into your cold supply. This is code in most places.
Scalding protection. Solar can heat water hotter than your tap should deliver. Install a tempering valve at the outlet that mixes cold water to limit temperature to 120-125°F.
Roof safety. If mounting on a roof, use proper fall protection. Roofs are dangerous, especially when you’re carrying heavy panels or tanks. If you’re not comfortable with heights, mount at ground level or hire help for the roof work.
Structural support. A 40-gallon tank weighs 330 pounds when full. Your mounting structure needs to support that plus wind load. Don’t attach to weak roof sections or use undersized brackets.
Does It Actually Save Money?
Let’s do the math for a typical scenario:
Cost to build: $175 in materials, one weekend of work.
Annual savings: If you’re currently paying $50/month for hot water and solar cuts that by 60% over 8 months (April-November), you’re saving $240 per year.
Payback period: $175 ÷ $240 = 0.7 years. Less than one year to pay for itself.
Lifetime savings: Over 15 years at $240/year = $3,600 saved. And that’s conservative—energy prices usually go up over time.
Compare that to a commercial solar water heater at $4,000 installed. It saves more per year (maybe $300-400) but takes 10-13 years to break even. DIY makes financial sense even if you’re not that handy.
For more details on off-grid energy costs and ROI, see our complete breakdown in the battery storage guide.
Common Problems and Solutions
Not getting hot enough: Usually means not enough sun exposure, undersized collector, or heat loss from poor insulation. Add more reflectors around the collector to boost input, or increase insulation thickness.
System overheating: In summer, you might get too much heat. Add a temperature-activated valve that diverts water when it gets above 140°F, or partially shade the collector on very hot days.
Leaks at connections: Most DIY systems leak initially at pipe fittings. Use quality fittings, apply pipe dope or teflon tape generously, and tighten properly. Test before final installation.
Glazing fogging up: Condensation inside the glazing means it’s not sealed properly. Moisture is getting in. Re-seal with silicone and drill small weep holes at the bottom to let moisture escape.
Circulation stops: In thermosiphon systems, if the tank is lower than the collector, circulation won’t work—hot water can’t flow up. Tank must be at least 12 inches higher than the top of the collector.
Freezing damage: If you didn’t drain the system before a freeze, pipes can burst. Always drain completely before first frost if you’re in a freezing climate and not using antifreeze.
Upgrading Your System Later
Start simple, upgrade as you learn.
Add more collector area: Build a second panel and plumb it in parallel or series with the first. More area = more hot water.
Upgrade to thermosiphon: If you started with a batch heater, you can add a separate storage tank and convert to thermosiphon for better performance and capacity.
Add a pump and controller: Convert your passive system to active circulation. A small pump and differential controller (turns pump on when collector is hotter than tank) improves efficiency but adds complexity.
Add antifreeze circulation: Install a heat exchanger in the tank and run antifreeze through the collector in a closed loop. This lets you operate year-round in freezing climates.
Most people start with a simple batch system, use it one season, then upgrade to thermosiphon after seeing how well it works. Build your knowledge incrementally.
Is This Worth Your Time?
If you’re paying for hot water and get decent sun, absolutely. The payback period is under a year, it’s a weekend project, and you learn useful skills.
If you’re completely off-grid, solar water heating makes even more sense. Every kilowatt-hour you don’t use for water heating is power available for other loads. Your battery bank will thank you.
The best part? Once it’s built, it’s free hot water. No moving parts to break (in passive systems), no bills, no maintenance beyond occasionally cleaning the glass. Just free energy from the sun.
For more off-grid DIY projects that actually save money, check out our guide on building your own solar power bank.
Frequently Asked Questions
How long does it take to heat water with a solar water heater?
On a sunny day, a properly sized system can heat 40 gallons from cold to 120-140°F in 4-6 hours. Cloudy days take longer and won’t get as hot. Performance varies with sun intensity and outside temperature.
Can I use a solar water heater in winter?
Yes, but it requires freeze protection. Simple batch systems should be drained in freezing weather. Thermosiphon systems can run year-round if you use antifreeze circulation or drain-back protection. Performance drops in winter due to lower sun angle and colder temperatures.
Do I need a permit to install a solar water heater?
Depends on your location. Many areas require permits for plumbing changes or roof-mounted equipment. Check with your local building department. Ground-mounted systems on your own property often don’t require permits.
How much does a DIY solar water heater cost to build?
$150-200 if buying all new materials. Under $100 if you scavenge glass, tanks, and pipes. The main costs are insulation, fittings, and glazing if you have to buy it new.
What’s the best angle for a solar water heater?
Tilt it at your latitude angle for year-round use. For summer-only use, go 15 degrees less than your latitude. For winter boost, go 15 degrees more. In most US locations, 30-40 degrees works well for seasonal systems.
Can I build a solar water heater without copper pipe?
Yes. Black polyethylene tubing works fine and costs much less. It’s not quite as efficient as copper but good enough for most DIY systems. Make sure it’s UV-resistant if any part will be exposed to sun outside the collector box.
How much hot water can a 4×8 collector produce?
In good sun conditions, a 32-square-foot collector can heat 30-40 gallons per day to usable temperatures (110-140°F). Actual output depends on sun exposure, season, starting water temperature, and how well your system is built.
Final Thoughts
Solar water heating is one of the most practical DIY solar projects you can do. It’s simpler than photovoltaic panels, cheaper, and has immediate results you can feel every time you take a hot shower.
Start with a basic batch system. Learn how it works. Then upgrade if you want more capacity or year-round operation. The beauty of DIY is you can build exactly what you need without overpaying for commercial systems.
Will it cover 100% of your hot water needs? Probably not in most climates. But 50-70% coverage from a $175 investment is hard to beat. And when you’re standing in a hot shower knowing the sun heated that water for free, the project pays for itself in satisfaction alone.
If you’re serious about energy independence, this is a great next step after getting your solar panel system up and running.

Lio Verdan writes about solar energy, off-grid living, and eco-innovation through Gridova Living — a platform dedicated to energy freedom and sustainable technology.