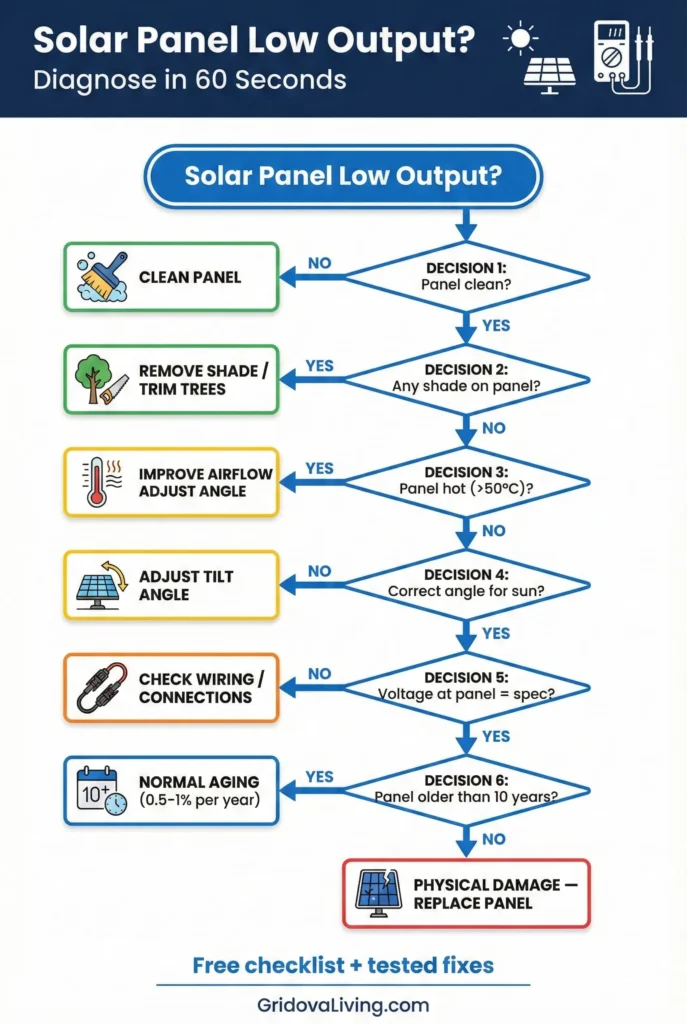
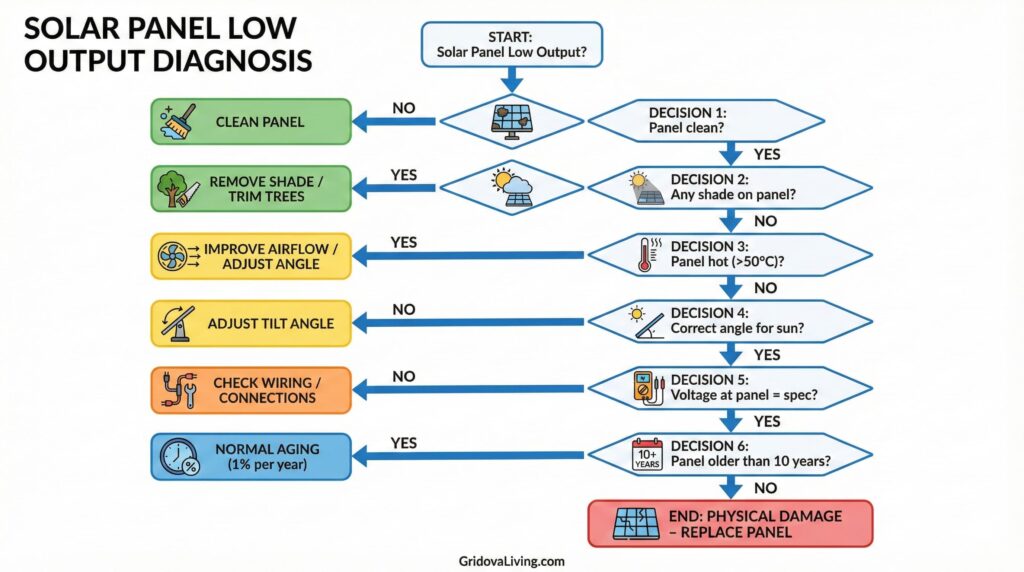
Here are the eight most common reasons solar panels underperform, with tested fixes for each.
Quick Diagnostic: Expected vs Actual Output
Before assuming your panel is broken, understand what “normal” output looks like:
Nameplate watts (100W) ≠ Real-world watts: Manufacturers rate panels under perfect lab conditions (STC: Standard Test Conditions). Real-world conditions rarely match STC, so expect 70-85% of rated output on average.
Example: 100W panel in real conditions:
• Perfect noon sun, 77°F, clean: 85-95W (normal)
• Hot day 95°F: 70-80W (temperature loss)
• Light clouds: 40-60W (cloud attenuation)
• Partial shade: 10-30W (disproportionate loss)
If your 100W panel produces 85W on a clear day, it’s working correctly. If it produces 30W with no clouds or shade, there’s a problem.
Reason #1: Dirt, Dust, and Debris (Most Common)
Dirty panels are the #1 cause of low output. Dust, pollen, bird droppings, and grime block sunlight from reaching solar cells. Even a thin layer reduces output 10-20%. Heavy buildup can drop production 40-50%.
How to diagnose: Visual inspection. If you can’t clearly see your reflection in the panel surface, it’s dirty. Light dust looks like a hazy film. Heavy dirt is visible as dark patches or spots.
Regional differences: Desert areas (Arizona, Nevada) accumulate dust rapidly—clean every 2-4 weeks. Rainy climates (Pacific Northwest) stay cleaner—every 6-12 months sufficient. Urban areas get more pollution buildup than rural.
The fix:
Turn off system (DC disconnect and inverter). Spray panels with garden hose—use RO or distilled water to avoid hard water spots. For stubborn grime, use soft microfiber cloth with mild soap (dish soap works). Rinse thoroughly. Avoid abrasive materials—they scratch anti-reflective coating.
Don’t use: Pressure washers (damage cells), harsh chemicals (degrade coating), hard brushes (scratch glass). Clean early morning or evening when panels are cool—cold water on hot panels can crack them.
Expected improvement: 10-25% output increase after cleaning dirty panels. Test before/after with multimeter or monitoring app to confirm.
Reason #2: Partial Shading (Disproportionate Impact)
Shade is counterintuitive. Covering 10% of a panel can reduce output by 50-80% because solar cells are wired in series. One shaded cell bottlenecks the entire string.
Common shade sources: Tree branches, roof vents, chimneys, nearby buildings, utility poles, antenna, solar panel frame shadows (poorly spaced arrays), accumulated snow on panel edges.
How to diagnose: Observe panels at different times of day. Shade moves as sun tracks across sky. Morning shade from east, evening shade from west. Use phone compass app to identify sun path. Take photos every 2 hours from 8am-4pm to document shade patterns.
The fix:
Trim vegetation: Remove or trim overhanging branches. Trees grow—what wasn’t shading panels last year might be shading them now.
Reposition panels: If portable/ground-mounted, move to unshaded location. Rooftop panels are fixed but tilt angle adjustment sometimes helps.
Install microinverters or power optimizers: These isolate shaded panels so one shaded panel doesn’t drag down entire array. Expensive retrofit ($150-300/panel) but worth it if shade is unavoidable.
Expected improvement: Eliminating shade can double or triple output. Partial shade from tree branch reduced my system from 800W to 200W. Trimmed branch, output jumped back to 750W immediately.
For complete shade analysis, see our solar system calculator with shade factor input.
Reason #3: High Temperature (Voltage Drop)
Solar panels hate heat. Higher temperatures reduce voltage, lowering power output. This surprises people—sunny hot days feel ideal for solar but panels produce less than sunny cool days.
Temperature coefficient: Most panels lose 0.3-0.5% power per °C above 25°C (77°F). On a 40°C (104°F) day, panels lose 15 × 0.4% = 6% just from temperature. At 50°C (122°F) panel surface temperature, loss reaches 10%.
How to diagnose: Use infrared thermometer to measure panel surface temperature. Above 50°C (122°F) = significant heat loss. Compare output on cool morning (20°C) vs hot afternoon (45°C)—afternoon will be 10-15% lower despite brighter sun.
The fix:
Improve airflow: Ground-mounted panels: raise 6-12 inches off ground for air circulation underneath. Rooftop panels: ensure 4-6 inch gap between panel and roof for ventilation.
Tilt adjustment: Increase tilt angle slightly (5-10°) to improve airflow and reduce direct heat absorption. Steeper angle sheds heat better.
Spray cooling (extreme climates only): Some Arizona installers spray panels with water during peak heat (2-4pm). Evaporative cooling drops surface temperature 10-15°C temporarily. Only works in low-humidity climates.
Accept the reality: Temperature loss is physics—you can minimize it but not eliminate it. Factor 10-15% heat loss into expectations for summer months.
Winter advantage: Cold boosts panel efficiency. Same panel produces 10-15% more power at 0°C than 25°C. This partially offsets shorter winter days.
Reason #4: Wrong Angle (Suboptimal Sun Exposure)
Panel angle dramatically affects output. Panels perpendicular to sun (90° angle) = 100% output. Panels at shallow angle or facing wrong direction = 40-70% output.
Optimal angles:
• Latitude = tilt angle (general rule)
• Adjust seasonally: Winter = latitude + 15°, Summer = latitude – 15°
• Fixed year-round: latitude angle compromise
Example: Phoenix (33° latitude):
• Summer optimal: 18° tilt
• Winter optimal: 48° tilt
• Year-round compromise: 33° tilt
How to diagnose: Use angle finder app (smartphone inclinometer) to measure current panel tilt. Compare to optimal angle for your latitude and season. More than 20° off optimal = significant loss.
The fix:
Adjustable mounts: Portable panels usually have kickstands—adjust twice yearly (spring/fall) for seasonal optimization. Ground mounts can be adjusted if designed for it.
Track the sun: Manual tracking (repositioning panel every 2-3 hours) increases daily output 20-30%. Automated trackers exist but expensive ($300-1,000)—only worth it for large systems.
Fixed rooftop panels: Can’t change angle easily. Accept compromise angle or consider tilt mounts during installation.
Expected improvement: Adjusting from flat (0°) to optimal angle (30-40°) increases output 25-40%. Adjusting from poor angle (60° in summer) to optimal (20°) gains 30-50%.
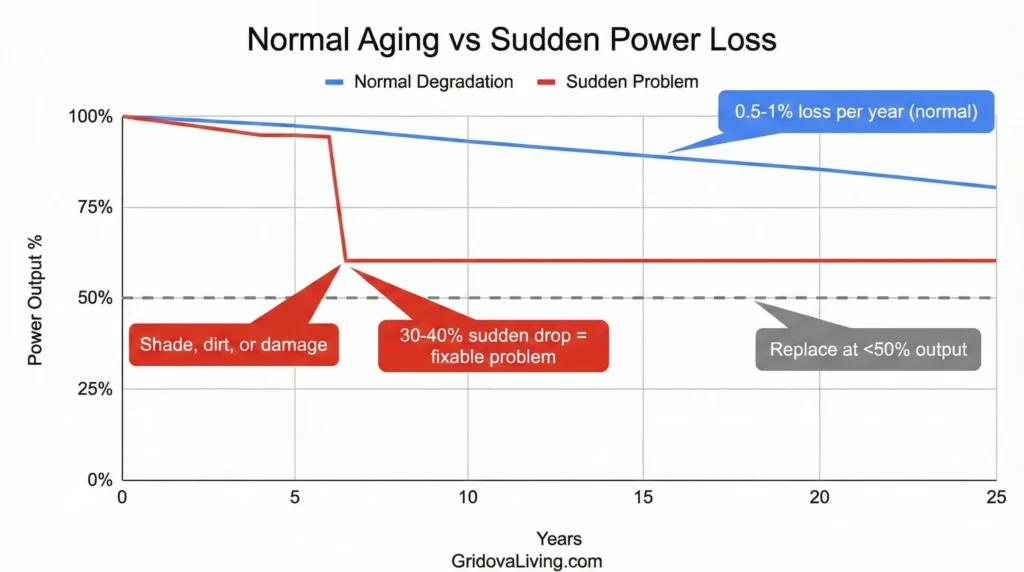
Reason #5: Aging and Degradation (Normal Wear)
Solar panels degrade slowly over time. Industry standard: 0.5-1% power loss per year. After 10 years, expect 5-10% less output than new. After 25 years, 10-20% less. This is normal, not a defect.
Accelerated degradation causes:
• Extreme temperature cycling (desert climates)
• Coastal salt air (corrosion)
• UV exposure (high altitude)
• Poor quality panels (cheap brands degrade faster)
How to diagnose: Compare current output to original baseline. If panel is 10 years old and produces 10% less than when new, that’s normal degradation. If it produces 30% less, there’s additional problem.
Check warranty: Most panels guarantee 80-90% output at 25 years. If degradation exceeds warranty curve, file claim.
The fix:
Can’t reverse aging. Gradual degradation is inevitable. Plan for it—size system 10-15% larger initially to account for future degradation.
If degradation is extreme (20%+ loss in 5 years), investigate other causes first (shading, dirt, temperature). If confirmed premature aging, contact manufacturer for warranty replacement.
When to replace: If panel output drops below 50% of rated capacity and fixes don’t help, replacement is more cost-effective than troubleshooting. Check our updated panel recommendations for efficient modern replacements.
Reason #6: Faulty Charge Controller or Inverter
Sometimes panel is fine but controller/inverter limits power. MPPT controllers maximize panel output. PWM controllers waste 20-30% of potential power. Inverter problems can bottleneck entire system.
How to diagnose: Test panel voltage/current at panel output (before controller) with multimeter. Compare to voltage/current at controller output. If panel shows 20V/5A (100W) but controller outputs 15V/3A (45W), controller is problem, not panel.
Common controller issues:
• Wrong settings (battery type mismatch)
• Undersized controller (can’t handle panel wattage)
• Damaged from lightning/power surge
• Firmware bugs (update often fixes)
The fix:
Check controller settings—verify battery chemistry setting matches actual battery (lithium vs AGM vs flooded). Update controller firmware if available. Reset controller to factory defaults and reconfigure.
If controller is undersized (30A controller with 40A panels), upgrade controller. If controller is damaged, replace with quality MPPT controller.
For complete system setup guidance, see our inverter and controller configuration guide.
Reason #7: Wiring Issues (Voltage Drop or Resistance)
Long cable runs, undersized wires, or corroded connections cause resistance, wasting power as heat instead of delivering it to battery.
Voltage drop formula: 10-foot run with 10A current through 14 AWG wire loses 0.5V. 30-foot run loses 1.5V. This matters—panel producing 20V arrives at battery as 18.5V, reducing charging efficiency.
How to diagnose: Measure voltage at panel output. Measure voltage at battery input. If difference exceeds 1-2V, you have excessive voltage drop.
The fix:
Shorten cable runs—position charge controller closer to panels. Upgrade wire gauge—use 10 or 12 AWG for long runs instead of 14 or 16 AWG. Clean all connections—corrosion adds resistance. Check MC4 connectors, terminal lugs, fuse holders.
Replace damaged cables—rodent damage, UV degradation, or physical wear creates high-resistance points.
Reason #8: Physical Damage (Cracks, Delamination, Hot Spots)
Physical panel damage reduces output. Microcracks are invisible initially but grow larger over time, disrupting electrical flow. Hot spots indicate localized cell failure.
Types of damage:
• Microcracks: Hairline cracks in cells (hard to see)
• Glass cracks: Visible cracks in front glass
• Delamination: Layers separating (bubbles, discoloration)
• Hot spots: Cells overheating (thermal camera reveals)
• Snail trails: Brownish discoloration (cosmetic, minimal impact)
How to diagnose: Close visual inspection in bright light. Look for cracks, discoloration, bubbles. Use thermal camera or infrared thermometer to detect hot spots (10-20°C hotter than surrounding cells = problem).
The fix:
Minor surface scratches: No fix needed, don’t affect output significantly.
Deep cracks or delamination: Can’t repair. File warranty claim if within warranty period (usually 10-25 years). Replace panel if out of warranty.
Hot spots: Sometimes caused by dirt/shade on specific cells—clean and check if hot spot persists. If hot spot remains after cleaning, cell is damaged—replace panel.
Prevention: Avoid walking on panels, placing heavy objects on them, or impact from hail/debris. Panels are durable but not indestructible.
How to Test Panel Output Properly
Equipment needed: Multimeter ($20-50). Optional: Clamp meter ($30-80) for current measurement.
Test procedure:
1. Disconnect panel from system (open DC disconnect)
2. Set multimeter to DC voltage (20V or 200V range)
3. Touch probes to panel output terminals (red = positive, black = negative)
4. Record open-circuit voltage (Voc) in full sun
Expected values:
• 100W 12V panel: 18-22V open circuit
• 100W 24V panel: 36-44V open circuit
• Values 10%+ below spec = problem
5. Reconnect panel to battery (through charge controller)
6. Measure current with clamp meter around positive wire
7. Record amps in full sun
Expected values:
• 100W panel: 5-6A typical
• Values 20%+ below spec = problem
Test at solar noon (12:00-1:00 PM) on clear day for accurate baseline. Morning/evening tests show lower output (normal).
When to Replace vs Repair
Repair-worthy issues:
• Dirty panels (clean)
• Shade (trim/reposition)
• Angle (adjust)
• Loose connections (tighten)
• Controller settings (reconfigure)
Replace-worthy issues:
• Physical damage (cracks, delamination)
• Extreme degradation (50%+ loss)
• Hot spots (cell failure)
• Panel older than 20 years with poor output
Cost consideration: Panels cost $0.50-1.50/watt now. 100W panel = $50-150. If repair requires professional service ($200-500), often cheaper to replace panel entirely.
Check warranty first—most panels have 10-25 year warranties. Manufacturer may replace free if defect is covered.
Preventing Low Output Issues
Quarterly maintenance routine:
• Clean panels (or after dust storms)
• Check for new shade sources (tree growth)
• Inspect connections for corrosion
• Review monitoring data for trends
Annual deep check:
• Test output with multimeter (baseline comparison)
• Thermal inspection (hot spots)
• Visual inspection for physical damage
• Controller/inverter firmware update
Proactive maintenance prevents 80% of low-output problems. Catching issues early (5-10% loss) is easier to fix than waiting until output drops 40-50%.
For comprehensive maintenance tips, see our solar panel cleaning and maintenance guide.
FAQ
Why does my solar panel produce less than rated watts?
Rated watts (STC: Standard Test Conditions) assume perfect lab conditions—25°C panel temp, 1000 W/m² irradiance, no shade, clean panel. Real-world conditions rarely match. Expect 70-85% of rated output on average. 100W panel producing 80-85W in bright sun is normal, not defective.
Can a solar panel lose efficiency over time?
Yes, panels degrade 0.5-1% per year naturally. After 10 years, expect 5-10% loss. After 25 years, 10-20% loss. This is normal aging, not failure. Premium panels (SunPower, LG) degrade slower (0.25-0.5%/year). Budget panels degrade faster (0.8-1.2%/year).
How do I know if my solar panel is damaged?
Test output with multimeter in full sun. Compare to rated voltage/current (check datasheet). If open-circuit voltage is 15%+ below spec, panel is likely damaged. Visual inspection for cracks, discoloration, or hot spots (use thermal camera) confirms damage.
Does cleaning solar panels really make a difference?
Yes, significantly. Light dust reduces output 5-15%. Heavy dirt/bird droppings reduce output 25-40%. Cleaning restores full output immediately. Test before/after—I measured 22% increase after cleaning 3-month dust buildup in Arizona. Rainy climates need less frequent cleaning.
Can a bad inverter cause low solar panel output?
Indirectly, yes. Inverter doesn’t affect panel output itself but affects how much power reaches your loads. Faulty inverter or charge controller can waste 20-40% of panel power through inefficiency or incorrect settings. Test panel output directly (before inverter) to isolate issue.
Why do solar panels produce less power when hot?
Higher temperatures reduce voltage. Solar cells have negative temperature coefficient (typically -0.3 to -0.5%/°C). At 50°C panel surface temp (common in summer), output drops 10% compared to 25°C. This is physics, not defect. Improve airflow to minimize but can’t eliminate heat loss.

Lio Verdan writes about solar energy, off-grid living, and eco-innovation through Gridova Living — a platform dedicated to energy freedom and sustainable technology.