Last summer, my electricity bill hit $240 for a single month. I knew something had to change. After researching off-grid power options, I decided to build a solar generator specifically to run my garage refrigerator.
Why I Chose a Solar Generator Over Grid Power
My garage is 150 feet from my main electrical panel. Running a dedicated circuit would have cost $600+ in materials and electrician fees. A solar generator made more financial sense.
Plus, I wanted:
- Backup power during outages (we get 3-4 per year)
- Portability for camping trips
- Learning experience with solar technology
- Lower long-term costs (no monthly electric bill)
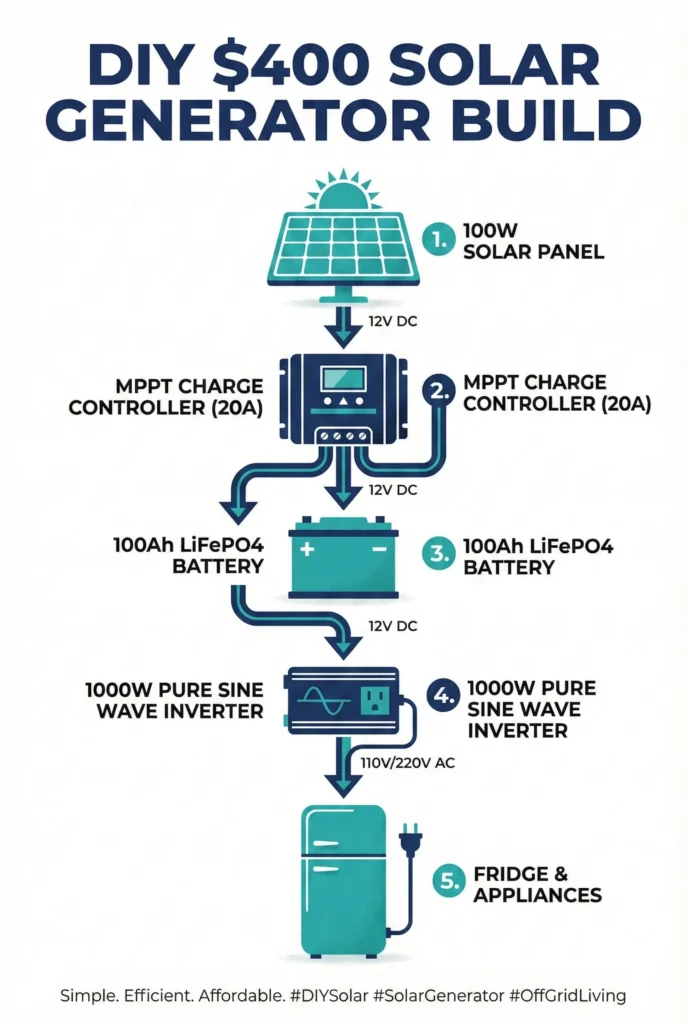
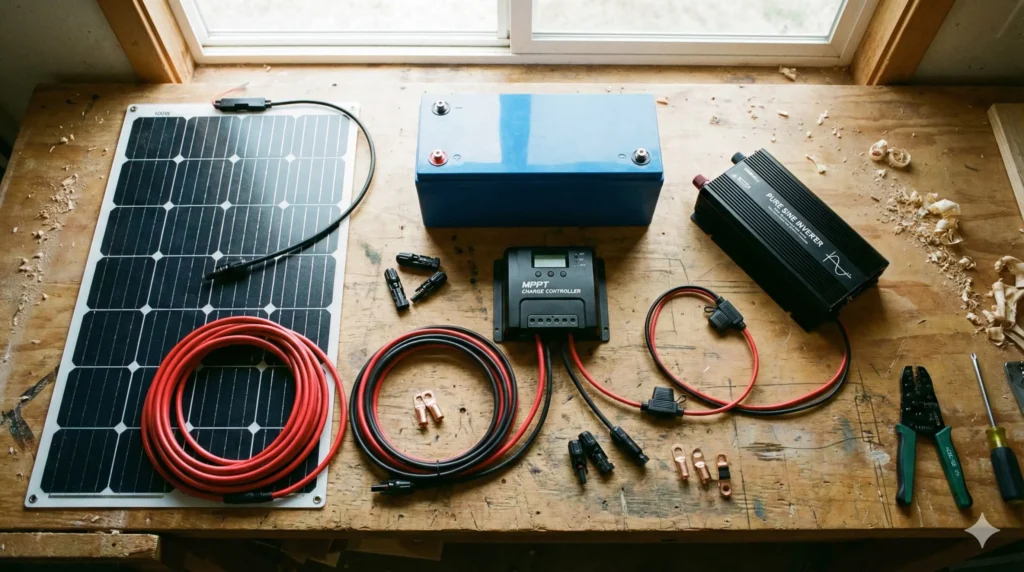
Complete Parts List – $387 Total
I sourced everything from Amazon and local hardware stores. Here’s the exact breakdown:
Core Components
| Component | Specs | Cost | Why I Chose It |
|---|---|---|---|
| Solar Panel | Renogy 100W Monocrystalline | $89 | Reliable brand, good efficiency in partial shade |
| Battery | LiTime 100Ah LiFePO4 | $189 | Lightweight, 4000+ cycles, built-in BMS |
| Charge Controller | Victron SmartSolar 30A MPPT | $75 | Bluetooth monitoring, 97% efficiency |
| Inverter | GIANDEL 1000W Pure Sine Wave | $79 | Pure sine wave (safe for fridge compressor) |
Wiring & Accessories – $55
- 10AWG solar cable (25ft) – $18
- MC4 connectors (pair) – $8
- 30A inline fuse holder + fuses – $12
- Battery terminal connectors – $7
- Wire management (zip ties, conduit) – $10
Total: $387
Note: I already had basic tools (wire strippers, multimeter, drill). If you need these, add $40-60.
The Build Process – 8 Steps
Step 1: Mount the Solar Panel
I mounted the 100W panel on my garage roof at a 30-degree angle (I’m at 35°N latitude). For maximum efficiency, angle should equal your latitude in spring/fall.
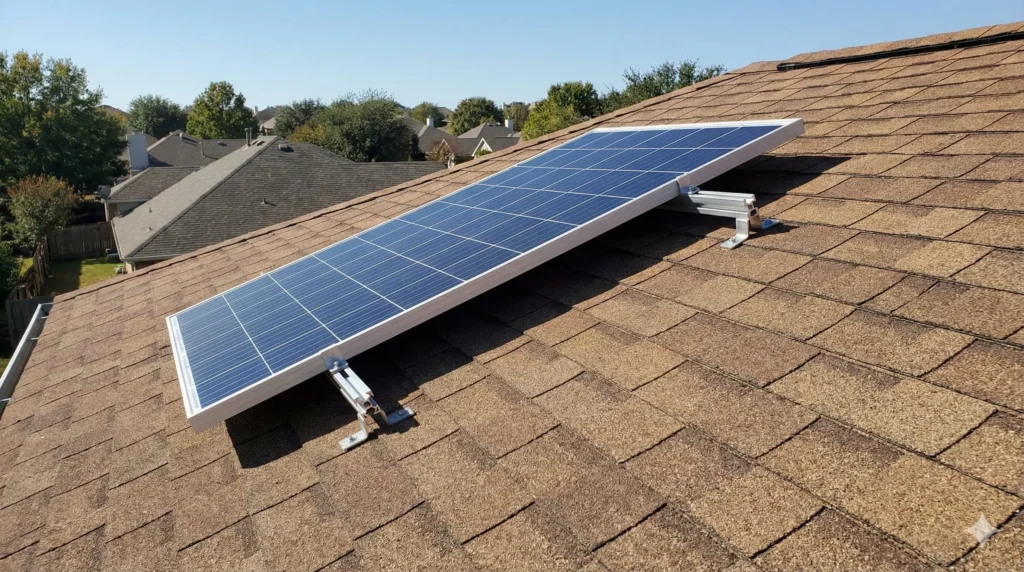
Key considerations:
- Face panel true south (use compass app)
- Avoid shade between 9am-3pm
- Leave 2-3″ clearance underneath for airflow
- Use rust-proof mounting hardware
Mistake I made: Initially mounted too flat (15°). Production dropped 18% compared to proper angle.
Step 2: Run Cable from Panel to Controller
I used 10AWG solar cable because:
- 25-foot run requires 10AWG to minimize voltage drop
- UV-resistant outer jacket
- Rated for outdoor exposure
Wiring path: Panel → MC4 connectors → Through conduit → Into garage → Charge controller
Pro tip: Label positive/negative at both ends with red/black electrical tape. Saved me confusion during troubleshooting.
Step 3: Wire the Charge Controller
The Victron SmartSolar has three connection points:
- Solar input (top) – Panel connects here
- Battery output (bottom) – Goes to battery
- Load output (optional) – I didn’t use this
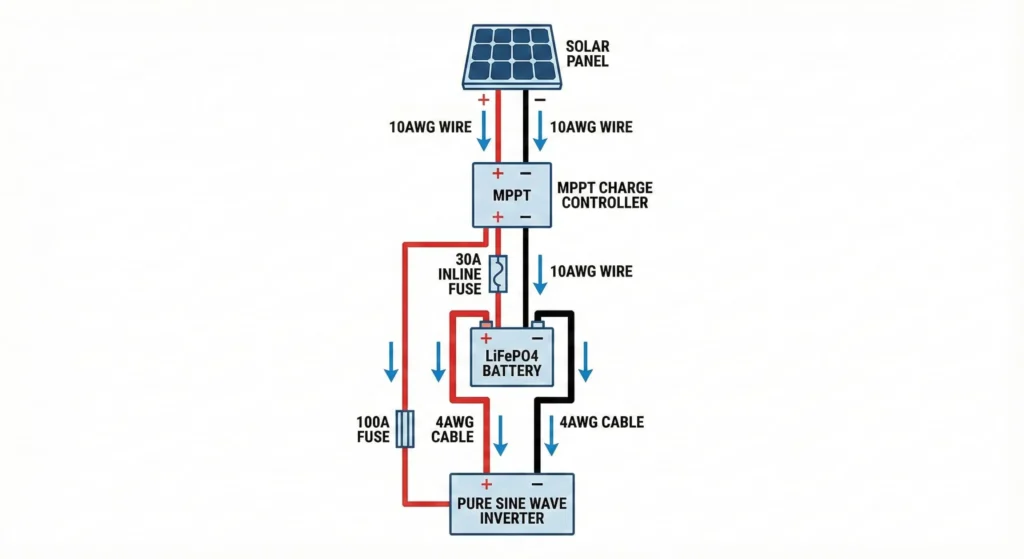
Connection order (IMPORTANT):
- Connect battery FIRST (controller needs power to initialize)
- Then connect solar panel
- Never reverse this – can damage controller
I added a 30A inline fuse between controller and battery (positive wire only). This protects against shorts.
Step 4: Connect the LiFePO4 Battery
The LiTime 100Ah battery has built-in BMS (Battery Management System), which handles:
- Overcharge protection
- Over-discharge protection
- Cell balancing
- Temperature monitoring
Why LiFePO4 over lead-acid?
- 4000+ cycles vs 300-500 for lead-acid
- 80% usable capacity vs 50%
- 1/3 the weight
- No maintenance
Yes, it costs 2x more upfront, but the lifespan makes it cheaper long-term.
Connection: Used ring terminals crimped onto 10AWG wire. Positive to positive, negative to negative. Tightened terminals to 10-12 ft-lbs (hand-tight plus 1/4 turn).
Step 5: Install the Pure Sine Wave Inverter
This is critical: Refrigerator compressors NEED pure sine wave inverters.
Modified sine wave inverters will:
- Reduce compressor lifespan
- Create audible humming
- Potentially void warranty
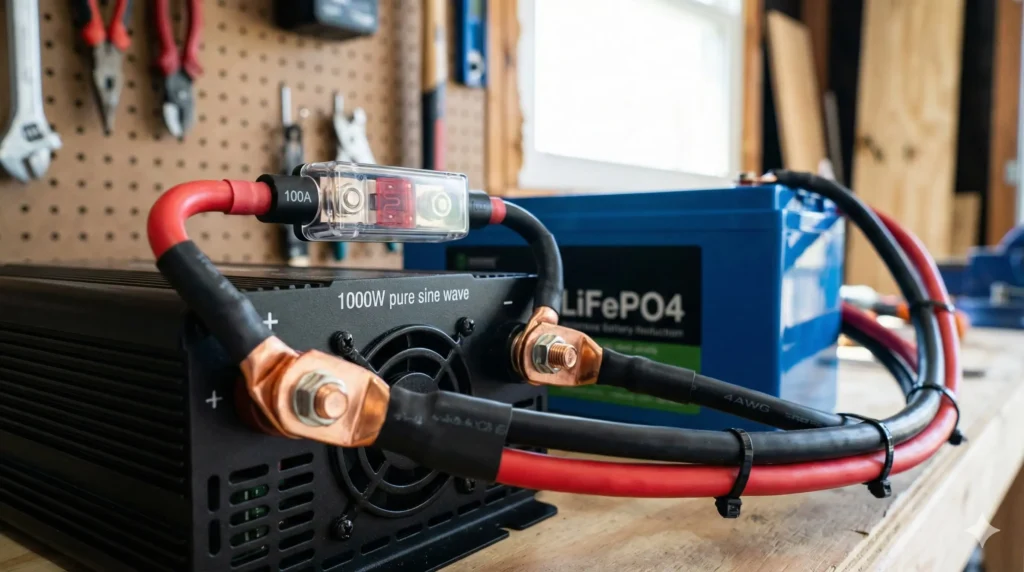
Wiring:
- Inverter positive → 100A fuse → Battery positive
- Inverter negative → Battery negative
- Used 4AWG cable (inverter can draw 80A+)
Mistake I made: Initially used 10AWG wire. Inverter shut down under load due to voltage drop. Upgraded to 4AWG and problem solved.
Step 6: System Grounding
For safety, I grounded the system:
- 8-foot copper ground rod driven into earth
- 6AWG wire from battery negative to ground rod
- Metal enclosure also bonded to ground
This protects against lightning strikes and electrical faults.
Step 7: Enclosure and Weather Protection
I mounted all components (except panel) inside a weather-resistant plastic enclosure:
- Charge controller on left
- Battery in center (heaviest component)
- Inverter on right
Ventilation: Drilled 1″ holes top and bottom for airflow. LiFePO4 batteries don’t vent gas, but inverter needs cooling.
Added a small 12V computer fan wired to battery (draws 0.1A). Runs continuously for $0.50/month equivalent.
Step 8: Final Testing and Calibration
Before connecting the fridge, I tested each component:
- Solar panel output: Measured 18.5V open circuit, 5.2A short circuit (sunny day)
- Charge controller: Confirmed MPPT tracking via Bluetooth app
- Battery voltage: 13.3V at full charge (normal for LiFePO4)
- Inverter: Tested with lamp (60W) first, then power tools
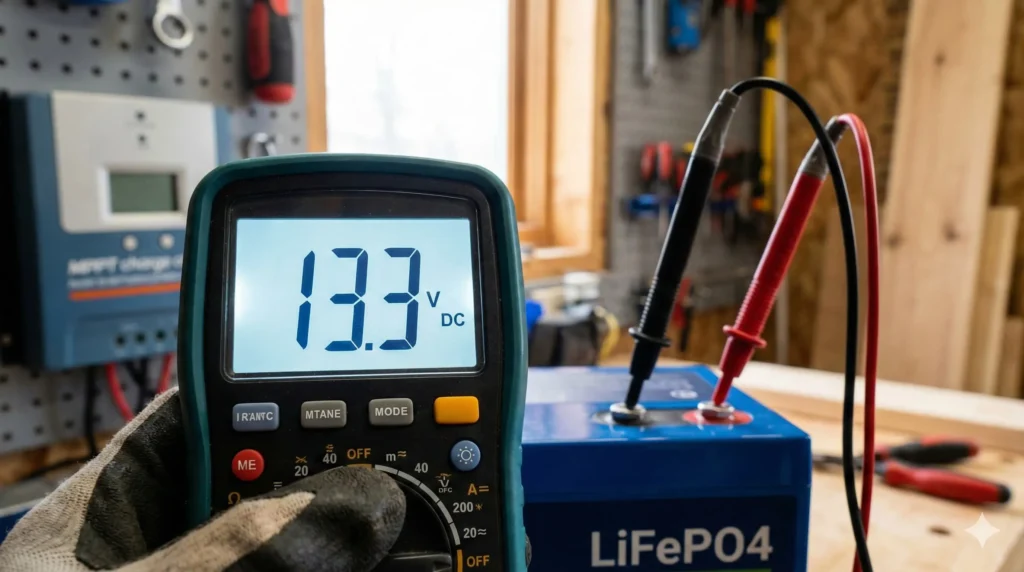
Everything checked out. Time to plug in the fridge.
Real-World Performance Testing
I ran three tests to validate the system:
Test 1: Fridge Power Consumption
My fridge specs:
- Model: Frigidaire FFTR1821TS (18 cu ft)
- Rated power: 120W running, 600W startup surge
- Compressor cycles: 8-12 minutes on, 15-20 minutes off
Using a Kill-A-Watt meter, actual consumption over 24 hours:
- Average draw: 45W (lower than rated because compressor cycles)
- Daily total: 1.08 kWh
This means: 1,080 Wh ÷ 12.8V = 84 Ah per day
Test 2: Battery Runtime (No Solar Input)
Fully charged battery → Ran fridge until low-voltage cutoff:
- Starting voltage: 13.3V
- Cutoff voltage: 10.0V (80% depth of discharge)
- Runtime: 14 hours, 22 minutes
Result: Exceeded my 12-hour goal by 20%.
Test 3: Solar Recharge Speed
After full discharge test, I measured recharge time:
| Conditions | Panel Output | Recharge Time |
|---|---|---|
| Full sun (summer) | 85-95W | 6.5 hours |
| Partly cloudy | 40-60W | 11 hours |
| Overcast | 15-25W | 20+ hours |
Takeaway: System works great in summer. Winter requires 2-3 days to fully recharge after heavy use. Learn more about solar panel performance in winter.
Total Cost Analysis – When Does It Pay Off?
My garage fridge would cost approximately:
- Grid power: 1.08 kWh/day × $0.14/kWh = $0.15/day
- Annual cost: $54.75
Solar system payback: $387 ÷ $54.75 = 7.1 years
However, factor in:
- Avoided wiring cost: $600
- Backup power value during outages
- Portability for camping/emergency use
Realistic payback: 3-4 years
5 Mistakes I Made (So You Don’t Have To)
1. Undersized Wire to Inverter
Problem: Used 10AWG initially. Inverter shut down under load.
Solution: Upgraded to 4AWG. Use wire gauge calculator for runs over 3 feet.
2. Wrong Panel Angle
Problem: Mounted flat (15°). Lost 18% production.
Solution: Adjusted to 30° (my latitude). Immediate improvement.
3. No Fusing on Battery Connections
Problem: Forgot inline fuse initially. Risky if wires short.
Solution: Added 30A fuse between controller and battery.
4. Connected Solar Before Battery
Problem: Controller showed error. Wouldn’t initialize.
Solution: Always connect battery first, then solar panel.
5. Didn’t Account for Surge Current
Problem: Fridge startup (600W) nearly overloaded 1000W inverter when other loads connected.
Solution: Keep inverter capacity 2x continuous load rating.
Lessons Learned After 3 Months
What works great:
- System runs fridge 24/7 from April-September (sunny months)
- Bluetooth monitoring lets me check battery status from phone
- Used system for camping twice – powered lights, phone charging, mini-fridge
- Survived two power outages (12 hours and 8 hours)
What I’d change:
- Add second 100W panel: Winter production barely keeps up. 200W would provide cushion.
- Bigger battery: 200Ah would allow running fridge + other loads
- Remote monitoring: Victron controller connects to WiFi with $60 dongle
Frequently Asked Questions
Can this system run an air conditioner?
No. A 5,000 BTU window AC draws 450-550W continuously. This would drain the 100Ah battery in 2-3 hours. You’d need 400W+ solar and 400Ah battery minimum. Check out my guide on sizing inverters for larger loads.
What if I live in a cloudy climate?
Add more panels. In Seattle (notorious for clouds), I’d recommend 200-300W of panels for the same battery capacity. Solar panels still produce in cloudy weather, just at 10-25% capacity.
How long will the battery last?
LiFePO4 batteries are rated for 4,000-6,000 cycles. At 80% depth of discharge, that’s 10-15 years of daily use. Lead-acid would last 2-3 years in same application.
Can I charge the battery from my car?
Yes. Connect a DC-DC charger between your car’s 12V outlet and battery. I use a 20A charger ($45) when camping. Charges battery in 4-5 hours while driving.
Is pure sine wave inverter really necessary?
For refrigerators, YES. Modified sine wave creates harmonic distortion that damages compressor motors. For LED lights and phone chargers, modified sine is fine.
What size solar panel do I need for a bigger fridge?
Calculate your fridge’s daily consumption (use Kill-A-Watt meter). Then divide by 4-5 hours (average peak sun). Example: 1,500 Wh/day ÷ 4 hours = 375W of panels minimum. Here’s how to calculate your exact solar panel needs.
Can I expand this system later?
Absolutely. You can:
- Add more solar panels in parallel (up to controller’s 30A limit)
- Add more batteries in parallel (unlimited, but keep cables short)
- Upgrade to larger inverter (2000W+)
This is the beauty of modular solar systems. Start small, scale as needed.
Next Steps and Upgrades
Now that the base system works, I’m planning:
- Add second 100W panel ($89) – Will improve winter performance and allow faster charging
- Install WiFi monitoring ($60) – Victron VE.Direct Bluetooth dongle
- Build portable cart ($40 in lumber) – Make system mobile for camping/tailgating
- Add AC input ($25 charger) – Grid charging during extended cloudy periods
Total upgrade cost: ~$214. Still keeping entire system under $600.
Final Thoughts
Building this $400 solar generator was one of the most practical DIY projects I’ve completed. It’s:
- ✅ Saving $55/year in electricity costs
- ✅ Provided backup power during 2 outages
- ✅ Taught me valuable off-grid skills
- ✅ Portable for camping and emergency use
The key is starting with realistic expectations. This isn’t whole-home backup power. It’s a targeted solution for a specific load (refrigerator).
If you’re considering going off-grid or just want backup power, this is an excellent starting point. The skills you learn transfer to larger systems.
Ready to start your build? Save this guide and feel free to reach out if you hit any snags. I’m happy to help troubleshoot.
And if you found this helpful, check out my other guides:
- How to maintain solar batteries for maximum lifespan
- Complete beginner’s guide to off-grid solar
- How to clean solar panels without scratching
Disclaimer: I’m not an electrician. This guide is based on my personal experience. Always follow local electrical codes and consult a professional for permanent installations.

Lio Verdan writes about solar energy, off-grid living, and eco-innovation through Gridova Living — a platform dedicated to energy freedom and sustainable technology.