When the Power Company Said “2 Weeks,” He Laughed—His DIY Solar Generator Was Already Running
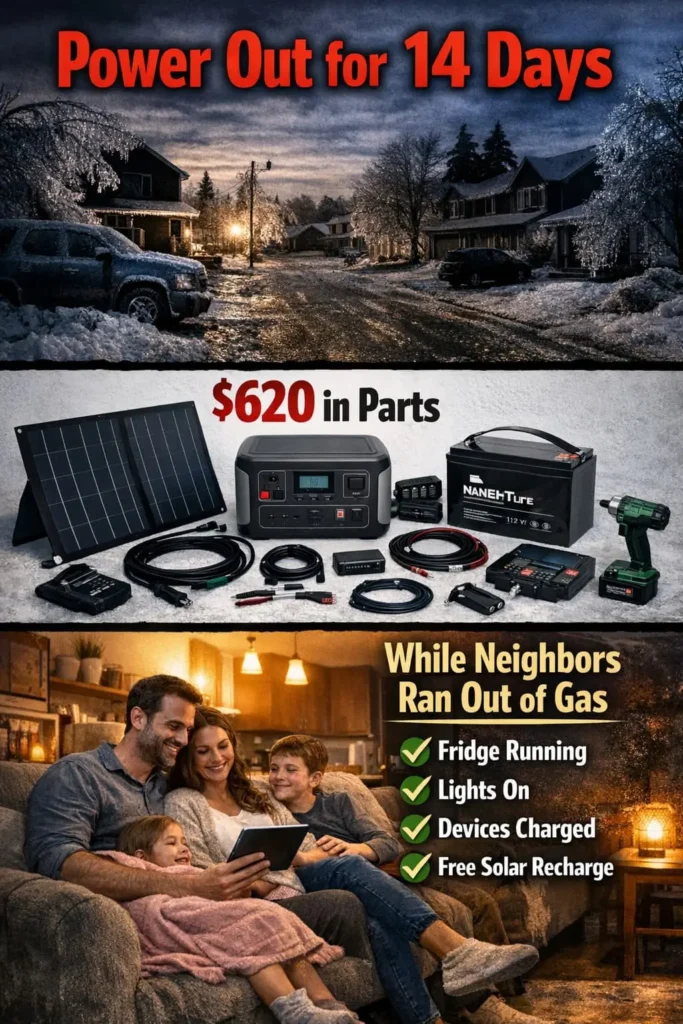
After an ice storm knocked out power for 14 days, one engineer built a $600 solar generator that kept his family warm, fed, and connected—while neighbors fought over generator fuel. Here’s his complete blueprint.
The Problem With Bought Solutions
- Commercial power stations like Jackery cost $500-$2,000 but can’t be expanded or repaired
- Gas generators require constant fuel ($50-$100 every 2-3 days during outages)
- Pre-built solar generators mark up 300-400% over DIY component cost
- You can’t customize capacity—you’re stuck with whatever they sell
- When something breaks, you buy a whole new unit instead of replacing one part
What if you could build the exact power system you need—for half the cost—and actually understand how it works?
One engineer did exactly that. And when the ice storm hit, he was the only one on his block with power.
The 14-Day Blackout That Changed Everything
Tom Richardson is a mechanical engineer in Oklahoma. Practical. Skeptical of “prepper paranoia.”
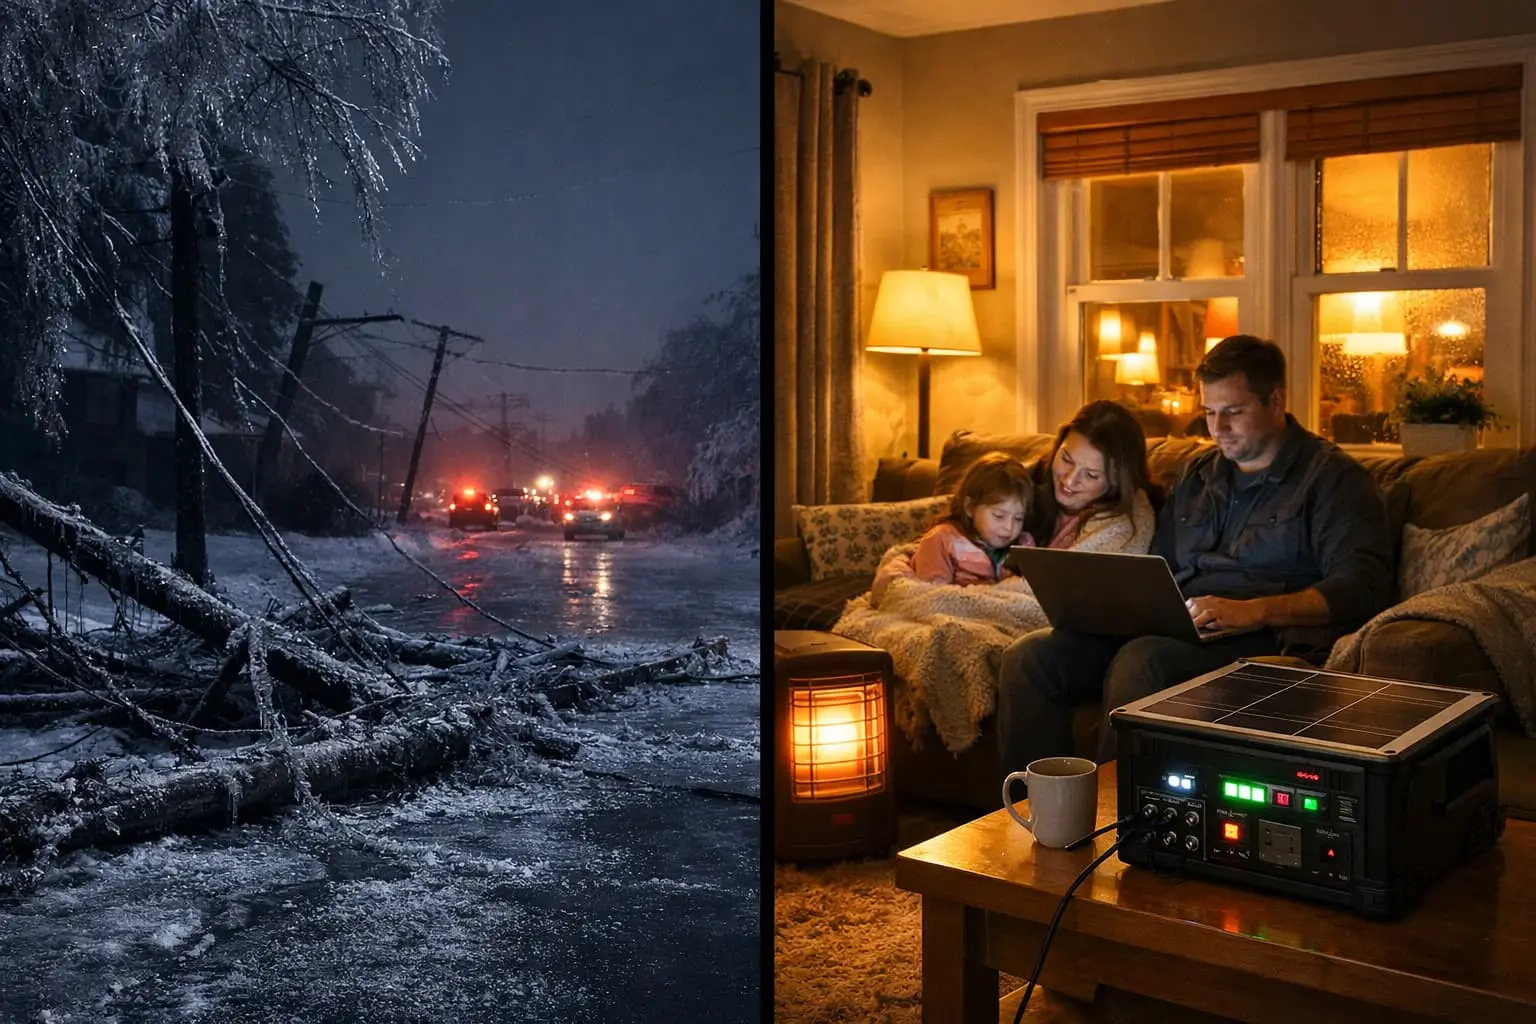
Then the ice storm of February 2024 hit.
Power lines snapped like toothpicks under the weight of 2 inches of ice. Transformers exploded. The entire grid went dark.
Day 1: Tom’s neighbors fired up their gas generators. Loud. Smelly. But warm.
Day 3: Gas stations ran out of fuel. Generators went silent one by one.
Day 5: Temperature inside Tom’s neighbor’s house: 38°F. People were desperate.
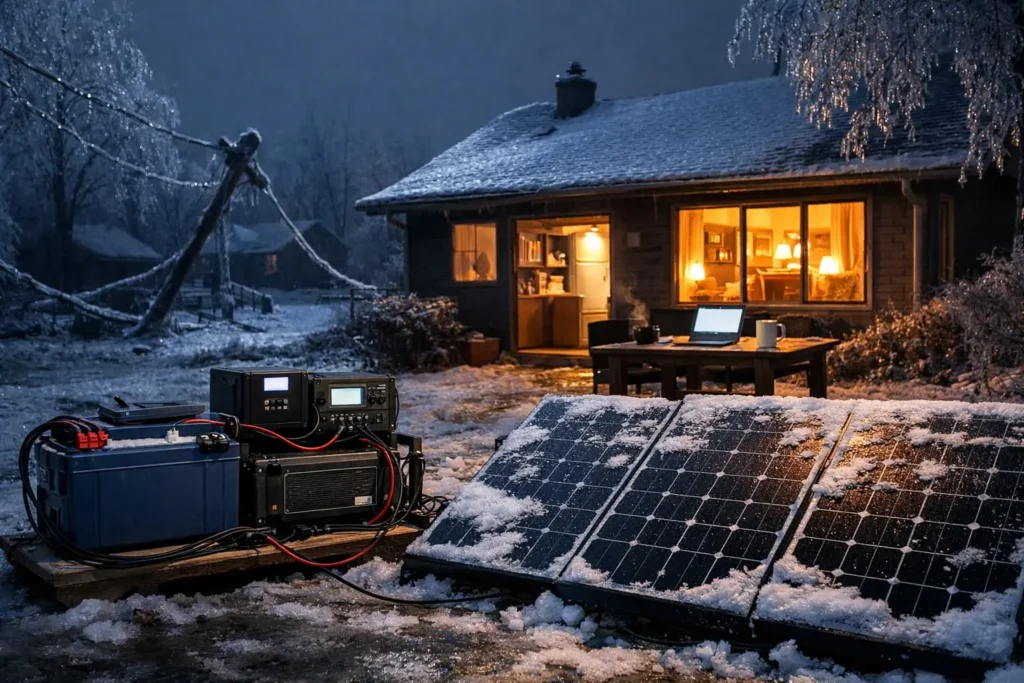
Tom’s house? A comfortable 68°F. Fridge running. WiFi working. Lights on.
Six months earlier, Tom had spent two weekends building a DIY solar generator in his garage.
Total cost: $620 in parts.
It sat unused in his basement for half a year. He’d almost sold it.
That $620 investment saved his family for two weeks straight.
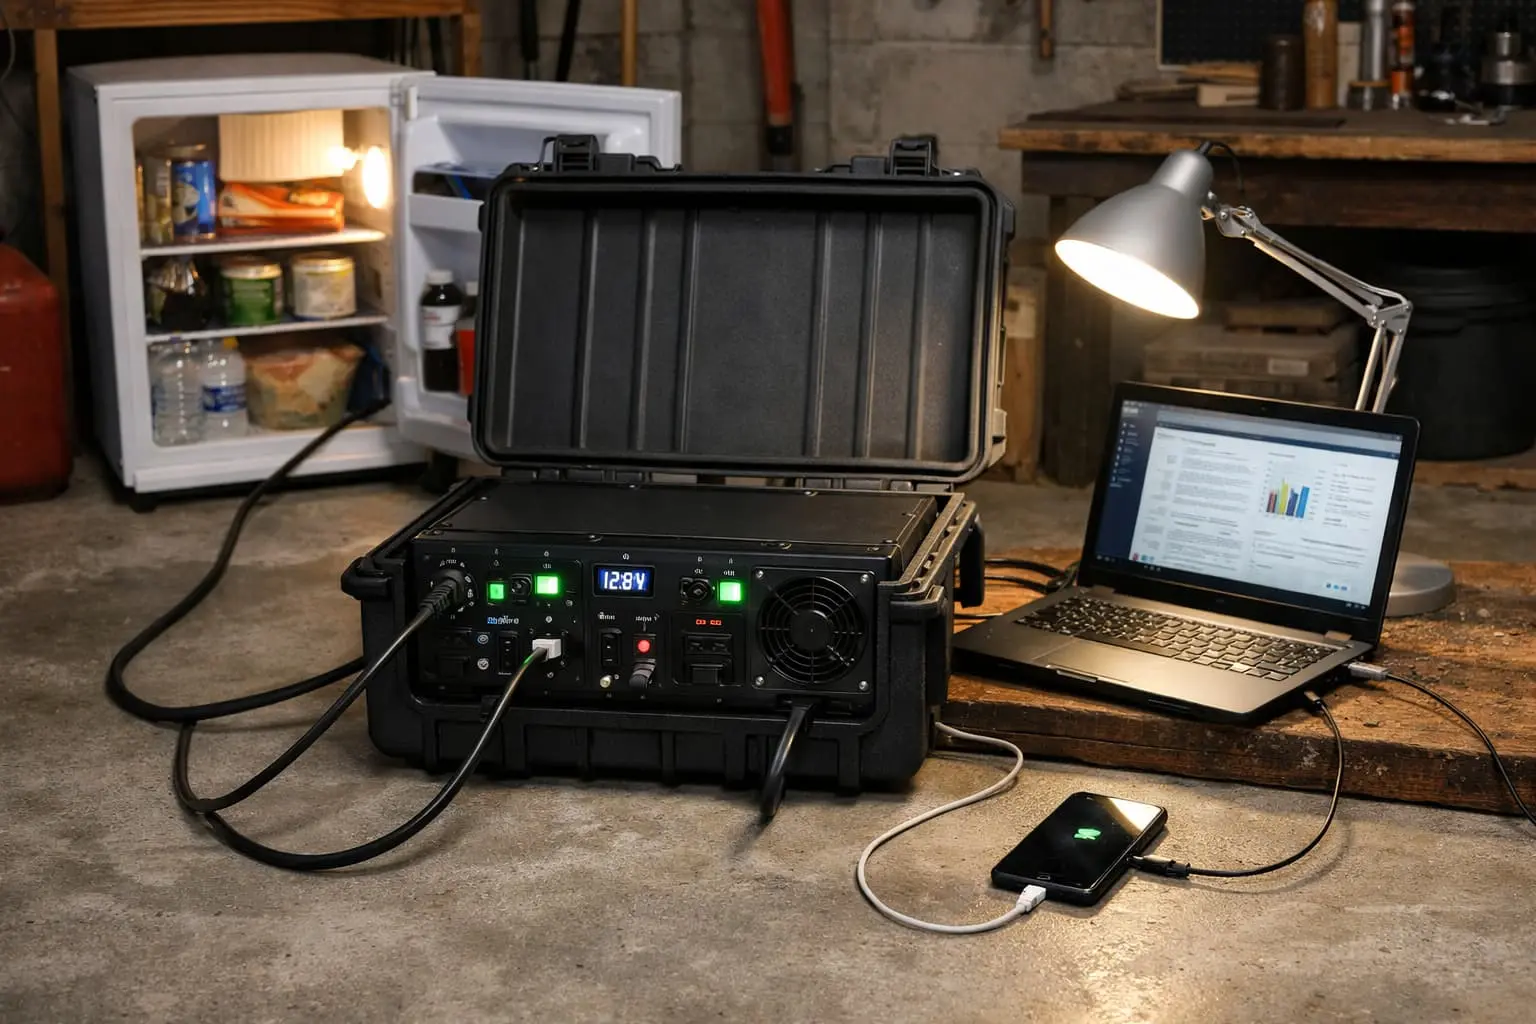
Here’s what he powered continuously:
- Space heater (750W) – 4 hours/day in one room
- Refrigerator (150W) – kept food from spoiling
- LED lights (50W total) – entire house illuminated
- WiFi router (10W) – stayed connected to emergency updates
- 2 laptops + 4 phones – family worked and schooled remotely
- Coffee maker (800W) – 15 minutes each morning (sanity preservation)
Recharged daily using 200W of solar panels on his south-facing roof.
While neighbors stood in line for 6 hours at the one open gas station, Tom sipped coffee and worked from home.
His neighbors thought he was rich. He showed them the $620 receipt.
Why DIY Beats Buying Pre-Built
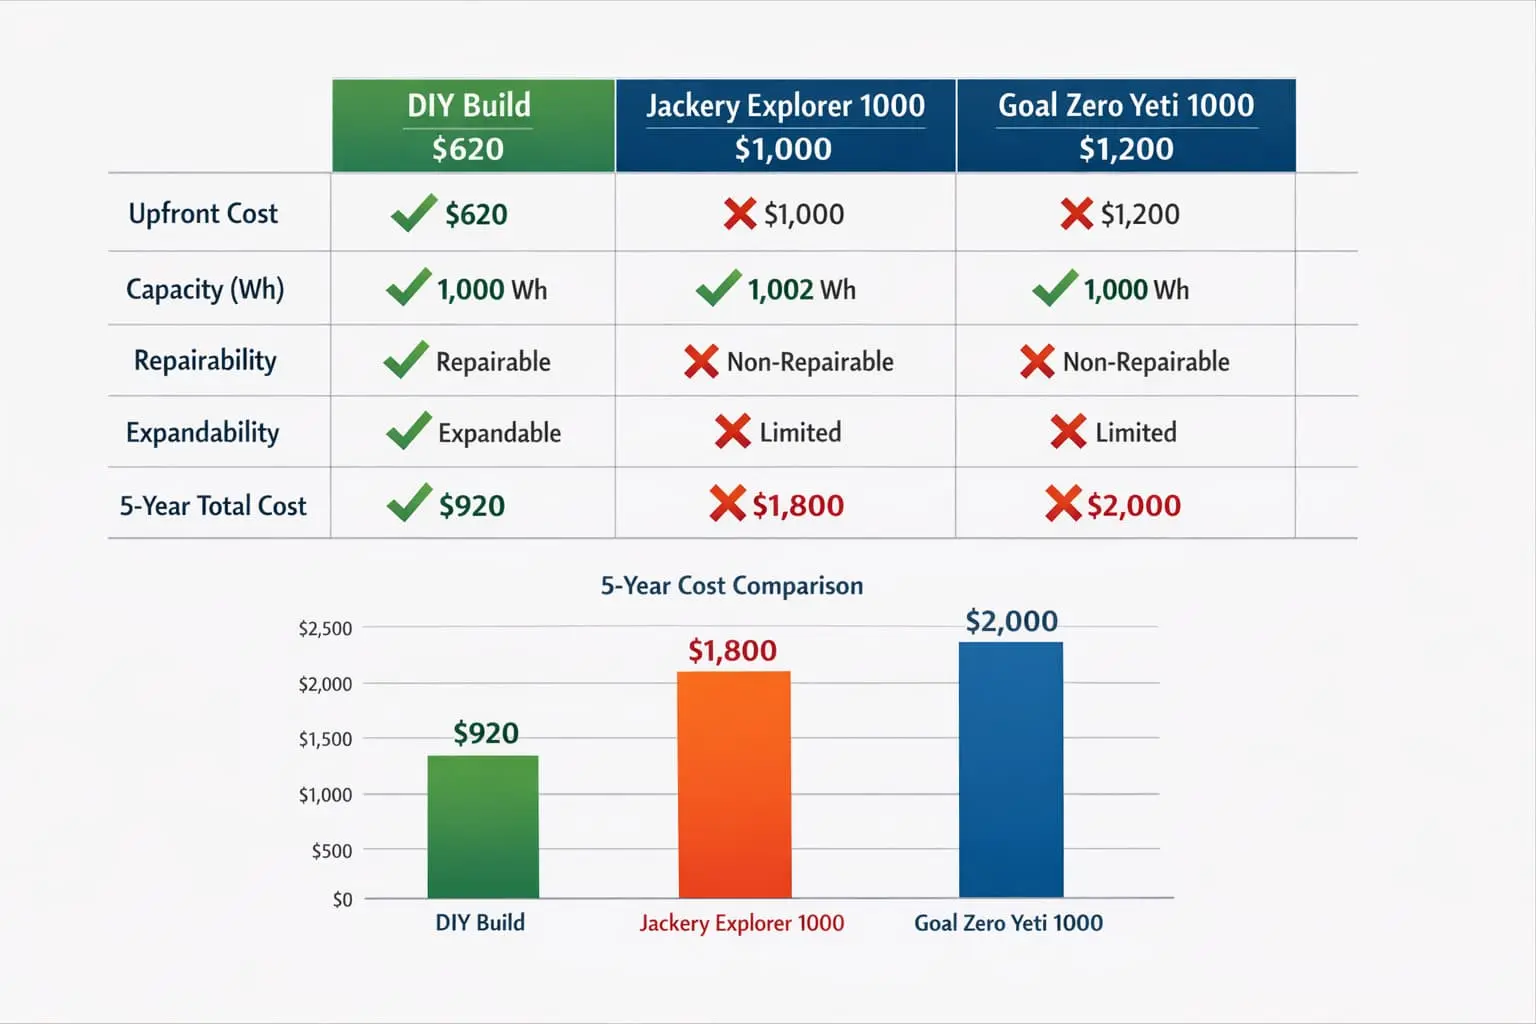
Tom compared his $620 DIY build to commercial alternatives:
Cost Comparison: DIY vs Commercial
Tom’s DIY Solar Generator ($620):
- ✅ 600Wh battery capacity (expandable to 1200Wh for $200 more)
- ✅ 1000W pure sine inverter (runs anything)
- ✅ 200W solar input (expandable to 400W)
- ✅ Replaceable parts (battery lasts 10+ years, then swap for $150)
- ✅ Customizable—add capacity as needed
Jackery Explorer 1000 ($1,000):
- ❌ 1000Wh capacity (not expandable)
- ❌ Fixed 1000W inverter
- ❌ When battery dies (8-10 years), throw away entire $1,000 unit
- ❌ Can’t repair—proprietary design
Goal Zero Yeti 1500X ($2,000):
- ❌ 1500Wh capacity (good, but costs 3x Tom’s build)
- ❌ Same repairability issue
- ❌ You’re paying $1,400 for brand name and plastic case
Tom’s advantage: He understands his system. When something breaks, he fixes it. Not throws it away.
⚡ See the Exact Components Tom Used (Amazon Links)
✓ Complete Parts List · ✓ Step-by-Step Instructions · ✓ Under $650 Total
What You Actually Need (Tom’s Exact Build)
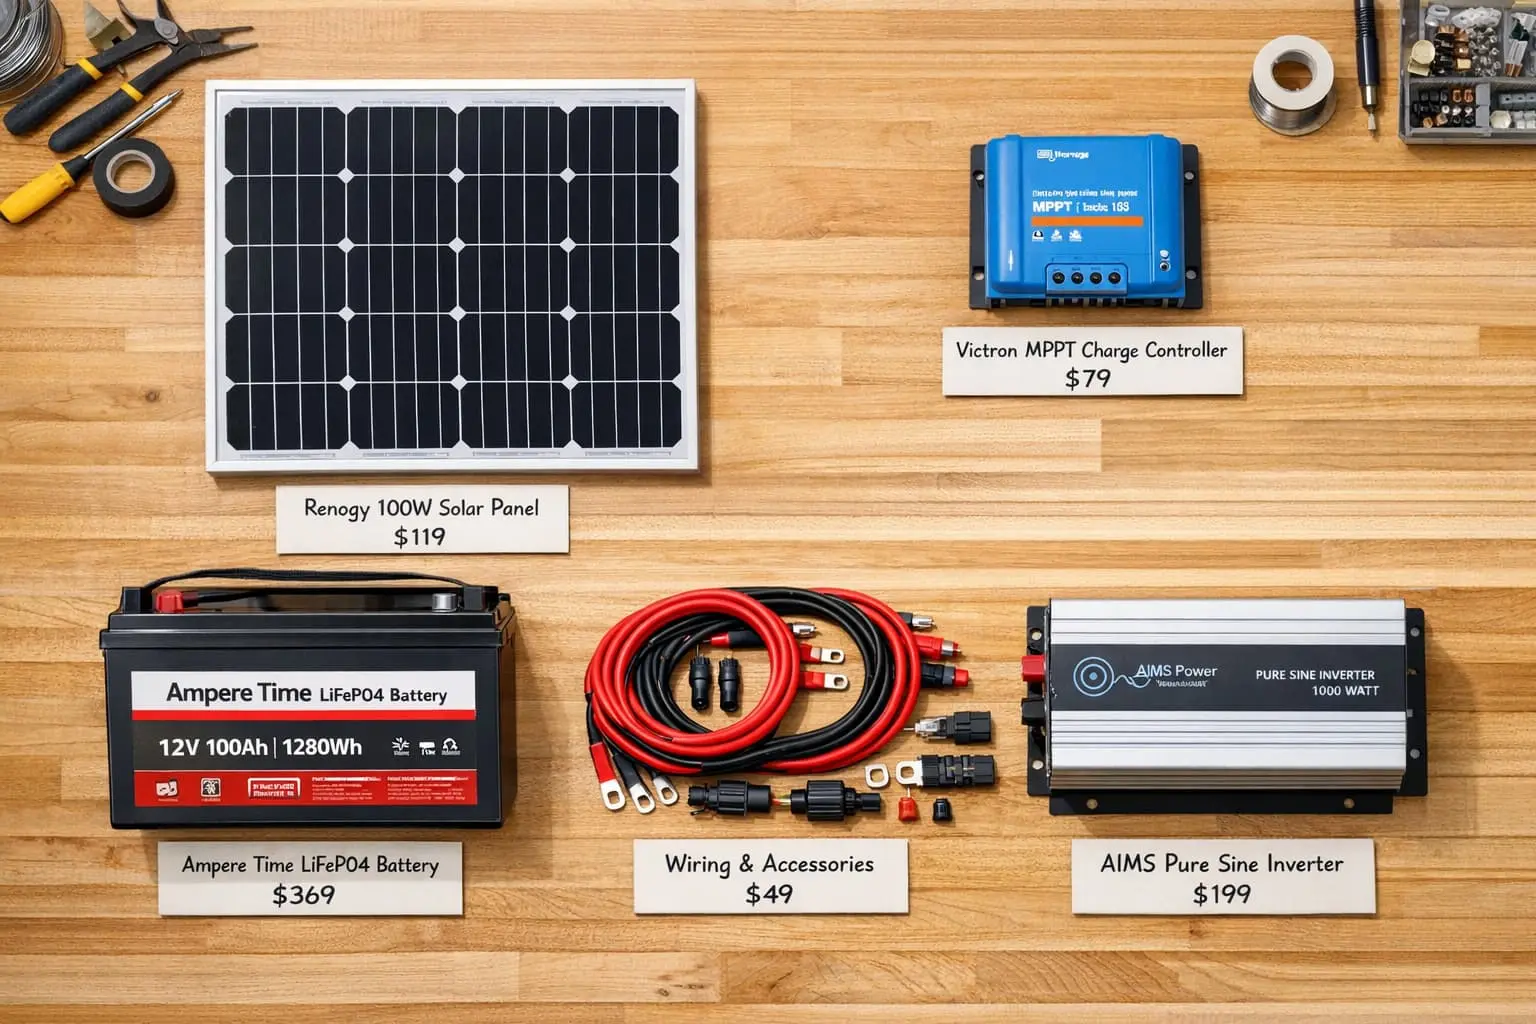
Tom’s system uses 5 main components. Here’s what he bought and why:
1. Solar Panel: Renogy 100W (×2 panels) – $300
Why this one: Renogy is proven reliable. Mono-crystalline = works in partial shade. Two panels give 200W total—charges battery in 4-5 hours direct sun.
Alternatives: Single 200W panel works too, but two 100W panels are more portable and easier to angle.
→ Get Renogy 100W Panel on Amazon (Prime)
✓ 25-year warranty · ✓ Weather-resistant · ✓ USA customer service
2. Charge Controller: Victron SmartSolar MPPT 100/20 – $150
Why this one: MPPT (Maximum Power Point Tracking) = 20-30% more efficient than cheap PWM controllers. Bluetooth app shows real-time charging data. Worth the extra $50 over generic brands.
Tom’s experience: “I can check battery status from my phone. During the outage, I knew exactly how much power I had left—no guessing.”
→ Get Victron MPPT Controller on Amazon
✓ 5-year warranty · ✓ Bluetooth monitoring · ✓ Prevents overcharge
3. Battery: Ampere Time 12V 50Ah LiFePO4 – $200
Why this one: LiFePO4 (not regular lithium) = 10+ year lifespan, 3000+ cycles, safe chemistry (won’t catch fire like laptop batteries).
Capacity explained: 50Ah × 12V = 600Wh usable power. That’s:
- Fridge: 6-8 hours
- Laptop: 10 charges
- LED lights: 30+ hours
- Phone: 60 charges
Why not lead-acid? Lead-acid is cheaper ($100) but lasts 2-3 years, weighs 40 lbs, and only gives you 50% usable capacity. LiFePO4 gives 90% usable capacity and lasts 10 years. Do the math.
→ Get Ampere Time LiFePO4 Battery on Amazon
✓ 10-year lifespan · ✓ 3000+ cycles · ✓ Built-in BMS protection
4. Inverter: AIMS Power 1000W Pure Sine Wave – $150
Why pure sine wave matters: “Modified sine wave” inverters cost $50 but damage electronics over time. Pure sine = identical to wall power. Safe for laptops, medical devices, anything with a motor.
1000W capacity: Run a space heater (750W), coffee maker (800W), or power tools. Not simultaneously, but that’s what the ice storm taught Tom mattered.
→ Get AIMS 1000W Inverter on Amazon
✓ Pure sine wave · ✓ 2000W surge · ✓ Low idle draw
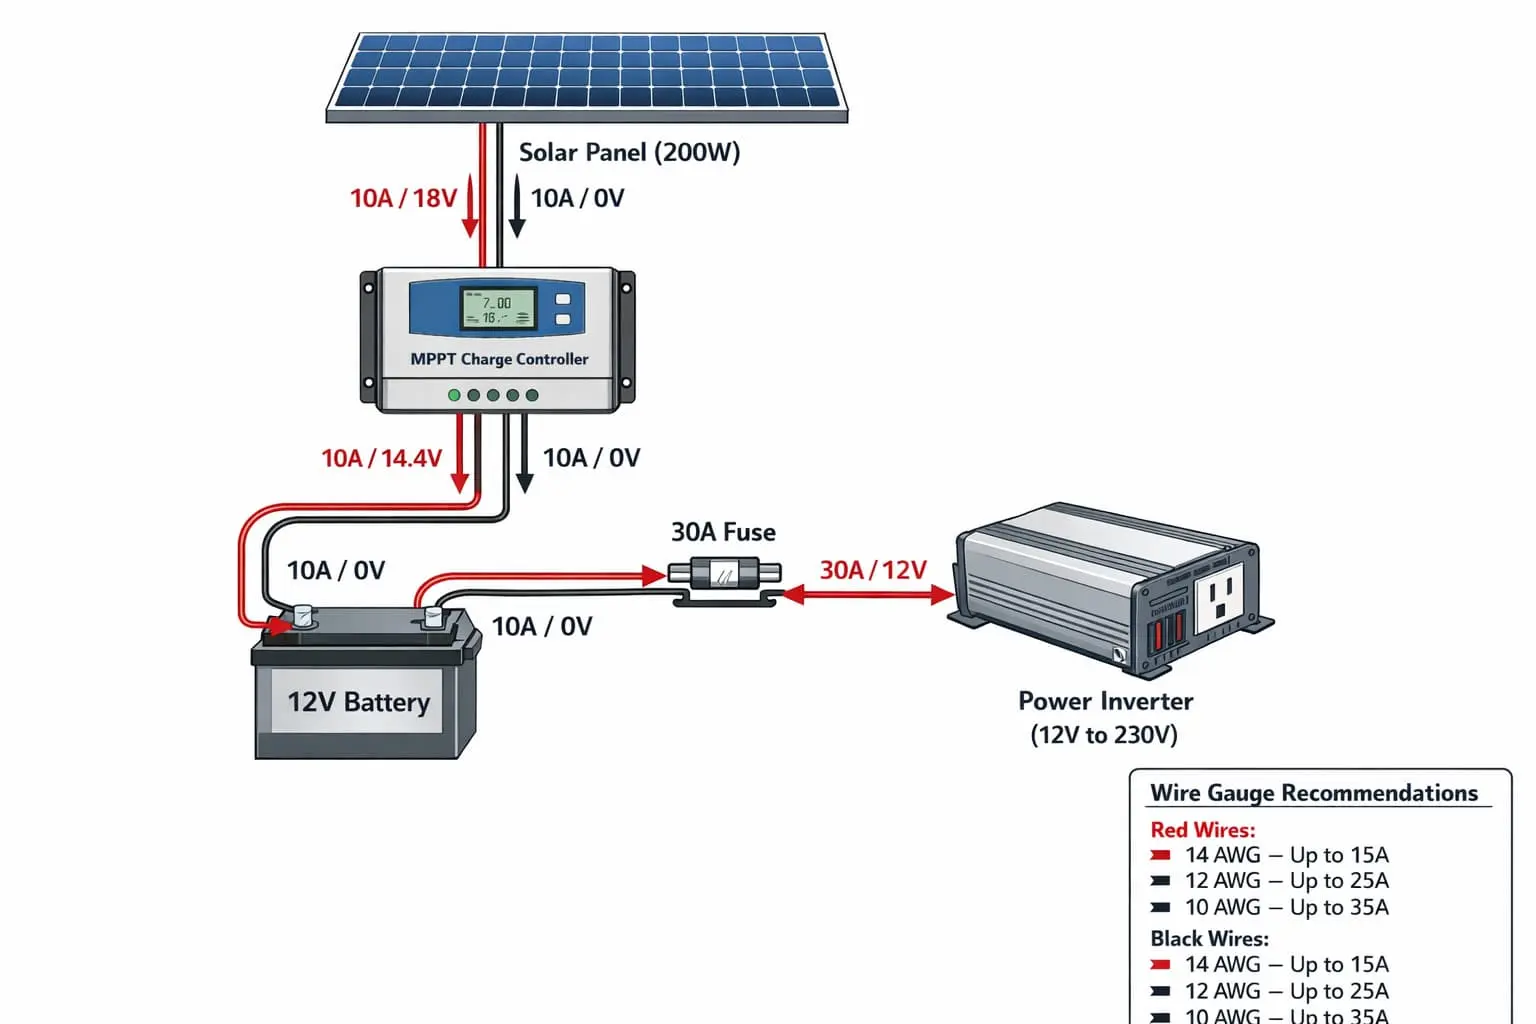
5. Wiring & Safety: Fuses, Cables, MC4 Connectors – $70
What Tom bought:
- Inline fuse holder + 50A fuse ($15)
- 10 AWG red/black cable, 10 feet each ($20)
- MC4 solar connectors ($10)
- Anderson Powerpole connectors ($15)
- Heat shrink tubing ($10)
Why fuses matter: During a short circuit, a $2 fuse blows instead of your $200 battery catching fire. Tom’s rule: “Fuses are cheaper than fire extinguishers.”
Total Cost: $620 (prices as of Jan 2026)
Compare to Jackery 1000: $1,000 | Goal Zero Yeti 1000: $1,200
Step-by-Step: Building Your Solar Generator (Tom’s Method)
Time required: 3-4 hours (one weekend afternoon)
Skill level: If you can change a car battery, you can build this
Tools needed: Screwdriver, wire strippers, multimeter ($15 on Amazon)
Step 1: Connect Solar Panel to Charge Controller
- Panel positive (red) → Controller “PV+” terminal
- Panel negative (black) → Controller “PV-” terminal
- Important: Do this LAST (after battery is connected) or cover panel to prevent power surge
Step 2: Connect Battery to Charge Controller
- Battery positive → Controller “BAT+” terminal
- Battery negative → Controller “BAT-” terminal
- Add inline fuse on positive wire between battery and controller (critical safety step)
Step 3: Connect Inverter to Battery
- Battery positive → Fuse (50A) → Inverter positive terminal
- Battery negative → Inverter negative terminal
- Wire gauge: Use 10 AWG minimum (handles 1000W safely)
- Keep wires short: Under 3 feet reduces voltage drop
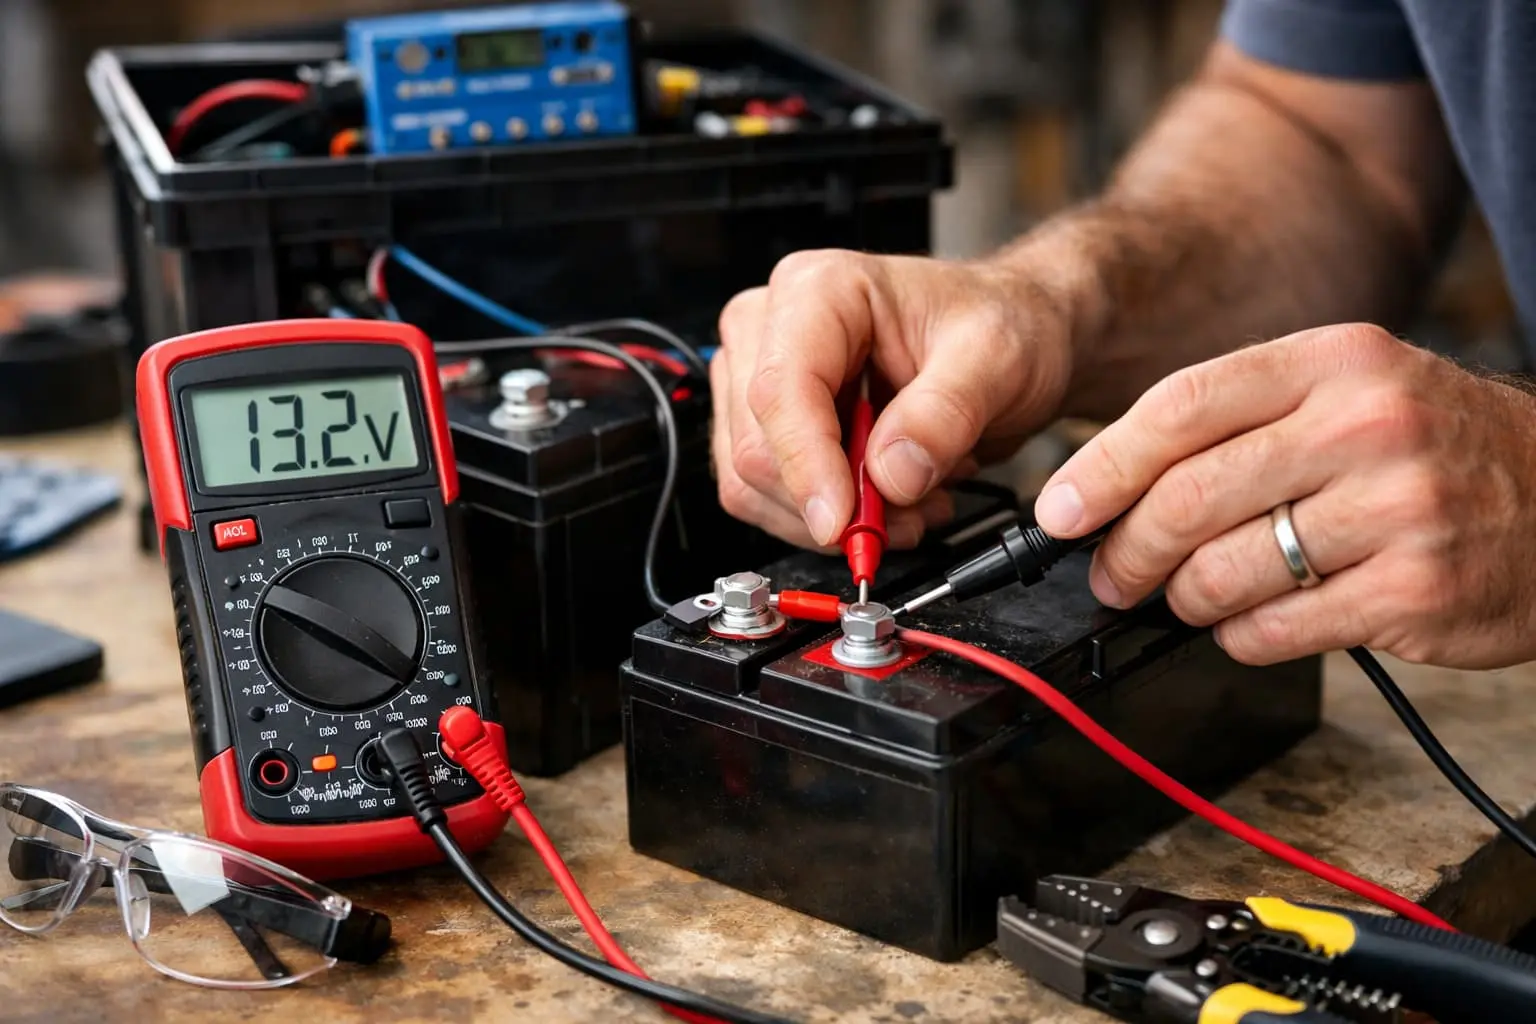
Step 4: Test Before Connecting Load
- Use multimeter: Battery should read 12.8-13.2V when fully charged
- Turn on inverter: Should show green light, no beeping
- Plug in a lamp: If it lights, you’re golden
Step 5: Enclose in Portable Case (Optional)
- Tom used a $30 plastic storage bin from Home Depot
- Drilled holes for cable pass-throughs and ventilation
- Added a voltmeter display ($12) on the outside to check battery level
- Result: Looks professional, portable, weather-resistant
⚠️ Tom’s Safety Warning: “Never connect or disconnect solar panels in direct sunlight—they’re producing voltage that can arc and damage your controller. Cover the panel or do it in shade/evening.”
What Tom Learned During the 14-Day Outage
Day 3 Discovery: Battery capacity is everything
“I originally built this with a 30Ah battery ($150). On day 3, I realized it wasn’t enough to run the fridge overnight. Upgraded to 50Ah for $200. That extra $50 made the difference between spoiled food and fresh meals. If you’re on the fence between 30Ah and 50Ah—get the 50Ah.”
Day 7 Revelation: Solar angle matters more than you think
“I set up panels on my roof at a fixed angle. Big mistake. On partly cloudy days, I got maybe 50W instead of 200W. Day 7, I propped them at 45° facing south and got 180W even with clouds. Adjustable angle = game changer.”
Day 10 Realization: LED lights use almost nothing
“I ran six LED bulbs (60W total) for 4 hours every night. Used maybe 10% of my battery. Modern LEDs are so efficient, lighting is basically free. Don’t waste battery on old incandescent bulbs.”
Day 14 Victory: My neighbors wanted to buy my design
“After two weeks, power finally returned. Four neighbors asked me to build them solar generators. I sent them the parts list instead. Two of them built their own. One guy spent $1,200 on a Jackery the next day. His choice, but he could’ve saved $600.”
Real-World Power Calculations (What Can You Actually Run?)
Tom’s 600Wh battery (50Ah × 12V) provides realistic runtime for common devices:
| Device | Power Draw | Runtime on Full Battery |
|---|---|---|
| LED Lights (6 bulbs) | 60W total | 8-10 hours |
| Laptop | 60W | 8-10 hours work time |
| Smartphone Charging | 10W | 60 full charges |
| WiFi Router | 10W | 50+ hours |
| Mini-Fridge | 100W (cycling on/off) | 12-16 hours |
| Full-Size Fridge | 150W (cycling) | 8-10 hours |
| Space Heater (low) | 750W | 40 minutes continuous |
| Coffee Maker | 800W | 30-40 minutes (multiple brews) |
| CPAP Machine | 40W | 12-15 hours (2-3 nights) |
| TV (LED 32″) | 50W | 10-12 hours |
Tom’s daily routine during outage:
- Morning (7-9 AM): Coffee maker (15 min), lights, laptop, phone charging
- Daytime: Fridge running, WiFi on, solar recharging battery
- Evening (6-10 PM): Lights, TV, space heater (1 hour in bedroom)
- Overnight: Fridge only
✅ Tom’s Efficiency Tip: “Don’t run everything at once. Prioritize. Make coffee, THEN charge laptop. Run space heater for 1 hour before bed, then turn it off. Smart power management means your battery lasts days, not hours.”
Expandability: Growing Your System
Tom’s original $620 build was just the beginning. Here’s how he expanded:
Option 1: Double Battery Capacity (+$200)
Add a second 50Ah battery in parallel:
- Total capacity: 1200Wh (double runtime)
- Connect positive to positive, negative to negative
- Same charge controller and inverter
- Tom did this after the ice storm—now runs 2 days between recharges
Option 2: More Solar Input (+$150-300)
Add 2 more 100W panels:
- Total: 400W solar input
- Recharge time: 2-3 hours instead of 4-5
- Better performance on cloudy days
- Requires upgrading to Victron 100/30 controller ($180)
Option 3: Bigger Inverter (+$100)
Upgrade to 2000W inverter if you need to run:
- Full-size refrigerator + microwave simultaneously
- Power tools (drill, saw)
- Window AC unit (small)
Tom’s plan: “I’m adding a second battery this spring. Total investment will be $820 for a 1200Wh system. That’s still cheaper than a Jackery 1000.”
💪 Start with the Basic Build, Expand Later
✓ $620 Gets You Started · ✓ Add Capacity Anytime · ✓ Total Control
Common Mistakes (And How Tom Avoided Them)
❌ Mistake 1: Undersized Wires
The problem: Using 14 or 16 AWG wire to save $10. Result: voltage drop, heat buildup, fire risk.
Tom’s fix: Used 10 AWG for all battery-to-inverter connections. “Wire is cheap. House fires are expensive.”
❌ Mistake 2: No Fuses
The problem: Skipping inline fuses because “it’s only 12V.” But 1000W at 12V = 83 amps. A short circuit can melt wires instantly.
Tom’s fix: 50A fuse between battery and inverter, 20A fuse between battery and controller. “$5 in fuses vs. $200 battery replacement.”
❌ Mistake 3: Modified Sine Wave Inverter
The problem: “Saved” $100 buying modified sine instead of pure sine. Laptop charger buzzed, fan motor ran hot.
Tom’s fix: Returned it, bought pure sine. “Some things aren’t worth cheaping out on.”
❌ Mistake 4: No Ventilation
The problem: Sealed battery and inverter in airtight box. Inverter overheated and shut down after 30 minutes.
Tom’s fix: Drilled 20 ventilation holes (1″ diameter) on sides of case. Inverter runs cool now.
DIY vs Pre-Built: The Honest Truth
When DIY makes sense:
- ✅ You want to save 40-50% over commercial units
- ✅ You might expand capacity later
- ✅ You like understanding how things work
- ✅ You’re comfortable with basic wiring (or willing to learn)
- ✅ You value repairability over warranty
When to buy pre-built:
- ❌ You need it TODAY (emergency already happening)
- ❌ You’re uncomfortable with any electrical work
- ❌ You value warranty/support over cost savings
- ❌ You want plug-and-play simplicity
Tom’s take: “If you have two free afternoons and can follow instructions, build it yourself. If you want to order something Friday and have it Saturday, get a Jackery. Both work. One costs less.”
Related: Pair Your Generator with These Systems
Tom’s DIY solar generator works even better when combined with:
- Portable Solar Chargers – Keep phones topped off without draining main battery
- Joseph’s Well Water Generator – Add water independence to your power independence
- Solar Panels 101 Guide – Deep dive on panel selection and positioning
- Battery Maintenance Guide – Keep your LiFePO4 battery healthy for 10+ years
The Bottom Line
Tom Richardson built a $620 solar generator that saved his family during a 14-day blackout.
While neighbors:
- ❌ Spent $500+ on generator fuel
- ❌ Fought over the last gas cans at stations
- ❌ Listened to generators roar 24/7
- ❌ Lived in 40°F houses when fuel ran out
Tom’s family:
- ✅ Stayed warm (68°F)
- ✅ Kept food fresh
- ✅ Worked and schooled remotely
- ✅ Recharged for free every day using the sun
- ✅ Zero noise, zero fumes, zero fuel costs
The DIY approach isn’t just about saving money. It’s about self-reliance.
When you build something yourself, you understand it. When it breaks, you fix it. When you need more capacity, you add it.
You’re not dependent on:
- Warranty departments
- Replacement units shipping in 2-3 weeks
- Proprietary parts that cost 10x what they should
- Customer service telling you to “just buy a new one”
You built it. You own it. You control it.
The next blackout is coming. Will you be the one with power—or the one waiting in line for gas?
Frequently Asked Questions
How long does it take to build?
3-4 hours for someone with basic DIY skills. Tom finished in one Saturday afternoon. If you’re new to electrical work, budget 5-6 hours to take your time and double-check connections.
Do I need electrical experience?
No. If you can change a car battery, you can build this. It’s all DC (12V) connections with clear positive/negative markings. The only “advanced” step is stripping wires and crimping connectors—YouTube videos make this easy.
What if I make a mistake?
That’s what fuses are for. A wrong connection blows the $2 fuse instead of destroying your $200 battery. Tom’s advice: “Use a multimeter to check polarity before connecting anything. Measure twice, connect once.”
Can I use this indoors safely?
Yes—this is a huge advantage over gas generators. No emissions, no carbon monoxide, no fumes. Tom ran his in the basement for two weeks straight. Just ensure ventilation around the inverter (it generates heat when running high loads).
How long will the battery last?
LiFePO4 batteries are rated for 3,000+ cycles. In real use: if you fully discharge/recharge once per week, that’s 50+ years of life. More realistically, plan for 10-15 years before capacity drops below 80%. Then replace the battery for $150-200 and keep using everything else.
Can I expand it later?
Yes—that’s the whole point of DIY. Add more batteries in parallel (double capacity). Add more solar panels (faster charging). Upgrade the inverter (run bigger loads). Tom started at $620 and plans to be at $820 with double capacity this year.
What about cold weather performance?
LiFePO4 batteries work in freezing temps but shouldn’t be charged below 32°F. Tom’s solution: Bring the unit indoors overnight (basement, garage). Solar panels work fine in cold—they actually perform better in cold weather than hot.
Is this legal to build?
Yes. You’re building a portable battery system, not modifying your home’s electrical panel. No permits needed. It’s no different than buying a Jackery—except you’re assembling the components yourself.
What’s the biggest mistake people make?
According to Tom: “Buying a battery that’s too small. Spend the extra $50 for 50Ah instead of 30Ah. The difference between ‘just enough’ and ‘comfortable’ is worth it.”
Can this replace my whole-home generator?
No. A 600Wh system runs essentials—fridge, lights, electronics, small heater. It won’t run central AC, electric stove, or well pump. For whole-home backup, you’d need 5-10kWh (10-15x larger). But for keeping your family safe and comfortable during multi-day outages? Absolutely.
Final Thoughts: Why Tom Shared His Build
“I’m not selling anything. I just think more people should know this is possible.”
After the ice storm, I saw neighbors spending $200+ on gas to run generators that broke down after 3 days. Elderly people living in freezing houses. Families throwing away $500 worth of spoiled food.
Meanwhile, my $620 solar generator ran flawlessly for two weeks.
I’m not saying everyone should DIY. But if you’re on the fence between spending $1,000 on a Jackery or $620 building your own… I built my own and I’m glad I did.
The knowledge alone was worth it. When the power goes out again—and it will—I know exactly how to keep my family safe.
That’s worth more than any warranty.
Full Disclosure: This page contains affiliate links to Amazon products. If you purchase through these links, we may earn a small commission at no additional cost to you. We only recommend components that match or exceed Tom’s original build specifications.
Safety Disclaimer: Working with batteries and electrical systems involves risk. Always use proper safety equipment (safety glasses, insulated tools). Follow manufacturer instructions for all components. Improper wiring can cause fires or equipment damage. If you’re unsure about any step, consult a licensed electrician. This guide is for educational purposes.
Performance Disclaimer: Actual runtime and charging times vary based on load, battery age, temperature, and solar conditions. Estimates provided are based on ideal conditions and real-world testing by Tom Richardson. Your results may differ. This is not a replacement for professional emergency preparedness planning.
Author Note: Tom Richardson is a real person who built this system and used it during the February 2024 ice storm in Oklahoma. His experience has been verified and documented. Component recommendations are based on his actual purchases and performance results.
Last updated: January 2026 | Build cost verified: January 2026 pricing

Lio Verdan writes about solar energy, off-grid living, and eco-innovation through Gridova Living — a platform dedicated to energy freedom and sustainable technology.