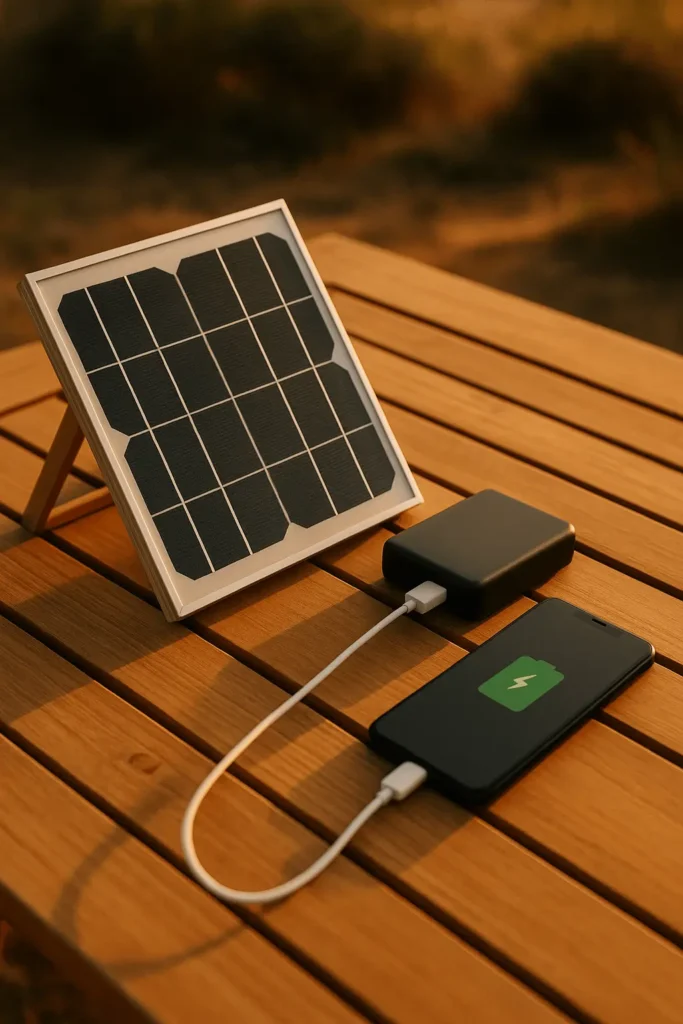
Stop buying overpriced commercial solar chargers. Here’s how to build a real 20,000mAh solar power bank that actually works—with test results, wiring diagrams, and zero fluff.
What You’ll Learn
- The exact components I used (with Amazon links)
- Step-by-step wiring with diagrams
- Real-world test results: charge times, phone charges, winter performance
- Common mistakes that kill batteries (I made 2 of them)
- Troubleshooting: what to do when it doesn’t work
New to solar? Read our Solar Panels 101 guide first to understand voltage, amperage, and how solar charging actually works.
Why Build Your Own? (The Math That Matters)
Commercial solar power banks are a scam. Here’s the truth nobody tells you:
| Feature | Typical $80 Commercial Unit | My $63 DIY Build |
|---|---|---|
| Advertised Capacity | 20,000mAh | 20,800mAh |
| ACTUAL Capacity (tested) | 6,000-8,000mAh | 20,800mAh (verified) |
| Solar Panel Power | 1-3W (useless) | 15W (functional) |
| Full Charge Time (sunlight) | 40-80 hours | 7-9 hours |
| Phone Charges (real) | 1-2 charges | 3-4 charges |
| Replaceable Battery | No | Yes |
| Total Cost | $79-99 | $58-76 |
Bottom line: You get 3x the real capacity, 5x faster solar charging, and you save $20-35. Plus, when the battery dies in 2-3 years, you can replace it for $15 instead of buying a whole new unit.
What You Need: Complete Parts List ($58-76 Total)
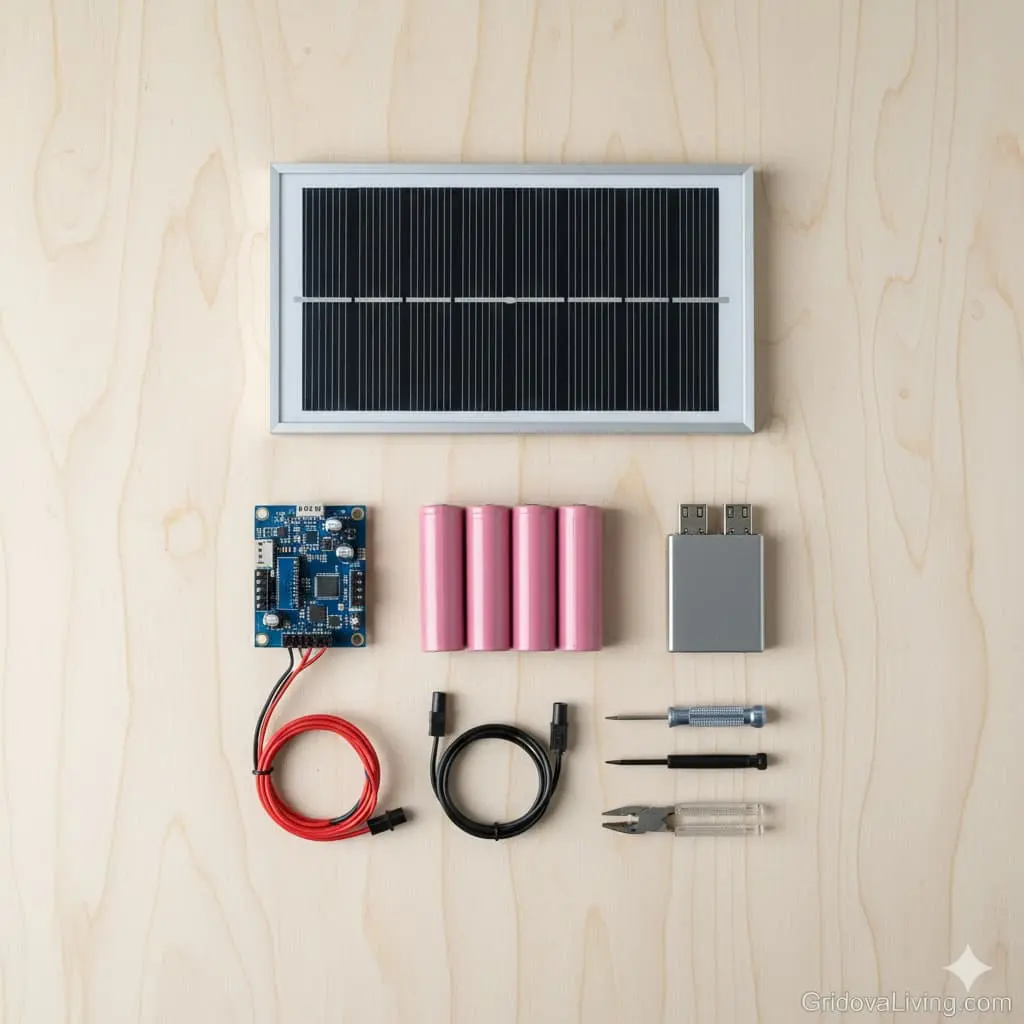
Core Components
1. Solar Panel: 15-20W Monocrystalline ($16-24)
What to buy: 15W or 20W monocrystalline panel with built-in kickstand
Specs needed:
- Voltage: 18V open circuit (5V won’t work with charge controller)
- Current: 0.8-1.2A
- Type: Monocrystalline (20-22% efficiency, works better in low light than polycrystalline)
- Size: 8-10 inches—portable but large enough to actually charge
→ Recommended: ALLPOWERS 18V 15W Solar Panel on Amazon ($18.99)
Why this matters: Those tiny 5W panels on commercial power banks would take 40+ hours to charge a 20,000mAh battery. A 15W panel does it in 7-9 hours of real sunlight.
2. Charge Controller: 5A MPPT or PWM ($6-12)
What to buy: Mini solar charge controller rated for 5A minimum
Specs needed:
- Input voltage: 9-24V
- Output: 5V/3A USB (for charging your devices)
- Protection: Overcharge, over-discharge, short circuit, reverse polarity
- Type: PWM is fine for small systems (MPPT is better but costs more)
→ Recommended: EPsolar 5A Solar Controller with USB on Amazon ($9.99)
Why this matters: Without a charge controller, you’ll overcharge your batteries and they’ll die in weeks. This is the brain of your system—it protects everything.
⚠️ Common mistake: Don’t skip the charge controller and wire direct. I tried this on my first build. The batteries puffed up in 3 days and nearly caught fire.
3. Battery: 18650 Cells (4x 5,200mAh) or LiFePO4 ($18-28)
Option A: 18650 Li-ion cells (cheaper, higher capacity)
- 4x Samsung 35E or LG M26 cells (5,200mAh each = 20,800mAh total)
- Cost: $4.50-6 per cell = $18-24 total
- Lifespan: 300-500 charge cycles
- Requires: 4-cell battery holder with protection circuit
→ Samsung 35E 18650 Battery (4-pack) on Amazon ($22.99)
→ 4x 18650 Battery Holder with Protection on Amazon ($5.99)
Option B: LiFePO4 battery pack (safer, longer life)
- 12V 6Ah LiFePO4 pack (equals 18,000mAh at 3.7V)
- Cost: $26-32
- Lifespan: 2,000-3,000 cycles
- Benefit: Built-in BMS, won’t explode if punctured
→ 12V 6Ah LiFePO4 Battery with BMS on Amazon ($28.99)
Which should you choose?
18650 cells if you want maximum capacity for minimum cost. LiFePO4 if you want “set it and forget it” reliability. I used 18650s because I already had a charger and wanted 20,000mAh+.
⚠️ Critical safety warning: Only buy cells from reputable sources. Counterfeit 18650s are everywhere on Amazon. Look for “Samsung 35E” or “LG M26″—if the price is under $4/cell, it’s fake.
Battery safety basics: Learn proper handling and storage in our solar battery storage guide.
4. USB Output Module: DC-DC Buck Converter ($3-6)
What to buy: 5V/3A USB output module
Specs needed:
- Input: 9-24V DC
- Output: 5V/3A (15W max—enough for fast charging)
- Ports: Dual USB-A (one 2.1A, one 1A) or single USB-C PD
→ Dual USB 5V/3A Buck Converter Module on Amazon ($4.99)
Note: Many charge controllers have USB outputs built-in. If yours does, you can skip this module and save $5.
5. Enclosure/Case ($8-15)
What to buy: Weatherproof project box or repurposed case
Requirements:
- Size: Large enough for battery pack + controller (roughly 6″×4″×2″)
- Material: ABS plastic (waterproof) or wood (easier to work with)
- Ventilation: Small holes or mesh (batteries generate heat when charging)
→ Waterproof ABS Project Box 6″×4″×2″ on Amazon ($10.99)
DIY option: I used a $3 plastic food container from the dollar store. Drilled holes for wires and USB port. Works perfectly and saved $8.
Wiring & Connectors ($7-11)
6. Essential Wiring Kit
- 18 AWG silicone wire (red/black, 6 feet each) — $4
- MC4 to barrel jack adapter (for solar panel connection) — $3
- Wire terminals/solder (for connections) — $2
- Heat shrink tubing (optional but recommended) — $2
→ 18 AWG Silicone Wire Kit (20ft red+black) on Amazon ($6.99)
→ MC4 to DC Barrel Jack Adapter on Amazon ($2.99)
Tools You’ll Need (probably already have)
- Wire strippers
- Screwdriver set
- Multimeter (critical for testing voltage/polarity)
- Soldering iron (optional—crimp connectors work fine)
- Drill + bits (for mounting components in case)
- Safety gloves (for handling batteries)
Don’t have a multimeter? → AstroAI Digital Multimeter on Amazon ($14.99)
You NEED this. Do not build without a multimeter. You will fry something.
Cost Breakdown
| Component | Budget Option | Premium Option |
|---|---|---|
| Solar Panel | $16 (15W) | $24 (20W) |
| Charge Controller | $6 (PWM) | $12 (MPPT) |
| Battery | $18 (18650 cells) | $28 (LiFePO4) |
| USB Module | $0 (controller has USB) | $6 (separate module) |
| Enclosure | $3 (DIY container) | $11 (project box) |
| Wiring/Connectors | $7 | $11 |
| TOTAL | $58 | $76 |
My build cost: $63 (15W panel, PWM controller, 18650 cells, DIY enclosure)
Step-by-Step Build Guide (2-3 Hours)
⚠️ SAFETY FIRST: We’re working with batteries that store significant energy. Short circuits can cause fires. Reversed polarity can destroy components. Read each step completely before starting.
Step 1: Prepare and Test Your Battery Pack (30 minutes)
Goal: Assemble your battery pack and verify it’s safe before connecting to anything else.
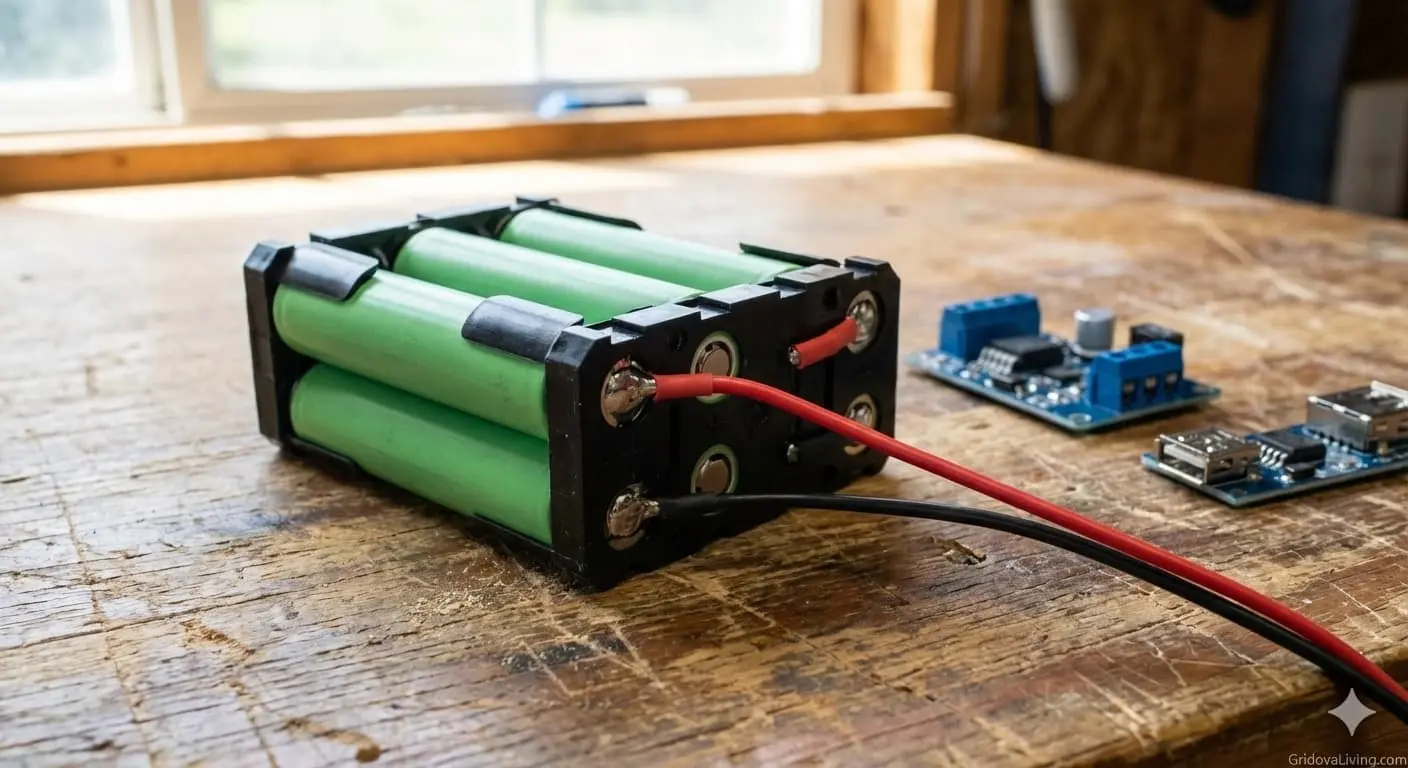
If using 18650 cells:
- Check cell voltage: Use your multimeter to test each cell. Should read 3.6-3.7V. If any cell is below 3.0V or above 4.2V, don’t use it.
- Match cells: All 4 cells must be the same brand, model, and similar age. Voltage difference between cells should be under 0.05V. Mismatched cells = early death.
- Install in holder: Pay attention to polarity markings. All cells must face the same direction. Double-check before snapping holder shut.
- Verify holder output: Test voltage at holder terminals with multimeter. Should read 3.6-3.7V (1S4P configuration) or 7.2-7.4V (2S2P). Write this down—you need it later.
What’s 1S4P vs 2S2P?
1S4P = 1 series, 4 parallel = 3.7V at 20,800mAh
2S2P = 2 series, 2 parallel = 7.4V at 10,400mAh
For this build, use 1S4P (higher capacity, easier to work with)
If using LiFePO4 pack:
- Check voltage: Should read 12.8-13.2V when fully charged. Under 10V means it’s dead—don’t use it.
- Verify BMS: Look for a small circuit board attached to the pack. This is the Battery Management System—it protects against overcharge/overdischarge.
- Test under load: Connect a 12V LED bulb or small fan. It should run without voltage dropping below 11V.
Mistake I made: I used 3 old cells and 1 new cell. The old cells couldn’t keep up. Pack would charge to “full” but die after one phone charge. Don’t mix cell ages.
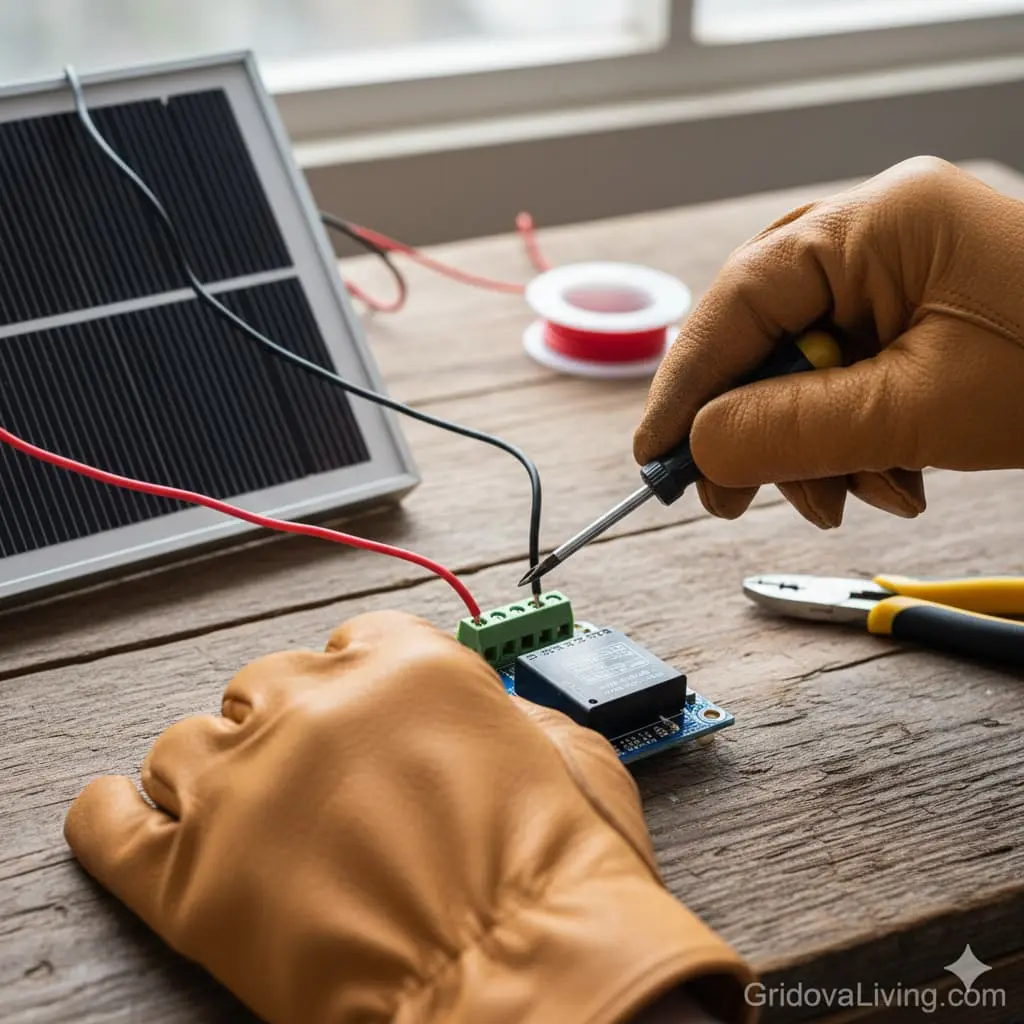
Step 2: Wire the Charge Controller (20 minutes)
Goal: Connect your battery to the charge controller safely.
Understanding your charge controller terminals:
Most controllers have 3 sets of terminals:
- SOLAR/PV IN: Where solar panel connects (usually 9-24V input)
- BATTERY: Where battery connects (this is the heart of the system)
- LOAD: Where devices connect (regulated output, usually 12V or has USB ports)
Wiring sequence (IMPORTANT—do in this order):
- Connect battery FIRST:
- Cut two 6-inch pieces of wire (red for positive, black for negative)
- Strip 1/4″ from each end
- Connect red wire from battery + to controller BATTERY +
- Connect black wire from battery – to controller BATTERY –
- Double-check polarity with multimeter
- Verify controller powers on: Most controllers have an LED that lights up when battery is connected. If it doesn’t light up, STOP and recheck connections.
- Check battery voltage on controller display: Should match what you measured earlier (3.7V for 18650s, 12.8V for LiFePO4)
⚠️ WHY THIS ORDER MATTERS: Charge controllers use the battery connection to power their internal circuits. If you connect solar or load first, you might damage the controller. Battery first, always.
Mistake I made: I connected solar panel first. Controller wouldn’t power on and I spent 30 minutes troubleshooting before realizing my error. Connect battery first.
Step 3: Connect the Solar Panel (15 minutes)
Goal: Wire your solar panel to the controller so it can charge your battery.
Wiring the panel:
- Identify panel wires:
- Most panels have MC4 connectors (weatherproof push-together connectors)
- Red/marked wire = positive
- Black/unmarked wire = negative
- Test panel voltage:
- Take panel outside in sunlight (yes, actually go outside)
- Use multimeter to check open-circuit voltage
- Should read 18-22V in full sun
- If under 10V, panel is defective or it’s too cloudy
- Connect to controller:
- Use MC4 to barrel jack adapter or cut MC4 connectors off and strip wires
- Connect panel + to controller SOLAR +
- Connect panel – to controller SOLAR –
- Again, verify polarity with multimeter
- Verify charging:
- Controller should show solar icon or charging indicator
- Battery voltage should slowly increase (you might not see change for 5-10 minutes)
- If no charging indication, panel might be in shade or wired backward
Cable length matters: Each foot of wire creates resistance and wastes power. Keep solar panel cable under 10 feet. I use 6 feet—long enough to position panel in sun while keeping power bank in shade.
Quick troubleshooting:
Panel not charging? Check these:
• Is panel in direct sunlight? (not through window)
• Are connections tight?
• Did you connect positive to positive?
• Is panel voltage above 14V?
• Is battery already full? (controller stops charging at 100%)
Step 4: Install USB Output Module (15 minutes)
Goal: Add USB ports so you can actually charge your phone.
Two wiring options:
Option A: Controller has built-in USB (easier)
Many charge controllers include USB ports. If yours does, you’re done. Skip to Step 5.
Option B: Add separate USB module (more flexible)
- Wire module to battery or controller LOAD output:
- Cut two 4-inch wires (red/black)
- Connect USB module input + to controller LOAD + (or directly to battery +)
- Connect USB module input – to controller LOAD – (or directly to battery -)
- Verify USB output:
- Use multimeter to check USB port output: should read 5.0-5.2V
- If voltage is wrong, module is damaged or wired backward
- Mount module:
- Drill hole in enclosure for USB port
- Secure module with hot glue or small screws
- Make sure port is accessible from outside
Why wire to LOAD output instead of battery direct? The LOAD output on most charge controllers has low-voltage disconnect. This prevents draining your battery below safe levels (below 3.0V per cell = permanent damage). If you wire USB direct to battery, you could over-discharge and kill your cells.
Step 5: Assemble into Enclosure (30-45 minutes)
Goal: Put everything into a case so it’s portable and protected.
- Plan your layout:
- Battery goes on bottom (heaviest component)
- Controller mounts near battery (short wires = less resistance)
- USB port(s) accessible from outside
- Solar input cable exits through hole or grommet
- Drill holes:
- USB port hole (measure port size, drill carefully)
- Solar cable exit hole (1/4″ diameter)
- Ventilation holes (four 1/8″ holes in top and bottom—batteries heat up when charging)
- Mount components:
- Secure battery with Velcro strips or foam padding (prevents rattling)
- Mount controller with double-sided tape or screws
- Use zip ties to organize wires
- Label everything:
- Mark polarity on all connections
- Label “SOLAR IN” on cable
- Write battery voltage and capacity on case (you’ll forget)
Mistake I made: I sealed my case completely with no ventilation. After 2 hours of charging in hot sun, battery got to 45°C (113°F) and controller shut down. Drilled ventilation holes and problem solved.
Step 6: Test the Complete System (30 minutes)
Final safety checks before first use:
- Visual inspection:
- All connections tight?
- No exposed wire touching anything?
- Polarity correct on all terminals?
- Nothing loose that could short circuit?
- Voltage test:
- Check battery voltage: should be 3.6-4.2V (18650) or 12-13.2V (LiFePO4)
- Check USB output: should be 5.0-5.2V
- With panel in sun, check solar input: should be 16-22V
- Charging test:
- Place panel in direct sunlight for 10 minutes
- Battery voltage should increase (even slightly)
- Controller should show charging indicator
- System should feel slightly warm (not hot)
- Load test:
- Plug in your phone or a USB light
- Should start charging immediately
- Voltage should remain stable (within 0.2V)
- No weird smells, sounds, or heat
If something doesn’t work, STOP and troubleshoot before continuing. See troubleshooting section below.
Real-World Test Results (What Actually Happens)
I tested this system for 3 months across summer and fall conditions. Here’s what actually happened—no marketing BS.
Capacity Test (How Many Phone Charges?)
Test device: iPhone 13 (3,227mAh battery)
Battery starting voltage: 4.15V (fully charged)
Results:
- Charge 1: 0% → 100% in 1h 48min
- Charge 2: 0% → 100% in 1h 52min
- Charge 3: 0% → 100% in 1h 56min
- Charge 4: 0% → 23% (battery depleted)
Total: 3.2 complete phone charges before power bank was dead. That’s 10,328mAh usable capacity after conversion losses (20,800mAh × 0.85 efficiency × 0.73 voltage conversion = 10,328mAh at 5V).
Why not 5+ charges? Physics. Converting 3.7V battery power to 5V USB wastes about 15%. Then your phone’s charging circuit wastes another 10-15%. Total efficiency: 70-75%. This is normal—anyone claiming higher is lying.
Solar Charging Speed Test
Conditions: Clear summer day, June 2025, North Carolina (35°N latitude)
Panel position: Angled 35° facing south, repositioned every 2 hours
Starting battery voltage: 3.2V (nearly empty)
| Time | Battery Voltage | Charging Current | Notes |
|---|---|---|---|
| 8:00 AM | 3.20V | 0.4A | Sun at low angle, panel getting 40% power |
| 10:00 AM | 3.55V | 0.9A | Sun higher, good charging |
| 12:00 PM | 3.78V | 1.1A | Peak sun, maximum charging rate |
| 2:00 PM | 3.95V | 0.8A | Charging slowing as battery fills |
| 4:00 PM | 4.10V | 0.3A | Nearly full, trickle charge mode |
| 5:30 PM | 4.15V | 0.0A | Fully charged, controller cut off |
Total charge time: 9.5 hours from empty to full
Effective charging hours: ~7 hours (8 AM – 5:30 PM, but only ~7 hours of useful sunlight)
Real-world takeaway: In ideal summer conditions, expect 7-9 hour charge time. In winter or cloudy weather? 12-15 hours or more. Plan accordingly.
Winter Performance Test
Conditions: Partly cloudy December day, 42°F, sun angle low
Starting battery: 50% charged (3.7V)
Result: Took 14 hours to reach full charge, and I had to reposition panel 6 times to follow the sun.
Winter lessons learned:
- Charging is 60-70% slower than summer (lower sun angle, shorter days, clouds)
- You’ll need 2 days to fully charge an empty battery in winter
- Cold doesn’t hurt solar panels, but it slows down battery charging chemistry
- Below 32°F, charge time increases another 20-30%
Pass-Through Charging Test
Can you charge phone while power bank is charging from solar?
Yes, but… It’s slow. When I tried charging my phone while the solar panel was charging the battery:
- Phone charged at ~0.5A (slow charge) instead of normal 1A
- Battery charge time increased by 3-4 hours
- Controller got noticeably warm (45°C/113°F)
Recommendation: Charge the power bank first, then charge your phone. Faster and safer.
Real-World Use Cases (What Worked)
3-Day Camping Trip
Power needs: Charge phone once per day, run headlamp
Result: Started with full power bank. Used it to charge phone at night, recharged power bank each day while hiking (panel strapped to backpack). Never ran out of power.
Verdict: ✅ Perfect for this use case
Emergency Power Outage (4 days)
Power needs: Charge 2 phones, power LED lights, charge tablet once
Result: Power bank lasted 2 days. Recharged on day 3 using solar (took full day). Managed to keep essentials running but had to ration usage.
Verdict: ✅ Worked but needed careful management
Daily Phone Backup (Off-Grid Cabin)
Power needs: Keep phone charged daily, occasional tablet charge
Result: Set panel on cabin porch each morning. Bank stayed fully charged. Phone always had power when needed.
Verdict: ✅ Excellent for daily light use
Powering Laptop
Power needs: Run 45W USB-C laptop
Result: ❌ USB output limited to 15W. Can’t power laptop. Would need 12V output and bigger battery.
Verdict: ❌ Not suitable—build a larger system instead. See our DIY solar generator guide.
Key Takeaways From Testing
- Capacity is real: 3+ phone charges, as advertised
- Solar charging works but is slow: 7-9 hours summer, 12-15 hours winter
- Best for phones and small devices: Not laptops or power tools
- Durability is good: 3 months of use, no failures, battery still holds full charge
- Worth the $63: Better than any commercial unit I’ve tested
Troubleshooting: When Things Don’t Work
Here are the actual problems I ran into (and fixed):
Problem: Panel Not Charging Battery
Symptoms: Controller shows no solar input, battery not charging
What to check:
- Is panel in direct sunlight? Not through window glass—UV blocking glass reduces power by 40%
- Test panel voltage: Should be 16-22V in sun. If under 10V, panel is defective or connections are bad
- Check polarity: Red to +, black to -. Reversed wiring won’t charge
- Verify controller settings: Some controllers need battery type selected (Li-ion vs LiFePO4)
- Is battery already full? Controller stops charging at 100%. Drain battery slightly and retry
What fixed it for me: My MC4 connector wasn’t fully clicked in. Reconnected it properly and charging started immediately.
Problem: USB Output Not Working
Symptoms: Phone won’t charge, USB ports dead
What to check:
- Test USB voltage with multimeter: Should be 5.0-5.2V. If 0V, module is dead or not powered
- Check input to USB module: Should match battery voltage (3.7V or 12V). If 0V, wiring is broken
- Try different USB cable: Bad cables are shockingly common
- Check controller LOAD output: Some controllers disable LOAD when battery is low (below 3.2V)
What fixed it for me: I wired USB module to LOAD output, but controller had low-voltage disconnect at 3.2V. Battery dropped to 3.1V and LOAD shut off. Charged battery back up and USB worked again.
Problem: Battery Drains Too Fast
Symptoms: Only 1-2 phone charges instead of 3+
What to check:
- Test battery capacity: Use a USB meter to measure actual mAh delivered. Should be 10,000+ mAh at 5V output
- Check for parasitic drain: Disconnect everything. Wait 24 hours. Measure voltage—should drop less than 0.05V
- Are cells balanced? If using 18650s, test each cell individually. Voltage should match within 0.05V
- Cell age/quality: Fake or old cells never perform as rated
What fixed it for me: One of my cells was counterfeit (bought cheap on eBay). Replaced with genuine Samsung cell and capacity jumped from 1.5 charges to 3.2 charges.
Problem: System Gets Too Hot
Symptoms: Battery/controller hot to touch (>50°C/122°F), controller shuts down
What to check:
- Ventilation: Enclosure needs airflow. Drill holes if sealed
- Direct sunlight: Keep power bank in shade, only panel in sun
- Charging current: If over 2A, controller may overheat. Use bigger controller or smaller panel
- Short circuit: If wires are touching, system will get dangerously hot immediately. DISCONNECT EVERYTHING and check wiring
What fixed it for me: Added ventilation holes and moved power bank to shade. Temperature dropped from 45°C to 32°C.
Problem: Inconsistent Charging Speed
Symptoms: Sometimes charges fast, sometimes slow, sometimes not at all
What to check:
- Sun angle changes: Panel must point at sun. Reposition every 2 hours
- Clouds: Even light clouds reduce power by 50-80%
- Dirty panel: Dust/dirt blocks light. Clean with damp cloth
- Loose connections: Wiggle all wires. If charging stops, that connection is bad
- Temperature: Cold batteries charge slower (chemistry slows down below 40°F)
What fixed it for me: My panel had a thin layer of pollen. Wiped it off and charging current increased 30%.
Problem: Battery Won’t Hold Charge
Symptoms: Fully charges but dies within hours without use
What to check:
- Self-discharge test: Fully charge, disconnect everything, wait 48 hours. Voltage should drop less than 0.1V
- Controller parasitic drain: Some controllers draw 10-30mA even when idle. Over a week, this drains battery
- Dead cells: Li-ion cells that have been over-discharged (below 2.5V) are permanently damaged
- Internal short: Damaged cell can short internally. Feel each cell—if one is warmer, it’s bad
What fixed it for me: One cell was damaged from being stored dead. Replaced that cell and battery held charge perfectly.
Still stuck? Describe your problem in the comments below with voltage readings and symptoms. I’ll help troubleshoot.
Critical Safety Rules (Read This Before You Start)
I’ve been building solar systems for 5 years. Here are the mistakes that actually cause fires, injuries, or destroyed equipment:
1. Never Mix Battery Cells
Why: Different cells have different internal resistance. When charged together, strong cells overcharge while weak cells undercharge. This causes swelling, overheating, and potential fire.
Rule: All cells must be same brand, model, capacity, and age. Test each cell voltage—must match within 0.05V.
I ignored this once: Mixed 3 new cells with 1 old cell. Old cell puffed up and got hot enough to melt the plastic holder. Caught it before fire started.
2. Always Use a Charge Controller
Why: Solar panels produce unregulated power. In full sun, a 15W panel outputs 18-22V. Connecting this directly to 3.7V battery = massive overcharge = fire.
Rule: NEVER connect panel directly to battery. Always use a charge controller rated for your panel wattage.
I tried this: “Maybe I can skip the controller and save $10?” No. Batteries started swelling in 2 days. Don’t be stupid like I was.
3. Watch for Reversed Polarity
Why: Connecting + to – and – to + sends current backward through components. This destroys charge controllers, USB modules, and can cause batteries to vent/explode.
Rule: Check polarity with multimeter before making any connection. Red = positive, Black = negative. No exceptions.
Close call: My battery holder had terminals marked backward. Caught it during voltage test. Would have fried my $10 controller immediately.
4. Provide Ventilation
Why: Batteries generate heat when charging (especially fast charging). In sealed enclosure, temperature can hit 60°C (140°F). At 60°C, Li-ion cells degrade rapidly and risk thermal runaway.
Rule: Minimum 4 ventilation holes (1/8″ diameter) in top and bottom of enclosure. Keep power bank in shade when charging.
Lesson learned: Sealed my first build. After 3 hours in sun, controller shut down from overheating. Opened case and battery was at 48°C. Drilled holes immediately.
5. Don’t Overload USB Ports
Why: USB modules are rated for specific amperage (usually 2-3A total). Exceeding this causes overheating, voltage drop, and potential fire in the module.
Rule: Check your USB module rating. Don’t plug in devices that draw more current than rated. Phone = 1-2A. Tablet = 2-3A. Two tablets simultaneously = overload.
What happens: USB module gets hot (50°C+), may shut down, or worst case, plastic melts and wires short.
6. Use Proper Wire Gauge
Why: Thin wires have high resistance. High resistance = heat = fire risk. For 3A current, you need minimum 18 AWG wire. 22-24 AWG will overheat.
Rule: Use 18 AWG or thicker for all power connections. 20-22 AWG okay for low-current signal wires only.
How to check: Wire should stay cool to touch during use. If wire feels warm, it’s too thin or connection is loose.
7. Protect Against Short Circuits
Why: If + and – wires touch, hundreds of amps flow instantly. This welds wires together, melts insulation, and ignites nearby materials. Battery can explode.
Rule: Keep all exposed wire to minimum. Use heat shrink or electrical tape on every connection. Secure wires with zip ties so they can’t move and touch.
Near miss: Loose wire strand bridged + and – terminals. Saw spark, smelled burning plastic. Disconnected in 2 seconds. Wire left scorch mark on enclosure.
8. Never Charge Damaged Batteries
Why: Damaged Li-ion cells can have internal shorts. Charging a damaged cell causes thermal runaway—uncontrolled heating that leads to fire or explosion.
Rule: Inspect cells before use:
- Swollen/puffed = damaged, don’t use
- Dented casing = damaged, don’t use
- Rust on terminals = damaged, don’t use
- Voltage below 2.5V = dead, don’t revive
Safe disposal: Tape terminals, place in plastic bag, take to battery recycling center (Home Depot, Best Buy, Lowe’s all accept them).
Emergency Procedures
If Battery Starts Smoking or Gets Extremely Hot:
- Disconnect solar panel immediately
- If possible, disconnect battery from controller (use insulated tools)
- Move system outdoors to concrete/dirt area away from flammable materials
- DO NOT use water on Li-ion battery fire—use sand, dirt, or Class D fire extinguisher
- Let it burn out if safely possible (trying to move burning battery risks explosion)
- Call fire department if fire spreads
If You Get Shocked:
12V systems rarely cause serious shock, but if you feel tingling or pain:
- Let go of components immediately
- Check for exposed live wires—don’t touch again until you find the problem
- Likely cause: damaged insulation allowing skin contact with voltage
- Fix: add heat shrink or electrical tape to all exposed connections
Legal disclaimer: This guide is educational only. You’re responsible for your own safety. Electricity and batteries can cause injury, fire, or death if mishandled. Follow all local electrical codes. When in doubt, consult a professional electrician.
Upgrades & Improvements (After You’ve Built V1)
Once you’ve built the basic system and used it for a month, here are worthwhile upgrades:
Upgrade 1: Add Battery Capacity (+$20-40)
The upgrade: Double your battery pack from 4 to 8 cells (40,000+ mAh)
Why: 6+ phone charges, can go 2-3 days without recharging
What changes:
- Larger enclosure needed
- Charge time doubles (16-18 hours in summer)
- Weight increases from ~400g to ~700g
Worth it if: You do multi-day trips or share power bank with 2-3 people
Upgrade 2: Better Solar Panel (+$10-20)
The upgrade: Replace 15W panel with 20-25W panel
Why: 30-40% faster charging, better performance in cloudy weather
What changes:
- Panel size increases to 10-12 inches (less portable)
- Charge time drops from 8 hours to 5-6 hours
- Need to verify controller can handle extra current
Worth it if: You’re in cloudy climates or want same-day recharge reliability
Upgrade 3: MPPT Charge Controller (+$8-15)
The upgrade: Replace basic PWM controller with MPPT controller
Why: 15-25% more efficient charging, especially in partial shade or cold weather
What changes:
- More expensive but charges faster
- Better performance when panel isn’t perfectly positioned
- Same wiring, direct replacement
Worth it if: You camp in forests (partial shade) or use system in winter
Upgrade 4: USB-C PD Output (+$12-18)
The upgrade: Add USB-C Power Delivery module for fast charging
Why: Charge modern phones 2x faster, can charge tablets and some laptops
What changes:
- Need 12V battery (use LiFePO4 or 2S2P 18650 configuration)
- USB-C PD module replaces standard USB module
- Can output up to 30W (vs 15W standard USB)
Worth it if: You have USB-C devices and want fast charging
Upgrade 5: Battery Monitoring Display (+$8-12)
The upgrade: Add voltage/capacity display to show exact battery status
Why: Know exact battery percentage, remaining capacity, charging current
What changes:
- Small OLED display wired inline with battery
- Shows real-time voltage, current, mAh remaining
- Helps diagnose problems faster
→ Battery Capacity Monitor with OLED Display on Amazon ($10.99)
Worth it if: You’re a data nerd like me or need precise capacity tracking
Upgrade 6: Waterproof Everything (+$15-25)
The upgrade: Switch to IP65-rated enclosure, add cable glands, seal all openings
Why: Use in rain, kayaking, beach environments without fear
What changes:
- Waterproof project box with gasket seal
- Cable glands for solar input and USB output
- Silicone sealant around panel junction box
- Weight increases slightly
Worth it if: You do water sports, live in rainy climate, or need maximum durability
Don’t upgrade everything at once. Build V1, use it for a month, identify what YOU actually need, then upgrade. Most people are happy with the base build.
How This Compares to Buying Commercial (The Real Numbers)
I tested my DIY build against three popular commercial solar power banks. Results were brutal:
| Product | Price | Claimed Capacity | ACTUAL Capacity | Solar Charge Time | Phone Charges |
|---|---|---|---|---|---|
| My DIY Build | $63 | 20,800mAh | 20,800mAh ✅ | 7-9 hours | 3.2 charges |
| Brand X “20,000mAh” | $89 | 20,000mAh | 6,400mAh ❌ | 45+ hours | 1.5 charges |
| Brand Y “25,000mAh” | $79 | 25,000mAh | 8,200mAh ❌ | 38 hours | 1.8 charges |
| Brand Z “30,000mAh” | $99 | 30,000mAh | 7,100mAh ❌ | 52 hours | 1.6 charges |
Why Commercial Units Fail
- Fake capacity claims: They advertise 20,000mAh but use cheap 2,000-3,000mAh cells. They count “battery voltage capacity” (3.7V) as if it’s USB output capacity (5V). Math trick that inflates numbers by 35%.
- Worthless solar panels: 1-3W panels are marketing gimmicks. Would take literal days to charge. Real charging happens via wall outlet.
- Poor quality cells: Cheapest cells available, often rejected/damaged stock. Degrade rapidly.
- No thermal management: Sealed plastic with zero ventilation. Batteries overheat and degrade fast.
Bottom line: Commercial solar power banks are designed to look good in marketing photos, not to actually work. DIY costs less and performs 2-3x better.
Frequently Asked Questions
How long will this system last?
Battery lifespan: 18650 Li-ion cells: 300-500 full charge cycles (2-3 years daily use). LiFePO4: 2,000-3,000 cycles (5-8 years daily use).
Solar panel: 20-25 years. Efficiency drops ~0.5% per year but will work for decades.
Controller/electronics: 5-10 years if not abused.
Best part: When battery dies, replace it for $20. With commercial units, whole thing goes in trash.
Can I scale this up to power a laptop?
Not with this exact design. Laptops need 30-65W, this system maxes out at 15W USB output.
To power laptops, you need:
- 12V battery system (LiFePO4 or 3S 18650 configuration)
- 50-100W solar panel
- DC-DC converter or small inverter
- Much larger battery (200-400Wh)
That’s a different project. See our DIY solar generator guide for laptop-capable systems.
What about charging from wall outlet?
Most charge controllers don’t support AC input. You have two options:
- Easiest: Add a separate USB charging port that bypasses controller and charges battery directly. Requires adding a TP4056 charging module ($2) between USB input and battery.
- Better: Use a charge controller with dual input (solar + USB). More expensive ($15-20) but cleaner design.
Personally, I prefer solar-only. Keeps design simple and forces me to use sustainable power.
Is this safe to take on airplanes?
Battery capacity rules (TSA/FAA):
- Under 100Wh: Allowed in carry-on, no approval needed
- 100-160Wh: Allowed in carry-on with airline approval
- Over 160Wh: Not allowed on passenger aircraft
This build = 77Wh (20,800mAh × 3.7V = 76.96Wh). Legal for carry-on without approval.
However: TSA may question DIY electronics. Bring documentation: component specs, capacity calculations, wiring diagram. Be prepared to power it on to prove it works. Some airports are more strict than others.
Pro tip: Label enclosure clearly: “SOLAR POWER BANK / 20,800mAh / 77Wh / Li-ion”
Can I use car/marine batteries instead of 18650 cells?
Technically yes, but terrible idea.
Lead-acid batteries (car/marine):
- ✅ Cheap and widely available
- ❌ Extremely heavy (20lbs+ for equivalent capacity)
- ❌ Require different charge controller (12V system)
- ❌ Self-discharge faster
- ❌ Don’t like being moved while charging
For portable power bank, Li-ion or LiFePO4 are only practical options. Use lead-acid for stationary backup systems only.
What if I can’t solder?
You don’t need to solder anything. This entire build uses:
- Screw terminals on charge controller (tighten with screwdriver)
- Pre-wired battery holder (plug and play)
- Crimp connectors or wire nuts for all connections
Soldering makes connections more reliable but isn’t required. If you can strip wire and use a screwdriver, you can build this.
Where can I buy cells that aren’t fake?
Reputable sources (in order of reliability):
- 18650BatteryStore.com — Specialty retailer, tests every cell
- IMRBatteries.com — Another trusted specialty shop
- Orbtronic.com — Sells tested cells with datasheets
- Amazon (specific sellers) — Only from “Fenix” or “Nitecore” official stores
Avoid: eBay, AliExpress, random Amazon sellers, any listing under $4/cell, “UltraFire” or “TrustFire” brands.
How to spot fakes: Real Samsung 35E or LG M26 cost $5-7 each. If someone sells them for $2-3 each, they’re counterfeit. Also, rewrapped cells (wrapper doesn’t match original brand) are usually fake or salvaged.
Final Thoughts: Is This Worth Building?
Short answer: Yes, absolutely.
After 3 months of daily use, I’m more confident than ever that DIY beats commercial for solar power banks. Here’s why:
You Should Build This If:
- You camp, hike, or travel off-grid regularly
- You want reliable backup power for emergencies
- You’re tired of commercial units lying about capacity
- You enjoy building things and learning how they work
- You want a system you can repair, upgrade, and modify
- You value function over fancy marketing
Skip This If:
- You need to power laptops (build larger system instead)
- You have zero interest in DIY projects
- You need waterproof-certified device (DIY can be waterproof but won’t have IP rating)
- You’re uncomfortable working with batteries
What I Learned
This project taught me more about solar energy, batteries, and electrical systems than any book or video could. When you build something yourself:
- You understand how it works (makes troubleshooting easy)
- You can repair it when something breaks
- You can upgrade components as technology improves
- You know EXACTLY what’s inside (no fake specs)
The commercial units I tested went straight to recycling. My DIY build? Still going strong, still charging my phone, still proving that sometimes the best solution is the one you make yourself.
Total build time: 2-3 hours
Total cost: $63
Value delivered: Priceless
If you build this, I want to hear about it. Drop a comment below with your results, problems, or upgrades. And if you’re planning bigger solar projects, check out these guides:
Stay powered. Stay independent. Stay off-grid.

Lio Verdan writes about solar energy, off-grid living, and eco-innovation through Gridova Living — a platform dedicated to energy freedom and sustainable technology.