
But you can optimize further depending on season and what you’re trying to maximize. Here’s how to get it exactly right.
Quick Angle Guide by Location
| Location | Latitude | Year-Round Angle | Summer Angle | Winter Angle |
|---|---|---|---|---|
| Miami, FL | 26° | 26° | 15° | 41° |
| Phoenix, AZ | 33° | 33° | 20° | 48° |
| Denver, CO | 40° | 40° | 25° | 55° |
| Seattle, WA | 48° | 48° | 33° | 63° |
Summer angle formula: Latitude minus 15°
Winter angle formula: Latitude plus 15°
Most people set panels at latitude angle and leave them. Adjusting seasonally adds maybe 10-15% more production, but it’s extra work twice a year. Worth it if you’re off-grid and need every watt. Not worth it if you’re grid-tied with plenty of capacity.

Why Latitude Matters
The sun’s path changes with latitude. Closer to the equator, the sun stays higher in the sky year-round. Further north, the sun sits lower, especially in winter.
Your panel angle needs to face the sun as directly as possible. Too flat and you’re losing output because sunlight hits at a steep angle. Too steep and same problem—light isn’t hitting the panel square-on.
Latitude angle puts you right in the sweet spot for average sun position throughout the year. It won’t be perfect every day, but it’s the best compromise for year-round production.
If you’re building a complete solar system from scratch, check our solar system sizing guide to plan everything correctly.
Seasonal Adjustments Explained
Summer: Sun is higher in the sky. Reduce your tilt angle by 10-15° to catch those high-angle rays. In summer at 40° latitude, the sun peaks around 73° above the horizon at solar noon. A 25° panel angle works better than 40°.
Winter: Sun is much lower. Increase tilt angle by 10-15° to catch low-angle winter sun. Same 40° latitude sees the sun peak at only 26° above horizon in December. A 55° panel tilt captures more of that low sun.
Spring/Fall: Sun height is between summer and winter extremes. Latitude angle works perfectly—which is why it’s the year-round compromise angle.
Seasonal adjustment matters most if you’re off-grid and battery-dependent. Winter production is already lower due to shorter days and cloudier weather. Optimizing tilt angle helps squeeze out every available watt when you need it most.

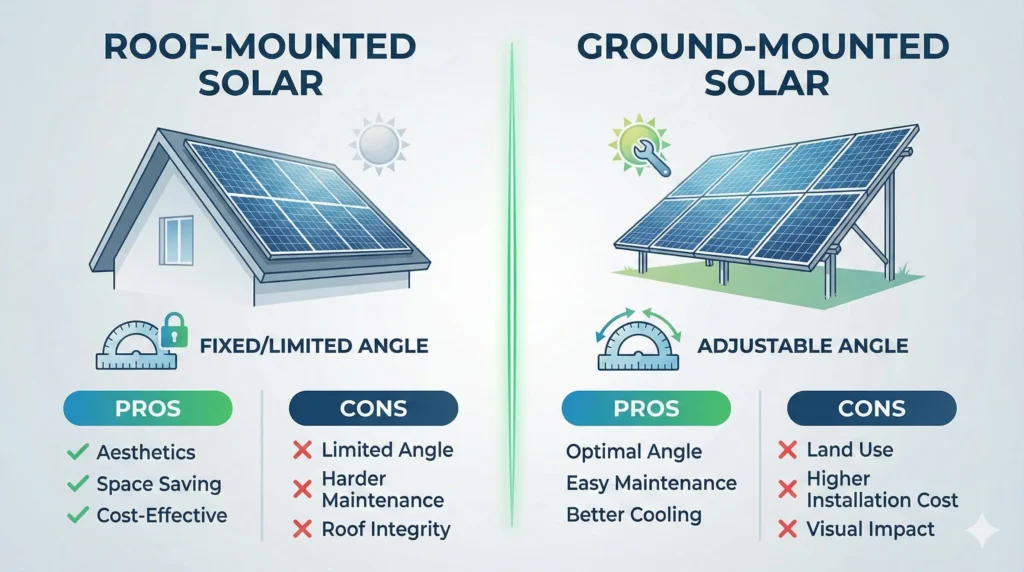
Fixed vs Adjustable Mounts
Fixed mounts are simpler and cheaper. Set your angle once at latitude and you’re done. No seasonal adjustments, no moving parts, nothing to maintain. This is what most people do.
Downside: You’re leaving 10-15% of potential production on the table by not optimizing for season. For grid-tied systems with net metering, this doesn’t matter much. For off-grid systems where every watt counts, it might.
Adjustable mounts let you change the tilt angle seasonally. More expensive upfront and requires climbing on your roof twice a year. But you get that extra 10-15% production when you need it—especially valuable in winter when sun hours are already limited.
Some people split the difference: fixed mounts at winter angle (latitude + 15°). This prioritizes winter production when you need help most, while summer production is still adequate despite being slightly less than optimal. Our panel selection guide covers mounting options in more detail.
What About Flat Roofs?
Flat roofs need tilt frames. Don’t lay panels completely flat—they’ll accumulate dirt, water won’t drain, and output suffers significantly.
Minimum tilt for flat installations: 10-15°. This lets water run off and prevents dirt buildup. Not optimal for production, but necessary for maintenance.
Better approach: Use tilt frames to achieve latitude angle even on flat roofs. Frames cost extra but the production increase pays for itself. Just account for wind loading—angled panels on flat roofs catch more wind. Secure them properly.
Spacing between rows matters on flat roofs too. If rows are too close, the front row shades the back row during low sun angles. General rule: space rows at least 1.5x the height of the tilted panels to avoid shading issues.
Ground Mounts Are Easier to Adjust
If you’re doing a ground mount instead of roof mount, adjustable angles are much simpler. You can walk up to the array, loosen a few bolts, adjust the angle, and tighten everything back down. No ladder, no roof work, no risk.
Ground mounts also let you orient panels true south more easily. Roofs are whatever direction they were built—maybe south-facing, maybe not. Ground mounts let you pick optimal direction regardless of house orientation.
Downside to ground mounts: They take up yard space, can be hit by lawn equipment or vehicles, and might get shaded by plants or structures. But for ease of maintenance and angle adjustment, they’re hard to beat.
Does Angle Really Make That Much Difference?
Yes and no. Here’s the reality:
Perfect angle vs latitude angle: Maybe 2-3% difference. Not worth obsessing over.
Latitude angle vs 10° off: About 5% production loss. Noticeable but not catastrophic.
Latitude angle vs 20° off: 10-15% production loss. Now it matters.
Latitude angle vs completely flat: 20-30% production loss depending on location. This is significant.
So yes, angle matters. But being perfect matters less than just being in the ballpark. Latitude angle ± 10° is fine. Beyond that and you’re starting to lose meaningful production.
Direction (azimuth) matters even more than tilt angle. Panels facing true south at a slightly wrong angle will still outperform perfectly-angled panels facing southeast or southwest. Prioritize getting direction right first, then worry about angle.
Northern Locations Need Steeper Angles
If you’re above 45° latitude (roughly the US-Canada border and north), you need steeper angles than southern locations.
At 50° latitude, your optimal angle is 50°—that’s pretty steep. In summer you might back off to 35°, but in winter you want 65° to catch that low sun. Without seasonal adjustment, winter production really suffers up north.
Northern locations also benefit more from seasonal adjustments. The difference between summer and winter sun angle is more extreme the further north you go. At 50° latitude, optimizing for winter might gain you 20-25% winter production compared to a fixed summer-optimized angle.
Southern locations (below 30° latitude) have less seasonal variation. The sun doesn’t get as low in winter, so seasonal adjustment helps less. You can often just set panels at latitude and forget them.
Snow Shedding Considerations
Steeper angles shed snow better. If you’re in a snowy climate, this matters.
Panels angled at 40°+ will shed most snow naturally as it warms during the day. Panels at 25° or flatter tend to accumulate snow, blocking production until you clear them or it melts.
This is one reason to bias toward winter angle (latitude + 15°) in snowy climates even as a fixed year-round setting. You get better winter production AND better snow shedding. Summer production takes a small hit, but in sunny summer months you’re producing plenty anyway.
Don’t count on snow sliding off panels immediately. It can sit there for days in cold weather. Having a roof rake or long pole to clear panels from the ground is worth it in heavy snow areas. For complete maintenance tips, see our panel cleaning and maintenance guide.
Tracking Systems: Worth It?
Single-axis trackers follow the sun east to west throughout the day. They can boost production 25-35% compared to fixed mounts.
Dual-axis trackers follow the sun both east-west and adjust tilt angle. They can boost production 35-45% compared to fixed mounts.
Sounds great, right? The catch: cost and complexity.
Trackers are expensive—often doubling the cost of your mounting system. They have moving parts (motors, actuators) that can break. They need maintenance. And in most cases, it’s cheaper to just buy a few more panels and keep a simple fixed mount.
Trackers make sense for large commercial installations where maximizing production per square foot matters. For residential, especially off-grid where reliability is critical, fixed mounts are usually the better choice.
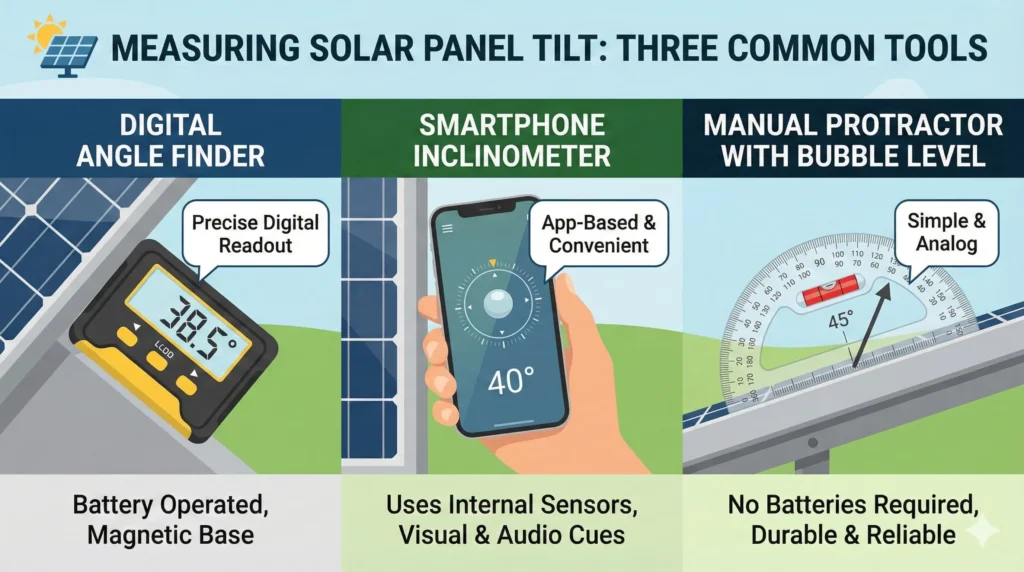
How to Measure Your Current Angle
If you have existing panels and want to know their current angle:
Method 1: Digital angle finder. These clip to your panel frame and display the angle. Cost $15-30. Very accurate and easy to use.
Method 2: Smartphone app. Many phones have built-in inclinometers. Lay your phone flat on the panel (in airplane mode so calls don’t interrupt) and the angle app will show degrees from horizontal.
Method 3: Protractor and level. Old school but works. Level against the panel, use a protractor against the level to measure angle from horizontal.
Knowing your actual angle helps you decide if adjustment is worth it. If you’re at latitude ± 5°, you’re fine. If you’re off by 20°+, adjustment could meaningfully increase production.
What If My Roof Angle Doesn’t Match?
Most roofs are built at 20-30° pitch for water drainage, not solar optimization. If your roof is 25° but your latitude is 40°, what do you do?
Option 1: Accept it. A 25° roof in a 40° latitude location will still work. You’re losing maybe 10-12% production compared to optimal, but installation is simpler and cheaper. For many people this trade-off makes sense.
Option 2: Use tilt frames. Add frames to your roof-mounted panels to increase angle. More expensive, creates more wind load, harder to install, but gets you closer to optimal angle. Worth it if you’re off-grid and need maximum production.
Option 3: Ground mount instead. If your roof angle is way off and you have yard space, ground mounting at the correct angle might be better than compromising on a poorly-angled roof.
Honestly, most people just flush-mount to the roof and accept the angle they get. It’s simpler, cheaper, and the production loss is usually tolerable. Only optimize if you really need those extra watts.
Magnetic Declination: Does It Matter?
True south and magnetic south aren’t the same. Magnetic declination varies by location—can be 20° off in some areas.
Should you use a compass to point panels south? No. Use the sun or a GPS app that shows true south. Compasses point to magnetic north, which is good enough for hiking but not precise enough for solar optimization.
Truth is, being off by 5-10° from true south doesn’t hurt production much—maybe 1-2%. But if you’re going through the trouble of mounting panels, might as well get direction right. Use a smartphone compass app that corrects for magnetic declination, or just note where the sun is at solar noon (roughly 12-1pm depending on your longitude within your time zone).
Commercial Buildings and Large Arrays
Everything above applies, but large arrays have additional considerations.
Wind loading: Big angled arrays catch serious wind. Structural engineering matters. Don’t wing it—get proper calculations done.
Shading between rows: Rows need proper spacing to avoid shading each other. This is complex trigonometry based on latitude, panel height, and row spacing. Use online calculators or hire a professional for large installations.
Ballasted systems: Flat commercial roofs often can’t be penetrated for mounting. Ballasted (weighted) systems sit on the roof using concrete blocks. Angle is adjustable but weight adds up fast—make sure your roof structure can handle it.
For large systems, the few percentage points gained from perfect angle optimization actually matter because you’re multiplying small gains across hundreds of panels. Worth paying for professional design and installation.
What’s the best angle for year-round solar production?
Set your panels at an angle equal to your latitude. This optimizes for average sun position throughout the year. For example, 40° latitude = 40° panel tilt.
Should I adjust solar panel angle in winter?
If you can easily adjust them, yes. Add 15° to your latitude angle in winter to catch low-angle sun. This can increase winter production by 10-20%, which helps when days are shorter.
Can solar panels be too steep?
Yes. Extremely steep angles (70°+) waste summer production while only marginally helping winter. Maximum recommended angle is latitude + 20° for winter-optimized fixed installations.
Does a few degrees really matter for solar panel angle?
Being within 10° of optimal loses maybe 5% production—noticeable but not critical. Being 20°+ off loses 15-20% production—now it matters. Get close but don’t obsess over perfection.
How often should I adjust solar panel tilt angle?
Most people never adjust—they set at latitude and leave it. If you do adjust, twice a year is enough: steeper in fall for winter, flatter in spring for summer.
What angle for solar panels on a flat roof?
Minimum 10-15° for drainage and cleaning. Ideal is latitude angle using tilt frames. Never lay panels completely flat—dirt and water accumulation kills performance.
Do I need south-facing roof for solar panels?
South is ideal in Northern Hemisphere. Southeast or southwest work fine with maybe 5-10% production loss. East or west facing lose 15-20%. Avoid north-facing panels—they’re basically useless in most locations.
Final Thoughts
Solar panel angle isn’t complicated. Start with your latitude. Adjust seasonally if you want to squeeze out extra production. Don’t overthink it.
The difference between “perfect” angle and “close enough” is a few percentage points. The difference between “close enough” and “way off” is 20-30%. Get in the ballpark and you’re fine.
If your roof angle doesn’t match your latitude, it’s usually not worth fighting it. Flush-mount to the roof and accept the angle you get. The simplicity and cost savings outweigh the small production loss for most people.
For off-grid systems where every watt matters, invest in adjustable mounts or ground mounting at the correct angle. The extra production in winter especially can make the difference between running your generator or not.
And remember: direction matters more than angle. A south-facing panel at a slightly wrong angle beats a perfectly-angled panel facing the wrong direction. Prioritize getting your panels facing true south, then optimize angle from there.
For more details on setting up your complete off-grid system, including proper battery wiring and inverter configuration, check out our other guides.

Lio Verdan writes about solar energy, off-grid living, and eco-innovation through Gridova Living — a platform dedicated to energy freedom and sustainable technology.
